In this article we are going to talk about How To Create State Machine In Qt5 GUI, State Machines can be used for many purposes, but in this article we will only cover topics
related to animation.
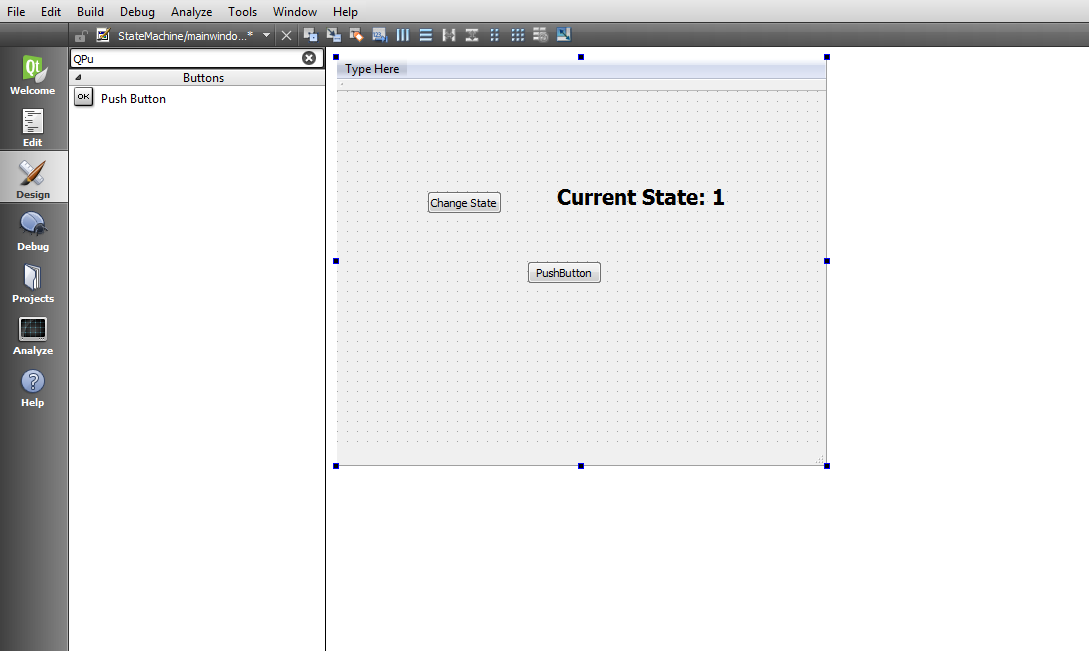
First, we will set up a new user interface for our example program, which looks like this, also you need to change the name of label to stateLabel
and Change State PushButton to changeState, and also PushButton to pushButton.

Next, we will include some headers in our source code
|
1 2 3 4 |
#include <QMainWindow> #include <QStateMachine> #include <QPropertyAnimation> #include <QEventTransition> |
After adding your mainwindow.h will look like this
|
1 2 3 4 5 6 7 8 9 10 11 12 13 14 15 16 17 18 19 20 21 22 23 24 25 |
#ifndef MAINWINDOW_H #define MAINWINDOW_H #include <QMainWindow> #include <QStateMachine> #include <QPropertyAnimation> #include <QEventTransition> namespace Ui { class MainWindow; } class MainWindow : public QMainWindow { Q_OBJECT public: explicit MainWindow(QWidget *parent = 0); ~MainWindow(); private: Ui::MainWindow *ui; }; #endif // MAINWINDOW_H |
After that, in our main window’s constructor, add the following code to create a new
state machine and two states, which we will be using later.
|
1 2 3 |
QStateMachine *machine = new QStateMachine(this); QState *s1 = new QState(); QState *s2 = new QState(); |
Then, we will define what we should do within each state, which in this case will be to
change the label’s text, as well as the button’s position and size.
|
1 2 3 4 5 6 7 8 9 |
s1 = new QState(); s1->assignProperty(ui->stateLabel, "text", "Current state: 1"); s1->assignProperty(ui->pushButton, "geometry", QRect(50, 200, 100, 50)); s2 = new QState(); s2->assignProperty(ui->stateLabel, "text", "Current state: 2"); s2->assignProperty(ui->pushButton, "geometry", QRect(200, 50, 140, 100)); |
Now we are going to create our animations
|
1 2 |
QPropertyAnimation *animation = new QPropertyAnimation(ui->pushButton, "geometry"); animation->setEasingCurve(QEasingCurve::OutBounce); |
Once you are done with that, let’s proceed by adding event transition classes to our source code.
|
1 2 3 4 5 6 7 8 9 10 |
QEventTransition *t1 = new QEventTransition(ui->changeState, QEvent::MouseButtonPress); t1->setTargetState(s2); t1->addAnimation(animation); s1->addTransition(t1); QEventTransition *t2 = new QEventTransition(ui->changeState,QEvent::MouseButtonPress); t2->setTargetState(s1); t2->addAnimation(animation); s2->addTransition(t2); |
Next, add all the states we have just created to the state machine and define state 1
as the initial state. Then, call machine->start() to start running the state machine
|
1 2 3 4 |
machine->addState(s1); machine->addState(s2); machine->setInitialState(s1); machine->start(); |
How it Works
There are two push buttons and a label on the main window layout. The button at the top-
left corner will trigger the state change when pressed, while the label at the top-right corner
will change its text to show which state we are currently in, and the button below will
animate according to the current state.
The QEventTransition classes define what will trigger the transition between one state and
another.
In our case, we want the state to change from state 1 to state 2 when the ui->changeState
button (the one at the upper left) is clicked. After that, we also want to change from state 2
back to state 1 when the same button is pressed again. This can be achieved by creating
another event transition class and setting the target state back to state 1. Then, add these
transitions to their respective states.
Instead of just assigning the properties directly to the widgets, we tell Qt to use the
property animation class to smoothly interpolate the properties toward the target values. It
is that simple!
There is no need to set the start value and end value, because we have already called the
assignProperty() function, which has automatically assigned the end value.
Also check Qt5 C++ GUI Development Articles in the below links
1: Qt5 C++ Introduction And Installation
2: Qt5 C++ First Console Application
3: Qt5 C++ First GUI Application
4: Qt5 C++ Signal And Slots Introduction
5: Qt5 C++ Layout Management
6: Qt5 C++ Creating Qt Style Sheets
7: Qt5 C++ Creating QPushButton
8: How To Create QCheckBox in Qt5
9: Qt5 GUI How To Create QRadioButton
10: Qt5 GUI Development How To Create ComboBox
11: Qt5 C++ GUI Development Creating QListWidget
12: Qt5 C++ GUI Development Creating QMessageBox
13 : Qt5 C++ GUI Creating QMenu And QToolbar
14: Qt5 C++ GUI Development Creating QPrintDialog
15: Qt5 C++ GUI Development Creating QFontDialog
16: Qt5 C++ GUI Development Creating QColorDialog
17: How to Create QFileDialog in Qt5 C++
18: How to Create QProgressbar in Qt5 C++
19: How to Create QPropertyAnimation in Qt5
20: How To Control QPropertyAnimation in Qt5
21: How To Create AnimationGroup in Qt5
So now run the complete project , after clicking the Change State button you will see the state changing

Also you can watch the complete video for this article
Subscribe and Get Free Video Courses & Articles in your Email