In this Qt5 GUI article iam going to show you How To Create QRadioButton.
Before starting our main topic , check Qt5 C++ GUI Development Articles with videos training and source codes
1: Qt5 C++ Introduction And Installation
2: Qt5 C++ First Console Application
3: Qt5 C++ First GUI Application
4: Qt5 C++ Signal And Slots Introduction
6: Qt5 C++ Creating Qt Style Sheets
7: Qt5 C++ Creating QPushButton
8: How To Create QCheckBox in Qt5
A QRadioButton is an option button that can be switched on (checked) or off (unchecked). Radio buttons typically present the user with
a “one of many” choice. In a group of radio buttons, only one radio button at a time can be checked; if the user selects another button,
the previously selected button is switched off.
Radio buttons are autoExclusive by default. If auto-exclusive is enabled, radio buttons that belong to the same parent widget
behave as if they were part of the same exclusive button group. If you need multiple exclusive button groups for radio buttons
that belong to the same parent widget, put them into a QButtonGroup.
Just like QPushButton, a radio button displays text, and optionally a small icon. The icon is set with setIcon(). The text can be set
in the constructor or with setText(). A shortcut key can be specified by preceding the preferred character
with an ampersand in the text. For example:
|
1 |
QRadioButton *button = new QRadioButton("Search from the &cursor", this); |
So first of all you need to create a New Project in Qt5 C++ framework.
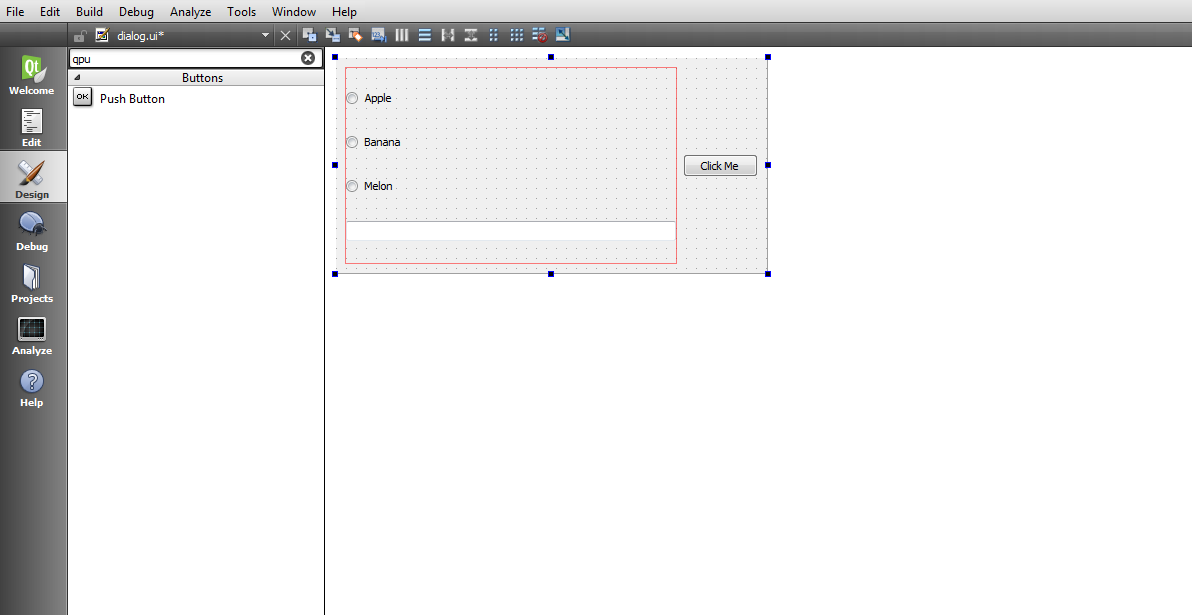
After that open your dialog.ui and we are going to give a simple design.
basically we need three QRadioButton with QPushButton, also we need a QLineEdit, you can give also your layouts for your widgets.
OK now after design it is time to do some coding in C++ , first open your dialog.cpp file
So for right now by default our QRadioButton is not checked, but if you want checked by default you need add this code in the constructor of
you dialog.cpp file.
|
1 |
ui->radioButton->setChecked(true); |
After adding the dialog.cpp will look like this
|
1 2 3 4 5 6 7 8 9 10 11 12 13 14 15 16 |
#include "dialog.h" #include "ui_dialog.h" Dialog::Dialog(QWidget *parent) : QDialog(parent), ui(new Ui::Dialog) { ui->setupUi(this); ui->radioButton->setChecked(true); } Dialog::~Dialog() { delete ui; } |
So now right click on your QPushButton, after that choose Go To Slot and from the dialog choose clicked() signal.
and it will open your dialog.cpp with on_pushButton_clicked() signal.
after that write this code on that method.
|
1 2 3 4 5 6 7 8 9 10 11 12 13 14 |
if(ui->radioButton->isChecked()) { ui->lineEdit->setText(ui->radioButton->text()); } else if(ui->radioButton_2->isChecked()) { ui->lineEdit->setText(ui->radioButton_2->text()); } else if(ui->radioButton_3->isChecked()){ ui->lineEdit->setText(ui->radioButton_3->text()); } |
Also your dialog.cpp will look like this at the end
|
1 2 3 4 5 6 7 8 9 10 11 12 13 14 15 16 17 18 19 20 21 22 23 24 25 26 27 28 29 30 31 32 33 34 35 36 |
#include "dialog.h" #include "ui_dialog.h" Dialog::Dialog(QWidget *parent) : QDialog(parent), ui(new Ui::Dialog) { ui->setupUi(this); ui->radioButton->setChecked(true); } Dialog::~Dialog() { delete ui; } void Dialog::on_pushButton_clicked() { if(ui->radioButton->isChecked()) { ui->lineEdit->setText(ui->radioButton->text()); } else if(ui->radioButton_2->isChecked()) { ui->lineEdit->setText(ui->radioButton_2->text()); } else if(ui->radioButton_3->isChecked()){ ui->lineEdit->setText(ui->radioButton_3->text()); } } |
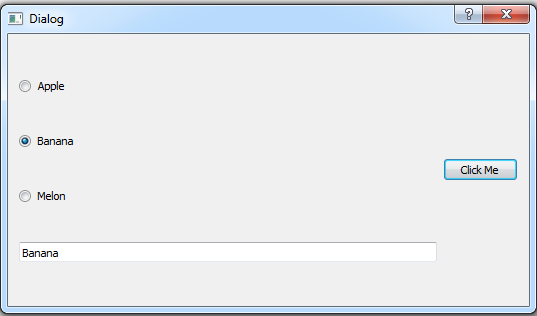
OK now run the project and this will be the result
Also you can watch the complete video for this article
Subscribe and Get Free Video Courses & Articles in your Email