In this Qt5 C++ Tutorial i want to show you Creating LineChart with QtChart, basically we are using QtChart class for this article, QtChart module provides a set of easy to use chart components. It uses the Qt Graphics View Framework, therefore charts can be easily integrated to modern user interfaces. Qt Charts can be used as QWidgets, QGraphicsWidget, or QML types. Users can easily create impressive graphs by selecting one of the charts themes. also we are using QLineSeries, so the QLineSeries class presents data in line charts, a line chart is used to show information as a series of data points connected by straight lines. also you can check the first article on QtCharts creating BarChart.
1: Qt5 C++ Tutorial Creating QBarChart
OK first of all you need to Create New Project in Qt5. After you have created the new project, open the project file (.pro) and add the charts module to your project, like this:
|
1 |
QT += core gui charts |
Then, you need to open mainwindow.h and add the following to include the header files that are required for using the charts module:
|
1 2 3 4 |
#include <QMainWindow> #include<QtCharts> #include<QChartView> #include<QLineSeries> |
The QtCharts and QtChartView headers are both essential for Qt’s charts module. You
must include both of them for any type of chart to work at all. The other header,
namely QLineSeries, is used here because we’re going to create a line chart.
The headers that get included in your project will be different depending on the type of
chart you want to create.
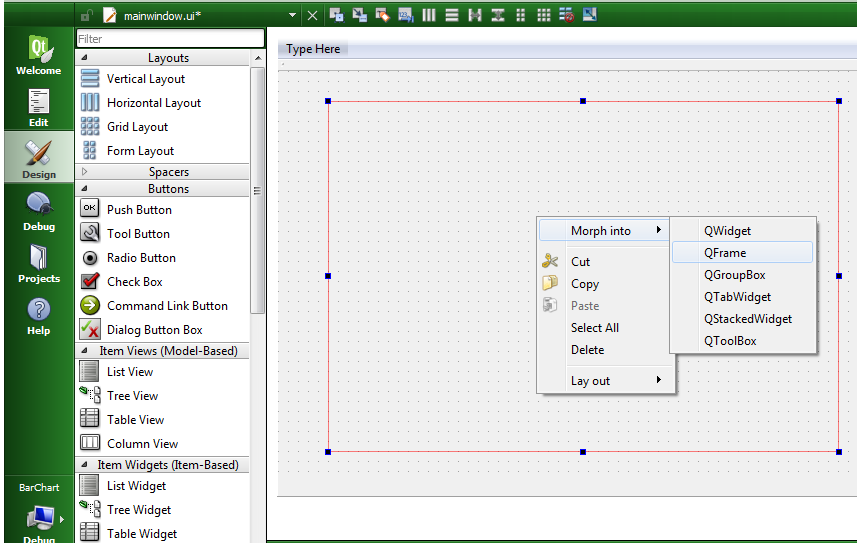
OK now we are going to open mainwindow.ui, and we want to add Horizontal Layout in our gui window.
after that, right-click on the layout widget you just dragged to the central widget, and select
Morph into | QFrame. This will change the layout widget into a QFrame widget while still
maintaining its layout properties. If you create a QFrame from Widget Box, it won’t have
the layout properties that we need. This step is important so that we can set it as the parent
of our chart.

So now open your mainwindow.cpp file and add these codes in the constructor of your class.
|
1 2 3 4 5 6 7 8 9 10 11 12 13 14 15 16 17 18 19 20 21 22 23 24 25 26 27 |
QLineSeries *series = new QLineSeries(); series->append(0, 6); series->append(2, 4); series->append(3, 8); series->append(7, 4); series->append(10, 5); *series << QPointF(11, 1) << QPointF(13, 3) << QPointF(17, 6) << QPointF(18, 3) << QPointF(20, 2); QChart *chart = new QChart(); //chart->legend()->hide(); chart->addSeries(series); chart->createDefaultAxes(); chart->setTitle("Line Chart Example"); chart->legend()->setVisible(true); chart->legend()->setAlignment(Qt::AlignBottom); QChartView *chartView = new QChartView(chart); chartView->setRenderHint(QPainter::Antialiasing); chartView->setParent(ui->horizontalFrame); |
After adding your mainwindow.cpp file will look like this .
|
1 2 3 4 5 6 7 8 9 10 11 12 13 14 15 16 17 18 19 20 21 22 23 24 25 26 27 28 29 30 31 32 33 34 35 36 37 38 39 40 41 42 43 44 45 46 47 |
#include "mainwindow.h" #include "ui_mainwindow.h" MainWindow::MainWindow(QWidget *parent) : QMainWindow(parent), ui(new Ui::MainWindow) { ui->setupUi(this); QLineSeries *series = new QLineSeries(); series->append(0, 6); series->append(2, 4); series->append(3, 8); series->append(7, 4); series->append(10, 5); *series << QPointF(11, 1) << QPointF(13, 3) << QPointF(17, 6) << QPointF(18, 3) << QPointF(20, 2); QChart *chart = new QChart(); //chart->legend()->hide(); chart->addSeries(series); chart->createDefaultAxes(); chart->setTitle("Line Chart Example"); chart->legend()->setVisible(true); chart->legend()->setAlignment(Qt::AlignBottom); QChartView *chartView = new QChartView(chart); chartView->setRenderHint(QPainter::Antialiasing); chartView->setParent(ui->horizontalFrame); } MainWindow::~MainWindow() { delete ui; } |
So in the above code these are the data that we need for creating of our line chart. also we have appended the data to our line series.
|
1 2 3 4 5 |
series->append(0, 6); series->append(2, 4); series->append(3, 8); series->append(7, 4); series->append(10, 5); |
And these are the points that we need for creating of line chart.
|
1 2 |
*series << QPointF(11, 1) << QPointF(13, 3) << QPointF(17, 6) << QPointF(18, 3) << QPointF(20, 2); |
As i have said for creating of charts in Qt5, you need to create QChart with QChartView, so in here first we create QChart and we add our line series to the QChart object.
|
1 2 3 4 5 6 7 8 9 |
QChart *chart = new QChart(); //chart->legend()->hide(); chart->addSeries(series); chart->createDefaultAxes(); chart->setTitle("Line Chart Example"); chart->legend()->setVisible(true); chart->legend()->setAlignment(Qt::AlignBottom); |
at the end we need to create a QChartView for rendering our bar chart.
|
1 2 3 |
QChartView *chartView = new QChartView(chart); chartView->setRenderHint(QPainter::Antialiasing); chartView->setParent(ui->horizontalFrame); |
Also check Qt5 C++ GUI Development Articles in the below links
1: Qt5 C++ Introduction And Installation
2: Qt5 C++ First Console Application
3: Qt5 C++ First GUI Application
4: Qt5 C++ Signal And Slots Introduction
5: Qt5 C++ Layout Management
6: Qt5 C++ Creating Qt Style Sheets
7: Qt5 C++ Creating QPushButton
8: How To Create QCheckBox in Qt5
9: Qt5 GUI How To Create QRadioButton
10: Qt5 GUI Development How To Create ComboBox
11: Qt5 C++ GUI Development Creating QListWidget
12: Qt5 C++ GUI Development Creating QMessageBox
13 : Qt5 C++ GUI Creating QMenu And QToolbar
14: Qt5 C++ GUI Development Creating QPrintDialog
15: Qt5 C++ GUI Development Creating QFontDialog
16: Qt5 C++ GUI Development Creating QColorDialog
17: How to Create QFileDialog in Qt5
18: How to Create QProgressbar in Qt5 C++
19: How to Create QPropertyAnimation in Qt5
20: How To Control QPropertyAnimation in Qt5
21: How To Create AnimationGroup in Qt5
22: How To Create State Machine in Qt5 C++
23: How To Draw Text And Line in Qt5
24: Qt5 GUI How To Draw Rectangle
25: Qt5 GUI How To Draw Ellipse
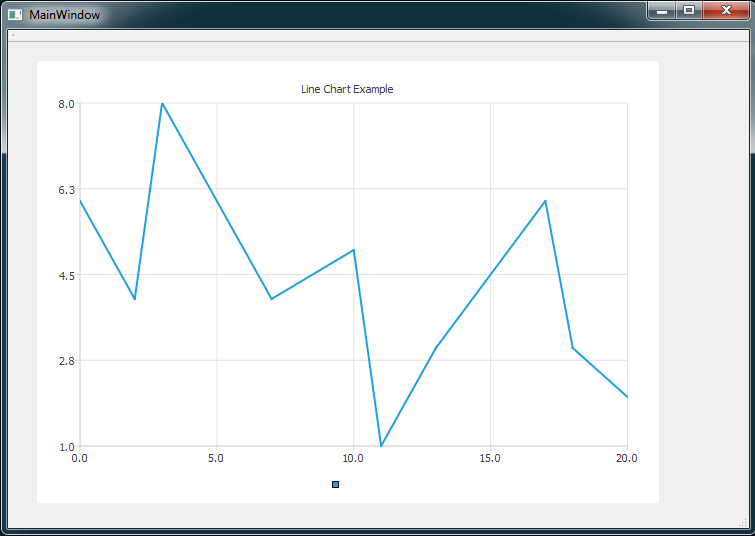
Run the complete project and this will be the result

Also you can watch the complete video for this article
Subscribe and Get Free Video Courses & Articles in your Email