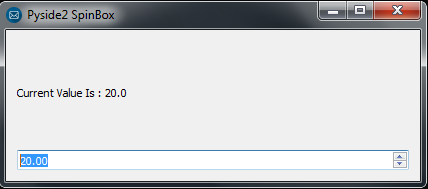
In this Python article we are going to talk about How to Create SpinBox in Pyside2, the QSpinBox class provides a spin box widget, QSpinBox allows the user to choose a value by clicking the up/down buttons or pressing up/down on the keyboard to increase/decrease the value currently displayed. The user can also type the value in manually. the spin box supports integer values but can be extended to use different strings with validate(), textFromValue() and valueFromText(). every time the value changes QSpinBox emits valueChanged() and textChanged() signals, the former providing a int and the latter a QString. The textChanged() signal provides the value with both prefix() and suffix() . The current value can be fetched with value() and set with setValue() .
Also you can check my previous articles on Pyside2 GUI Development.
1: Getting Started With Pyside2 | Qt For Python
2: Pyside2 GUI Creating First Window
3: Pyside2 GUI Creating Window Icon
4: Pyside2 GUI How To Create Icon Modes
5: Pyside2 GUI How To Create Tooltip
6: Pyside2 GUI QPushButton With Signal And Slot
7: Pyside2 GUI Making Center The Window
8: Python GUI How To Create AboutBox
9: Python GUI How to Create Digital Clock in Pyside2
10: How To Create StatusBar In Pyside2
11: Pyside2 Creating QProgressBar
12: Pyside2 Layout Managment with QHBoxLayout
13: Pyside2 GridLayout Example
16: Pyside2 Creating FontComboBox
17: Pyside2 Creating QCompleter
18: Pyside2 GUI Creating Slider
19: Pyside2 Create MenuBar & MenuItems
21: Pyside2 Creating Print Preview Dialog
22: How to Create Print Dialog in Pyside2
23: Python Exporting File as PDF with Pyside2
24: Pyside2 How to Create ColorDialog
25: How to Create ColorDialog in Pyside2
So now this is the complete source code for this article
|
1 2 3 4 5 6 7 8 9 10 11 12 13 14 15 16 17 18 19 20 21 22 23 24 25 26 27 28 29 30 31 32 33 34 35 36 37 38 39 40 41 42 43 44 45 46 47 48 49 50 |
from PySide2.QtWidgets import QApplication, QWidget, QSpinBox, QLabel, QVBoxLayout, QDoubleSpinBox import sys from PySide2.QtGui import QIcon class Window(QWidget): def __init__(self): super().__init__() self.setWindowTitle("Pyside2 SpinBox") self.setGeometry(300,200,300,100) self.setIcon() self.spin_box() self.show() def setIcon(self): appIcon = QIcon("icon.png") self.setWindowIcon(appIcon) def spin_box(self): vbox = QVBoxLayout() self.label = QLabel() self.spinbox = QDoubleSpinBox() self.spinbox.setMinimum(10) self.spinbox.setMaximum(100) self.spinbox.valueChanged.connect(self.spin_value) vbox.addWidget(self.label) vbox.addWidget(self.spinbox) self.setLayout(vbox) def spin_value(self): self.label.setText("Current Value Is : " + str(self.spinbox.value())) myapp = QApplication(sys.argv) window = Window() myapp.exec_() sys.exit() |
OK now in here we are going to set our window title, also we need to set the geometry of the window, like x and y position of the window, also width and height of the window .
|
1 2 |
self.setWindowTitle("Pyside2 SpinBox") self.setGeometry(300,200,300,100) |
Also in this method we have created our method for setting window icon.
|
1 2 3 |
def setIcon(self): appIcon = QIcon("icon.png") self.setWindowIcon(appIcon) |
In here we have created the object of QDoubleSpinBox, and also we have set the minimum and maximum value for the spinbox , you can see that at the bottom of the code we have connected the valueChanged signal of QSpinBox with the spin_value() method that we have created.
|
1 2 3 4 |
self.spinbox = QDoubleSpinBox() self.spinbox.setMinimum(10) self.spinbox.setMaximum(100) self.spinbox.valueChanged.connect(self.spin_value) |
And this is the method that we have already connected this at the top.
|
1 2 |
def spin_value(self): self.label.setText("Current Value Is : " + str(self.spinbox.value())) |
Because we are using QVBoxLayout, now we need to add our widgets in the QVBoxLayout.
|
1 2 |
vbox.addWidget(self.label) vbox.addWidget(self.spinbox) |
Finally, we have entered to the mainloop of the application. The event handling starts from this point. also we have created the object of our window in this class.
|
1 2 3 |
window = Window() myapp.exec_() sys.exit() |
So run the complete code this will be the result

Also you can watch the complete video for this article
Subscribe and Get Free Video Courses & Articles in your Email