In this Pyside2 article, we are going to learn How to Create ColorDialog in Python, for this purpose we are using QColorDialog class from Pyside2. so the color dialog’s function is used to allow users for choosing colors. for example, you might use this in a drawing program to allow the user to set the brush color. the getColor() function shows the dialog, and allows the user to specify a color. This function can also be used to let users choose a color with a level of transparency: pass the ShowAlphaChannel option as an additional argument.
Also you can check my previous articles on Pyside2 GUI Development.
1: Getting Started With Pyside2 | Qt For Python
2: Pyside2 GUI Creating First Window
3: Pyside2 GUI Creating Window Icon
4: Pyside2 GUI How To Create Icon Modes
5: Pyside2 GUI How To Create Tooltip
6: Pyside2 GUI QPushButton With Signal And Slot
7: Pyside2 GUI Making Center The Window
8: Python GUI How To Create AboutBox
9: Python GUI How to Create Digital Clock in Pyside2
10: How To Create StatusBar In Pyside2
11: Pyside2 Creating QProgressBar
12: Pyside2 Layout Managment with QHBoxLayout
13: Pyside2 GridLayout Example
16: Pyside2 Creating FontComboBox
17: Pyside2 Creating QCompleter
18: Pyside2 GUI Creating Slider
19: Pyside2 Create MenuBar & MenuItems
21: Pyside2 Creating Print Preview Dialog
22: How to Create Print Dialog in Pyside2
23: Python Exporting File as PDF with Pyside2
24: Pyside2 How to Create ColorDialog
So now this is the complete source code for this article
|
1 2 3 4 5 6 7 8 9 10 11 12 13 14 15 16 17 18 19 20 21 22 23 24 25 26 27 28 29 30 31 32 33 34 35 36 37 38 39 40 41 42 43 44 45 46 47 48 49 50 51 52 53 54 55 56 57 58 59 60 61 62 63 64 65 66 67 68 69 70 71 72 73 74 75 76 77 78 79 80 81 82 83 84 85 86 87 88 89 90 91 92 93 94 95 96 97 98 99 100 101 102 103 104 105 106 107 108 109 110 111 112 113 114 115 116 117 118 119 120 121 122 123 124 125 126 127 128 129 130 131 132 133 134 135 136 137 138 139 140 141 142 143 144 145 146 147 148 149 150 151 152 153 154 |
from PySide2.QtWidgets import QApplication, QMainWindow, QAction,QFontDialog ,QColorDialog ,QTextEdit, QFileDialog import sys from PySide2.QtGui import QIcon, QFont from PySide2.QtPrintSupport import QPrinter, QPrintPreviewDialog, QPrintDialog from PySide2.QtCore import QFileInfo class Window(QMainWindow): def __init__(self): super().__init__() self.setWindowTitle("Simple Notepad Application") self.setGeometry(300,200,700,500) self.textEdit = QTextEdit(self) self.textEdit.setFont(QFont('Sanserif', 13)) self.setCentralWidget(self.textEdit) self.setIcon() self.create_menu() self.show() def setIcon(self): appIcon = QIcon("icon.png") self.setWindowIcon(appIcon) def create_menu(self): mainMenu = self.menuBar() fileMenu = mainMenu.addMenu('File') viewMenu = mainMenu.addMenu('View') editMenu = mainMenu.addMenu('Edit') fontMenu = mainMenu.addMenu('Font') helpMenu = mainMenu.addMenu('Help') # open action openAction = QAction(QIcon('open.png'), "Open", self) openAction.setShortcut('Ctrl+O') # save action saveAction = QAction(QIcon('save.png'), "Save", self) saveAction.setShortcut('Ctrl+S') # exit action exitAction = QAction(QIcon('exit.png'), "Exit", self) exitAction.setShortcut('Ctrl+X') #print previeq action previewAction = QAction(QIcon('printpreview.png'), "Print Preview", self) # print action printAction = QAction(QIcon('print.png'), "Print", self) printAction.setShortcut("Ctrl+P") #export as pdf newly added for this article pdfAction = QAction(QIcon('pdf.png'), "Export PDF", self) #font action fontAction = QAction(QIcon('font.png'), "Font", self) #color action colorAction = QAction(QIcon('color.png'), "Color", self) #signals for the actions exitAction.triggered.connect(self.exit_app) previewAction.triggered.connect(self.print_preview_dialog) printAction.triggered.connect(self.print_dialog) pdfAction.triggered.connect(self.pdf_export) fontAction.triggered.connect(self.font_dialog) colorAction.triggered.connect(self.color_dialog) fileMenu.addAction(openAction) fileMenu.addAction(saveAction) fileMenu.addAction(exitAction) viewMenu.addAction(previewAction) viewMenu.addAction(printAction) viewMenu.addAction(pdfAction) fontMenu.addAction(fontAction) fontMenu.addAction(colorAction) def exit_app(self): self.close() def print_preview_dialog(self): printer = QPrinter(QPrinter.HighResolution) previewDialog = QPrintPreviewDialog(printer, self) previewDialog.paintRequested.connect(self.print_preview) previewDialog.exec_() def print_preview(self, printer): self.textEdit.print_(printer) def print_dialog(self): printer = QPrinter(QPrinter.HighResolution) dialog = QPrintDialog(printer, self) if dialog.exec_() == QPrintDialog.Accepted: self.textEdit.print_(printer) def pdf_export(self): fn, _ = QFileDialog.getSaveFileName(self, "Export PDF", None, "PDF files (.pdf); All files") if fn != '': if QFileInfo(fn).suffix() == "": fn += '.pdf' printer = QPrinter(QPrinter.HighResolution) printer.setOutputFormat(QPrinter.PdfFormat) printer.setOutputFileName(fn) self.textEdit.document().print_(printer) def font_dialog(self): (ok, font) = QFontDialog.getFont() if ok: self.textEdit.setFont(font) def color_dialog(self): color = QColorDialog.getColor() self.textEdit.setTextColor(color) myapp = QApplication(sys.argv) window = Window() myapp.exec_() sys.exit() |
In the above code we are using some codes from the previous article.
1: Pyside2 Create MenuBar & MenuItems
3: Pyside2 Creating Print Preview Dialog
4: How to Create Print Dialog in Pyside2
5: Python Exporting File as PDF with Pyside2
6: Pyside2 How to Create ColorDialog
you can check the above articles to know more about this code, but we are going to just focus on creating ColorDialog in Pyisde2.
These are the imports that we need in this article. the newly import is QColorDialog that we have imported from Pyside2.QtQiwdgets module.
|
1 2 3 4 5 |
from PySide2.QtWidgets import QApplication, QMainWindow, QAction,QFontDialog ,QColorDialog ,QTextEdit, QFileDialog import sys from PySide2.QtGui import QIcon, QFont from PySide2.QtPrintSupport import QPrinter, QPrintPreviewDialog, QPrintDialog from PySide2.QtCore import QFileInfo |
OK now in here we are going to set our window title, also we need to set the geometry of the window, like x and y position of the window, also width and height of the window .
|
1 2 |
self.setWindowTitle("Simple Notepad Application") self.setGeometry(300,200,700,500) |
Also we need to create our QTextEdit in our main class, first we have created the object of QTextEdit, after that we have set the font for our QTextEdit. also you need to set the textedit as central widget for the window.
|
1 2 3 |
self.textEdit = QTextEdit(self) self.textEdit.setFont(QFont('Sanserif', 13)) self.setCentralWidget(self.textEdit) |
In here we have created menuBar object and we have added some items to the menuBar.
|
1 2 3 4 5 6 |
mainMenu = self.menuBar() fileMenu = mainMenu.addMenu('File') viewMenu = mainMenu.addMenu('View') editMenu = mainMenu.addMenu('Edit') fontMenu = mainMenu.addMenu('Font') helpMenu = mainMenu.addMenu('Help') |
OK now in here we have added some menu items with the icons and also shortcuts. make sure that you have some icons in your working directory. we are using QAction for this purpose, in applications many common commands can be invoked via menus, toolbar buttons, and keyboard shortcuts. since the user expects each command to be performed in the same way, regardless of the user interface used, it is useful to represent each command as an action. actions can be added to menus and toolbars, and will automatically keep them in sync. for example, in a word processor, if the user presses a Bold toolbar button, the Bold menu item will automatically be checked. also we have added our new menu item action that is used for creating ColorDialog.
|
1 2 3 4 5 6 7 8 9 10 11 12 13 14 15 16 17 18 19 20 21 22 23 24 25 26 27 28 29 30 31 |
# open action openAction = QAction(QIcon('open.png'), "Open", self) openAction.setShortcut('Ctrl+O') # save action saveAction = QAction(QIcon('save.png'), "Save", self) saveAction.setShortcut('Ctrl+S') # exit action exitAction = QAction(QIcon('exit.png'), "Exit", self) exitAction.setShortcut('Ctrl+X') #print previeq action previewAction = QAction(QIcon('printpreview.png'), "Print Preview", self) # print action printAction = QAction(QIcon('print.png'), "Print", self) printAction.setShortcut("Ctrl+P") #export as pdf newly added for this article pdfAction = QAction(QIcon('pdf.png'), "Export PDF", self) #font action fontAction = QAction(QIcon('font.png'), "Font", self) #color action newly added colorAction = QAction(QIcon('color.png'), "Color", self) |
These are the six signals for our two menu items, and the newest one is for our creating ColorDialog that we have connected that signal to a method called color_dialog(), we will create this method later.
|
1 2 3 4 5 6 7 |
#signals for the actions exitAction.triggered.connect(self.exit_app) previewAction.triggered.connect(self.print_preview_dialog) printAction.triggered.connect(self.print_dialog) pdfAction.triggered.connect(self.pdf_export) fontAction.triggered.connect(self.font_dialog) colorAction.triggered.connect(self.color_dialog) |
Now after creation of menu actions, we need to add that to the related menubar like this. basically in this example we want to add the menu items in our file and view menu and also the newest menu item for creating color dialog in font menu .
|
1 2 3 4 5 6 7 8 9 10 |
fileMenu.addAction(openAction) fileMenu.addAction(saveAction) fileMenu.addAction(exitAction) viewMenu.addAction(previewAction) viewMenu.addAction(printAction) viewMenu.addAction(pdfAction) fontMenu.addAction(fontAction) fontMenu.addAction(colorAction) |
These are the methods that we have already covered, you can check the articles about these in the above link. also we have connected these methods with the specific menu item signals.
|
1 2 3 4 5 6 7 8 9 10 11 12 13 14 15 16 17 18 19 20 21 22 23 24 25 26 27 28 29 30 31 32 33 34 35 36 37 38 39 40 41 42 43 44 45 |
def exit_app(self): self.close() def print_preview_dialog(self): printer = QPrinter(QPrinter.HighResolution) previewDialog = QPrintPreviewDialog(printer, self) previewDialog.paintRequested.connect(self.print_preview) previewDialog.exec_() def print_preview(self, printer): self.textEdit.print_(printer) def print_dialog(self): printer = QPrinter(QPrinter.HighResolution) dialog = QPrintDialog(printer, self) if dialog.exec_() == QPrintDialog.Accepted: self.textEdit.print_(printer) def pdf_export(self): fn, _ = QFileDialog.getSaveFileName(self, "Export PDF", None, "PDF files (.pdf); All files") if fn != '': if QFileInfo(fn).suffix() == "": fn += '.pdf' printer = QPrinter(QPrinter.HighResolution) printer.setOutputFormat(QPrinter.PdfFormat) printer.setOutputFileName(fn) self.textEdit.document().print_(printer) def font_dialog(self): (ok, font) = QFontDialog.getFont() if ok: self.textEdit.setFont(font) |
OK now this is the important point of this article, basically this is the creation of color dialog method.
|
1 2 3 |
def color_dialog(self): color = QColorDialog.getColor() self.textEdit.setTextColor(color) |
so you can see, that first of all we have got the color, and after that we have set the color to the text of our TextEdit.
Finally, we have entered to the mainloop of the application. The event handling starts from this point. also we have created the object of our window in this class.
|
1 2 3 |
window = Window() myapp.exec_() sys.exit() |
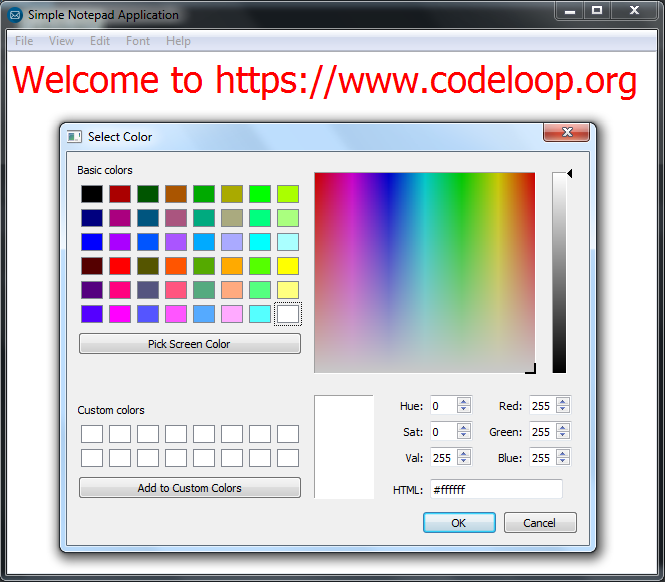
So run the complete code and this will be the result
Also you can watch the complete video for this article
Subscribe and Get Free Video Courses & Articles in your Email