In this article we are going to learn about Django Introduction and Installation , also we will learn how you can create your first project in Django Web Framework.
Check Django REST Framework Course
1: Django REST Framework Course For Beginners
What is Django ?
So Django is a Python Web Framework that is used for web development. Django framework uses a set of design principles that produces one of the most productive web development processes compared to many other web frameworks. also Django provides a set of tightly integrated components. all of these components are developed by the Django team itself. Django was originally developed as an in-house framework to manage a series of news-oriented websites. later, its code was released on the Internet and the Django team continued its development using the open source model. because of its roots, Django’s components were designed for integration, reusability, and speed from the start. Django’s database component, the Object-relational Mapper (ORM), provides a bridge between the data model and the database engine. it supports a large set of database systems. in addition, Django provides a neat development environment. it comes with a lightweight web server for development and testing. when debugging mode is enabled, Django provides very through and detailed error messages with a lot of debugging information. all of this makes isolating and fixing bugs very easy. Django supports multilingual websites through its built-in internationalization system. this can be very valuable for those working on websites with more than one language. the system makes translating the interface a very simple task.
Django Installation
Django comes as a Python package and thus can be installed in any Python environment. if you haven’t installed Django yet, the following is guide to install Django . in this article we are going to install the latest version of Django, that is Django 3.0, also iam using Python 3.6 . you can use this version of Python or higher. If you’re using Linux or macOS X, you probably have Python installed, if you are using Window you can download Python from Python Website.
Installing Django with Pip
The pip package management system is the preferred method for installing Django. Python 3.6 comes with pip preinstalled.
Run the following command at the shell prompt to install Django with pip.
|
1 |
pip install django |
Django will be installed in the Python site-packages/ directory, in this article i have not used virtual environment, but if you want you can use that.
Now, check whether Django has been successfully installed. run python on a terminal, import Django, and check its version, as follows:
|
1 2 3 4 |
>>> import django >>> django.get_version() '3.0' >>> |
If you get the preceding output, Django has been successfully installed on your machine.
Creating First Project in Django
OK now we are going to create our first project in django. Django provides a command that allows you to create an initial project file structure. Run the following command from your shell:
|
1 |
django-admin startproject MyProject |
This will create a Django project with the name MyProject.
Let’s take a look at the project structure generated:
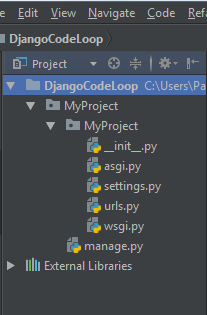
These files are as follows:
MyProject/: This is your project directory, which consists of the following files:
__init__.py: Python file to allow app packages to be imported from other
directories. Note __init__.py is not a Django specific file, it’s a generic file used in
almost all Python applications.
settings.py: This indicates settings and configuration for your project and contains initial default settings.
urls.py: This is the place where your URL patterns live. Each URL defined here is mapped to a view.
wsgi.py: This is the configuration to run your project as a Web Server Gateway Interface (WSGI) application.
The generated settings.py file contains the project settings, including a basic configuration to use an SQLite 3 database and a list named INSTALLED_APPS, which contains common Django applications that are added to your project by default.
manage.py: This is a command-line utility used to interact with your project. It is a thin wrapper around the django-admin.py tool. You don’t need to edit this file.
To complete the project setup, we will need to create the tables in the database required by the applications listed in INSTALLED_APPS. Open the shell and run the following commands:
|
1 2 |
cd MyProject python manage.py migrate |
You will note an output that ends with the following lines:
|
1 2 3 4 5 6 7 8 9 10 11 12 13 14 15 16 17 18 19 20 |
Operations to perform: Apply all migrations: admin, auth, contenttypes, sessions Running migrations: Applying contenttypes.0001_initial... OK Applying auth.0001_initial... OK Applying admin.0001_initial... OK Applying admin.0002_logentry_remove_auto_add... OK Applying admin.0003_logentry_add_action_flag_choices... OK Applying contenttypes.0002_remove_content_type_name... OK Applying auth.0002_alter_permission_name_max_length... OK Applying auth.0003_alter_user_email_max_length... OK Applying auth.0004_alter_user_username_opts... OK Applying auth.0005_alter_user_last_login_null... OK Applying auth.0006_require_contenttypes_0002... OK Applying auth.0007_alter_validators_add_error_messages... OK Applying auth.0008_alter_user_username_max_length... OK Applying auth.0009_alter_user_last_name_max_length... OK Applying auth.0010_alter_group_name_max_length... OK Applying auth.0011_update_proxy_permissions... OK Applying sessions.0001_initial... OK |
The preceding lines are the database migrations that are applied by Django. By applying migrations, the tables for the initial applications are created in the database.
Runing Development Server
Django comes with a lightweight web server to run your code quickly, without needing to spend time configuring a production server. When you run the Django development server, it keeps checking for changes in your code. It reloads automatically, freeing you from manually reloading it after code changes.
Start the development server by typing the following command Start the development server by typing the following command from your project’s root folder:
|
1 2 |
cd MyProject python manage.py runserver |
You should see something like this:
|
1 2 3 4 5 6 7 8 |
Watching for file changes with StatReloader Performing system checks... System check identified no issues (0 silenced). June 01, 2020 - 21:29:35 Django version 3.0, using settings 'MyProject.settings' Starting development server at http://127.0.0.1:8000/ Quit the server with CTRL-BREAK. |
Now, open http://127.0.0.1:8000/ in your browser. You should see a page stating that the project is successfully running, as shown in the following screenshot:

Subscribe and Get Free Video Courses & Articles in your Email