In this Python GUI Development article iam going to talk about creating GridLayout with Pyside2 (Qt For Python), basically we are using QGridLayout class for this article. also you can watch more articles on Python GUI Development with Pyside2 in the below links.
Check Python GUI Development With Pyside2
1: Getting Started With Pyside2 | Qt For Python
2: Pyside2 GUI Creating First Window
3: Pyside2 GUI Creating Window Icon
4: Pyside2 GUI How To Create Icon Modes
5: Pyside2 GUI How To Create Tooltip
6: Pyside2 GUI QPushButton With Signal And Slot
7: Pyside2 GUI Making Center The Window
8: Python GUI How To Create AboutBox
9: Python GUI How to Create Digital Clock in Pyside2
10: How To Create StatusBar In Pyside2
11: Pyside2 Creating QProgressBar
12: Pyside2 Layout Managment with QHBoxLayout
What is GridLayout ?
The QGridLayout class lays out widgets in a grid.
QGridLayout takes the space made available to it (by its parent layout or by the parentWidget()), divides it up into rows and columns, and puts each widget it manages into the correct cell.
Columns and rows behave identically; we will discuss columns, but there are equivalent functions for rows.
Each column has a minimum width and a stretch factor. The minimum width is the greatest of that set using setColumnMinimumWidth() and the minimum width of each widget in that column. The stretch factor is set using setColumnStretch() and determines how much of the available space the column will get over and above its necessary minimum.
Normally, each managed widget or layout is put into a cell of its own using addWidget(). It is also possible for a widget to occupy multiple cells using the row and column spanning overloads of addItem() and addWidget(). If you do this, QGridLayout will guess how to distribute the size over the columns/rows (based on the stretch factors).
So now this is the complete code for Python GUI GridLayout with Pyside2 | Qt For Python
|
1 2 3 4 5 6 7 8 9 10 11 12 13 14 15 16 17 18 19 20 21 22 23 24 25 26 27 28 29 30 31 32 33 34 35 36 37 38 39 40 41 42 43 44 45 46 47 48 49 50 51 52 53 54 55 56 57 58 59 60 61 62 63 64 65 66 67 68 69 70 71 72 |
from PySide2.QtWidgets import QApplication, QWidget , QVBoxLayout, QPushButton, QGroupBox, QGridLayout import sys from PySide2.QtGui import QIcon, QFont class Window(QWidget): def __init__(self): super().__init__() self.setWindowTitle("Grid Layout") self.setGeometry(300,200,500,400) self.setIcon() self.createGridLayout() vbox = QVBoxLayout() vbox.addWidget(self.groupBox) self.setLayout(vbox) self.show() def setIcon(self): appIcon = QIcon("icon.png") self.setWindowIcon(appIcon) def createGridLayout(self): self.groupBox = QGroupBox("Please Choose One Language") self.groupBox.setFont(QFont("Sanserif", 13)) gridLayout = QGridLayout() button = QPushButton("C++", self) button.setIcon(QIcon("cpp.png")) gridLayout.addWidget(button, 0,0) button1 = QPushButton("CSS", self) button1.setIcon(QIcon("css.png")) gridLayout.addWidget(button1, 0, 1) button2 = QPushButton("javascript", self) button2.setIcon(QIcon("javascript.png")) gridLayout.addWidget(button2, 1, 0) button3 = QPushButton("C#", self) button3.setIcon(QIcon("csharp.png")) gridLayout.addWidget(button3, 1, 1) button4 = QPushButton("Python", self) button4.setIcon(QIcon("pythonicon.png")) gridLayout.addWidget(button4, 2, 0) button5 = QPushButton("Java", self) button5.setIcon(QIcon("java.png")) gridLayout.addWidget(button5, 2, 1) self.groupBox.setLayout(gridLayout) myapp = QApplication(sys.argv) window = Window() myapp.exec_() sys.exit() |
OK in the above code first we have imported our classes from Pyside2 library
|
1 2 3 |
from PySide2.QtWidgets import QApplication, QWidget , QVBoxLayout, QPushButton, QGroupBox, QGridLayout import sys from PySide2.QtGui import QIcon, QFont |
And this is our main window class that inherits from QWidget, and we are going to add a few requirements for our window in this class like title, width, height and also we are calling our two methods in this class, the methods are setIcon() and createGridLayout() methods . after that we create our QVBoxLayout in our class. and at the end of this class we show our window by calling self.show() method.
|
1 2 3 4 5 6 7 8 9 10 11 12 13 14 15 16 |
class Window(QWidget): def __init__(self): super().__init__() self.setWindowTitle("Grid Layout") self.setGeometry(300,200,500,400) self.setIcon() self.createGridLayout() vbox = QVBoxLayout() vbox.addWidget(self.groupBox) self.setLayout(vbox) self.show() |
Also this method is for setting our window icon
|
1 2 3 |
def setIcon(self): appIcon = QIcon("icon.png") self.setWindowIcon(appIcon) |
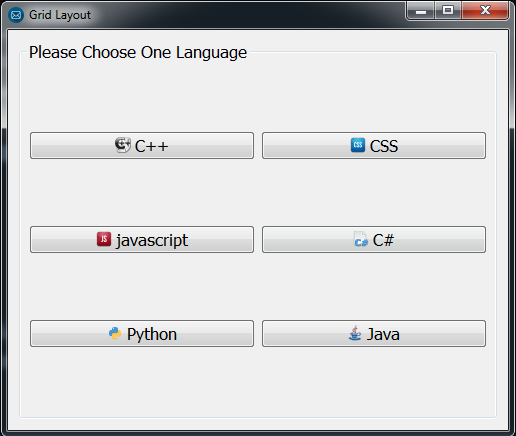
So now this is the creation of our GridLayout, in the first we are going to create a QGroupBox also we have set the font of our QGroupBox, after that we create the object of our QGridLayout(), basically we are going to add six QPushButton in our QGridLayout. also make sure that you have some icons in your working directory for the Buttons. and at the end we set our QGroupBox to our QGridLayout by using self.groupBox.setLayout(gridLayout).
|
1 2 3 4 5 6 7 8 9 10 11 12 13 14 15 16 17 18 19 20 21 22 23 24 25 26 27 28 29 30 31 |
def createGridLayout(self): self.groupBox = QGroupBox("Please Choose One Language") self.groupBox.setFont(QFont("Sanserif", 13)) gridLayout = QGridLayout() button = QPushButton("C++", self) button.setIcon(QIcon("cpp.png")) gridLayout.addWidget(button, 0,0) button1 = QPushButton("CSS", self) button1.setIcon(QIcon("css.png")) gridLayout.addWidget(button1, 0, 1) button2 = QPushButton("javascript", self) button2.setIcon(QIcon("javascript.png")) gridLayout.addWidget(button2, 1, 0) button3 = QPushButton("C#", self) button3.setIcon(QIcon("csharp.png")) gridLayout.addWidget(button3, 1, 1) button4 = QPushButton("Python", self) button4.setIcon(QIcon("pythonicon.png")) gridLayout.addWidget(button4, 2, 0) button5 = QPushButton("Java", self) button5.setIcon(QIcon("java.png")) gridLayout.addWidget(button5, 2, 1) self.groupBox.setLayout(gridLayout) |
Also every Pyside2 application must create an application object. The sys.argv parameter is a list of arguments from a command line.
Python scripts can be run from the shell. It is a way how we can control the startup of our scripts.
|
1 |
myapp = QApplication(sys.argv) |
Finally, we enter the mainloop of the application. The event handling starts from this point. The mainloop receives events from the window system and dispatches them to the application widgets. The mainloop ends if we call the exit() method or the main widget is destroyed. The sys.exit() method ensures a clean exit. The environment will be informed how the application ended.
The exec_() method has an underscore. It is because the exec is a Python keyword. And thus, exec_() was used instead
|
1 2 |
myapp.exec_() sys.exit() |
So now run the complete code and this will be the result
Also you can watch the complete video for this article
Subscribe and Get Free Video Courses & Articles in your Email
