In this Qt5 article iam going to show you How To Create QMessageBox In Qt5 GUI.
A message box displays a primary text to alert the user to a situation, an informative text to further explain the alert or to ask the
user a question, and an optional detailed text to provide even more data if the user requests it. A message box can also display an icon and
standard buttons for accepting a user response.Two APIs for using QMessageBox are provided, the property-based API, and the static functions.
Calling one of the static functions is the simpler approach, but it is less flexible than using the property-based API, and the result is less informative.
Using the property-based API is recommended.
Severity Levels and the Icon and Pixmap Properties
QMessageBox supports four predefined message severity levels, or message types, which really only differ in the predefined
icon they each show. Specify one of the four predefined message types by setting the icon property to one of the predefined icons.
The following rules are guidelines:
|
|
Question | For asking a question during normal operations. |
|
|
Information | For reporting information about normal operations. |
|
|
Warning | For reporting non-critical errors. |
|
|
Critical | For reporting critical errors. |
Check Qt5 C++ GUI Development Articles with videos training and source codes.
1: Qt5 C++ Introduction And Installation
2: Qt5 C++ First Console Application
3: Qt5 C++ First GUI Application
4: Qt5 C++ Signal And Slots Introduction
6: Qt5 C++ Creating Qt Style Sheets
7: Qt5 C++ Creating QPushButton
8: How To Create QCheckBox in Qt5
9: Qt5 GUI How To Create QRadioButton
10: Qt5 GUI Development How To Create ComboBox
11: Qt5 C++ GUI Development Creating QListWidget
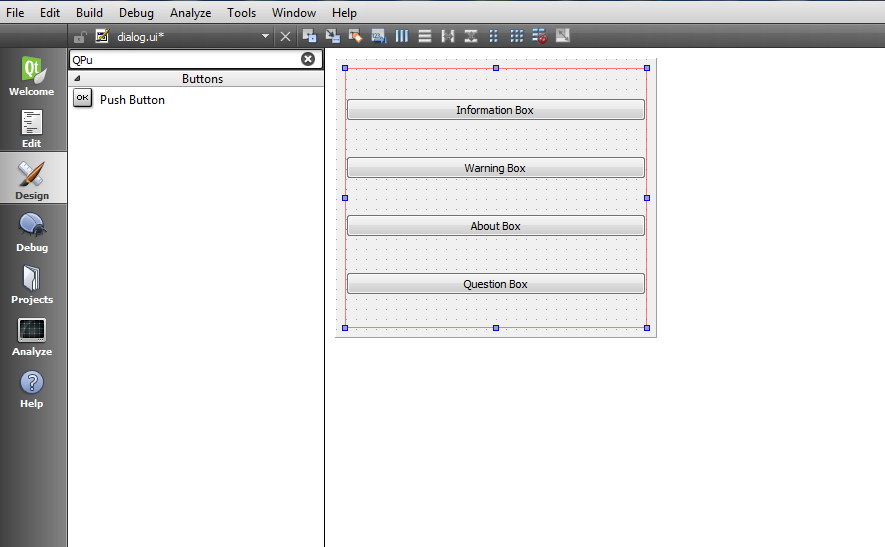
So first of all you need to create a new project in Qt5 framework, after that open your dialog.ui file
and give a simple design, basically we want four buttons in our design like this.

OK now we are going to implement Signal And Slot mechanism to our four QPushButton,
now right click on every QPushButton after that select Go To Slot and in the dialog choose clicked().
do the same process for all QPushButton, after that your dialog.cpp file will look like this.
|
1 2 3 4 5 6 7 8 9 10 11 12 13 14 15 16 17 18 19 20 21 22 23 24 25 26 27 28 29 30 31 32 33 34 35 36 37 |
#include "dialog.h" #include "ui_dialog.h" Dialog::Dialog(QWidget *parent) : QDialog(parent), ui(new Ui::Dialog) { ui->setupUi(this); } Dialog::~Dialog() { delete ui; } void Dialog::on_pushButton_clicked() { // Information MessageBox } void Dialog::on_pushButton_2_clicked() { //Warning MessageBox } void Dialog::on_pushButton_3_clicked() { //About MessageBox } void Dialog::on_pushButton_4_clicked() { //Question MessageBox } |
Also remember that add QMessageBox class in your dialog.h file like this
|
1 2 3 4 5 6 7 8 9 10 11 12 13 14 15 16 17 18 19 20 21 22 23 24 25 26 27 28 29 30 31 32 |
#ifndef DIALOG_H #define DIALOG_H #include <QDialog> #include<QMessageBox> namespace Ui { class Dialog; } class Dialog : public QDialog { Q_OBJECT public: explicit Dialog(QWidget *parent = 0); ~Dialog(); private slots: void on_pushButton_clicked(); void on_pushButton_2_clicked(); void on_pushButton_3_clicked(); void on_pushButton_4_clicked(); private: Ui::Dialog *ui; }; #endif // DIALOG_H |
OK now we are going to to do some coding for our QPushButtons in dialog.cpp, for every button in the slot section we need
to add a QMessageBox like this.
|
1 2 3 4 5 6 7 8 9 10 11 12 13 14 15 16 17 18 19 20 21 22 23 24 25 26 27 28 29 30 31 32 |
void Dialog::on_pushButton_clicked() { // Information MessageBox QMessageBox::information(this, "Information Box", "This is information text"); } void Dialog::on_pushButton_2_clicked() { //Warning MessageBox QMessageBox::warning(this, "Warning Box", "This is a warning box"); } void Dialog::on_pushButton_3_clicked() { //About MessageBox QMessageBox::about(this, "About Box", "This is about box"); } void Dialog::on_pushButton_4_clicked() { //Question MessageBox QMessageBox::question(this, "Question Box", "Do You Like Sport ? ", QMessageBox::Yes | QMessageBox::No ); } |
At the end this is your dialog.cpp
|
1 2 3 4 5 6 7 8 9 10 11 12 13 14 15 16 17 18 19 20 21 22 23 24 25 26 27 28 29 30 31 32 33 34 35 36 37 38 39 40 41 42 43 44 45 46 47 |
#include "dialog.h" #include "ui_dialog.h" Dialog::Dialog(QWidget *parent) : QDialog(parent), ui(new Ui::Dialog) { ui->setupUi(this); } Dialog::~Dialog() { delete ui; } void Dialog::on_pushButton_clicked() { // Information MessageBox QMessageBox::information(this, "Information Box", "This is information text"); } void Dialog::on_pushButton_2_clicked() { //Warning MessageBox QMessageBox::warning(this, "Warning Box", "This is a warning box"); } void Dialog::on_pushButton_3_clicked() { //About MessageBox QMessageBox::about(this, "About Box", "This is about box"); } void Dialog::on_pushButton_4_clicked() { //Question MessageBox QMessageBox::question(this, "Question Box", "Do You Like Sport ? ", QMessageBox::Yes | QMessageBox::No ); } |
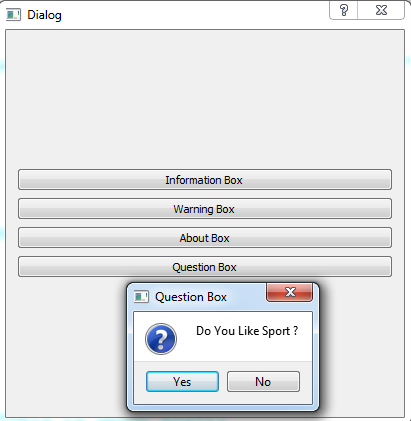
So now run the complete project and this will be the result

Also you can watch the complete video for this article
Subscribe and Get Free Video Courses & Articles in your Email


Dear Mr. Parwiz Forogh,
Are you for hire on a Qt C++ mobile app project that is very mature on both iOS and Android? If you are, please contact me back. If you are not, I wish you the best safe and healthy new year.
miagd!
jeff
—
Make it a great day!
Jeffrey Hatala
Systems Analyst
SUNY Broome Community College