In this Python GUI article we are going to learn Creating CheckBox In Pyside2, so for creating CheckBox we use QCheckBox class from Pyside2. also you can watch more articles on Python GUI Development with Pyside2 in the below links.
1: Getting Started With Pyside2 | Qt For Python
2: Pyside2 GUI Creating First Window
3: Pyside2 GUI Creating Window Icon
4: Pyside2 GUI How To Create Icon Modes
5: Pyside2 GUI How To Create Tooltip
6: Pyside2 GUI QPushButton With Signal And Slot
7: Pyside2 GUI Making Center The Window
8: Python GUI How To Create AboutBox
9: Python GUI How to Create Digital Clock in Pyside2
10: How To Create StatusBar In Pyside2
11: Pyside2 Creating QProgressBar
12: Pyside2 Layout Managment with QHBoxLayout
13: Pyside2 GridLayout Example
What is QCheckBox ?
A QCheckBox is an option button that can be switched on (checked) or off (unchecked). Checkboxes are typically used to represent features in an application that can be enabled or disabled without affecting others. Different types of behavior can be implemented. For example, a QButtonGroup can be used to group check buttons logically, allowing exclusive checkboxes. However, QButtonGroup does not provide any visual representation.
So now this is the complete code for Python GUI Creating CheckBox In Pyside2
|
1 2 3 4 5 6 7 8 9 10 11 12 13 14 15 16 17 18 19 20 21 22 23 24 25 26 27 28 29 30 31 32 33 34 35 36 37 38 39 40 41 42 43 44 45 46 47 48 49 50 51 52 53 54 55 56 57 |
from PySide2.QtWidgets import QApplication, QWidget, QVBoxLayout, QLabel, QCheckBox import sys from PySide2.QtGui import QIcon from PySide2.QtCore import Qt class Window(QWidget): def __init__(self): super().__init__() self.setWindowTitle("Pyside2 QCheckBox") self.setGeometry(300,200,400,100) self.setIcon() self.createCheckBox() self.show() def setIcon(self): appIcon = QIcon("icon.png") self.setWindowIcon(appIcon) def createCheckBox(self): vbox = QVBoxLayout() self.label = QLabel("", self) check = QCheckBox("I Like Football", self) check.stateChanged.connect(self.checkBoxChange) check.toggle() vbox.addWidget(check) vbox.addWidget(self.label) self.setLayout(vbox) def checkBoxChange(self, state): if state == Qt.Checked: self.label.setText("Yes I Like Football") else: self.label.setText("No I Dont Like Football") myapp = QApplication(sys.argv) window = Window() myapp.exec_() sys.exit() |
So at the top first we have imported our required classed from pyside2, after that we have created our window class that inherits from QWidget, and we have added the requirement of our window in that class, also we have called our setIcon() and createCheckBox() methods in our class.
|
1 2 3 4 5 6 7 8 9 10 11 12 |
class Window(QWidget): def __init__(self): super().__init__() self.setWindowTitle("Pyside2 QCheckBox") self.setGeometry(300,200,400,100) self.setIcon() self.createCheckBox() self.show() |
This method is for window icon
|
1 2 3 |
def setIcon(self): appIcon = QIcon("icon.png") self.setWindowIcon(appIcon) |
So now this is the method that we are going to create our checkbox, first of all we have created our QVBoxLayout, and after that we have created a label with checkbox, also we have used stateChanged() signal of QCheckBox and we have connected that to our method of checkBoxChange() that we are going to create.
|
1 2 3 4 5 6 7 8 9 10 11 12 13 |
def createCheckBox(self): vbox = QVBoxLayout() self.label = QLabel("", self) check = QCheckBox("I Like Football", self) check.stateChanged.connect(self.checkBoxChange) check.toggle() vbox.addWidget(check) vbox.addWidget(self.label) self.setLayout(vbox) |
So this is the method that we have connected with our signal at the top
|
1 2 3 4 5 6 |
def checkBoxChange(self, state): if state == Qt.Checked: self.label.setText("Yes I Like Football") else: self.label.setText("No I Dont Like Football") |
Also every Pyside2 application must create an application object. The sys.argv parameter is a list of arguments from a command line.
Python scripts can be run from the shell. It is a way how we can control the startup of our scripts.
|
1 |
myapp = QApplication(sys.argv) |
Finally, we enter the mainloop of the application. The event handling starts from this point. The mainloop receives events from the window system and dispatches them to the application widgets. The mainloop ends if we call the exit() method or the main widget is destroyed. The sys.exit() method ensures a clean exit. The environment will be informed how the application ended.
The exec_() method has an underscore. It is because the exec is a Python keyword. And thus, exec_() was used instead
|
1 2 |
myapp.exec_() sys.exit() |
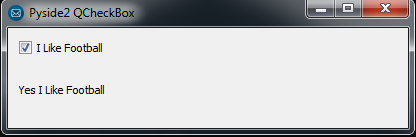
Run the complete code and this will be the result
Also you can watch the complete video for this article
Subscribe and Get Free Video Courses & Articles in your Email