In this PyQt5 Tutorial we want to learn about Creating Calendar with Qt Designer, for creating of calendar in pyqt5 with Qt Designer we need to use QCalendarWidget. so PyQt5 QCalendarWidget is graphical user interface (GUI) widget in PyQt5, Python binding for the Qt toolkit. QCalendarWidget widget displays calendar view and it allows users to select date and also supports different customization options.
QCalendarWidget allows you to display calendar view in your PyQt5 application. Users can select date from the calendar view by clicking on date, which is emitted as signal. widget also supports different customization options, such as setting minimum and maximum dates, selecting current date and setting specific date range.
Also QCalendarWidget provides different methods to get and set selected date, retrieve minimum and maximum dates and retrieve currently displayed month and year. this makes it useful tool for building date related functionality into PyQt5 applications, such as scheduling or event management.
In result we can say that PyQt5 QCalendarWidget is powerful and customizable widget that provides convenient way for users to select dates in PyQt5 applications.
- Working with Qt Designer in PyQt5
- Create CheckBox in PyQt5 with Qt Designer
- PyQt5 Radiobutton in Qt Designer
OK now we want to create our calendar using Qt Designer , so you need to open your Qt Designer, you can write pyqt5designer in your terminal, after opening create a new Dialog without Buttons window.
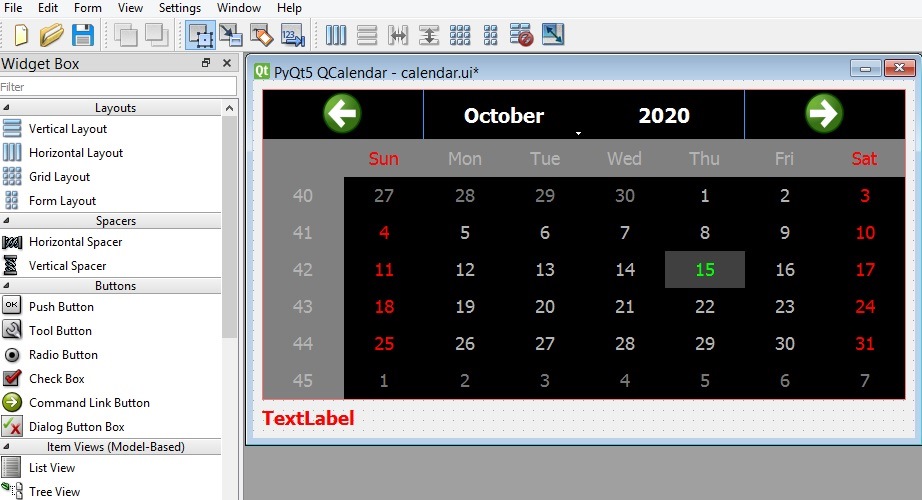
Now design your application in these steps
- Add a QVBoxLayout in your Designer
- Add a QCalendar Widget in QVBoxLayout
- Add a QLabel in QVBoxLayout
Right click on the QCalendarWidget and select Change Stylesheet, because we want to add some styles to our pyqt calendar, and add these styles in their.
|
1 2 3 4 5 6 7 8 9 10 11 12 13 14 15 16 17 18 19 20 21 22 23 24 25 26 27 28 29 30 31 32 33 34 35 36 37 38 39 40 |
/*Tool button styles */ QCalendarWidget QToolButton { height:40px; width:150px; color:white; font-size:20px; icon-size:56px,56px; background-color:black; } /* header row */ QCalendarWidget QWidget{ alternate-background-color:rgb(128,128,128) } /*normal days */ QCalendarWidget QAbstractItemView:enabled { font-size:18px; color:rgb(180,180,180); background-color:black; selection-background-color:rgb(64,64,64); selection-color:rgb(0,255,0); } |
Also you need to do the same for the QLabel.
|
1 2 3 4 5 6 |
QLabel { color:rgb(255, 0, 0) } |
This is the design that we want

After completing the design you need to save your design, now we want to interact with this design in Python, there are two ways that you can do, the first way is that you can convert .ui file in to .py file and the second way is loading the ui file in Python, in this article we want to load our ui file. for loading ui file we want to use uic module, so create a new Python file, i want to name it LoadCalendar.py and add these codes.
|
1 2 3 4 5 6 7 8 9 10 11 12 13 14 15 16 17 18 19 20 21 22 23 24 25 26 27 28 29 30 31 32 33 34 35 |
from PyQt5.QtWidgets import QApplication, QDialog, QCalendarWidget, QLabel import sys from PyQt5 import uic class UI(QDialog): def __init__(self): super().__init__() #this is used for loading ui file uic.loadUi('calendar.ui', self) #find the widgets self.calendar = self.findChild(QCalendarWidget, "calendarWidget") self.label = self.findChild(QLabel, "label") self.calendar.selectionChanged.connect(self.calendar_date) def calendar_date(self): dateselected = self.calendar.selectedDate() date_in_string = str(dateselected.toPyDate()) self.label.setText("Date Is : " + date_in_string) app = QApplication([]) window = UI() window.show() app.exec_() |
Also we need to find the child in our ui file using findChild() method, because we want to connect selectionChanged() signal of the QCalendarWidget with calendar_date() method.
This is the method that we have already connected with the selectionChanged() signal of the QCalendarWidget, so in this method first we have got the date from Calendar and we have
set the date in the QLabel.
- How to Create MySQL Database in PyQt5
- How to Insert Data to Mysql Database in PyQt5
- Selecting Data from Mysql Database in QTableWidget
- PyQt5 Simple Login with MySQL Database
If you want the ui file, this is my ui file, you can directly save this file as calendar.ui. but if you design your ui file by yourself it will be good.
|
1 2 3 4 5 6 7 8 9 10 11 12 13 14 15 16 17 18 19 20 21 22 23 24 25 26 27 28 29 30 31 32 33 34 35 36 37 38 39 40 41 42 43 44 45 46 47 48 49 50 51 52 53 54 55 56 57 58 59 60 61 62 63 64 65 66 67 68 69 70 71 72 73 74 75 76 77 78 79 80 81 82 83 84 85 86 87 88 89 90 91 92 93 94 95 |
<?xml version="1.0" encoding="UTF-8"?> <ui version="4.0"> <class>Dialog</class> <widget class="QDialog" name="Dialog"> <property name="geometry"> <rect> <x>0</x> <y>0</y> <width>505</width> <height>363</height> </rect> </property> <property name="windowTitle"> <string>PyQt5 QCalendar</string> </property> <layout class="QVBoxLayout" name="verticalLayout_2"> <item> <layout class="QVBoxLayout" name="verticalLayout"> <item> <widget class="QCalendarWidget" name="calendarWidget"> <property name="styleSheet"> <string notr="true">QCalendarWidget QToolButton { height:40px; width:150px; color:white; font-size:20px; icon-size:56px,56px; background-color:black; } QCalendarWidget QWidget{ alternate-background-color:rgb(128,128,128) } QCalendarWidget QAbstractItemView:enabled { font-size:18px; color:rgb(180,180,180); background-color:black; selection-background-color:rgb(64,64,64); selection-color:rgb(0,255,0); } </string> </property> </widget> </item> </layout> </item> <item> <widget class="QLabel" name="label"> <property name="font"> <font> <pointsize>14</pointsize> <weight>75</weight> <bold>true</bold> </font> </property> <property name="styleSheet"> <string notr="true">QLabel { color:rgb(255, 0, 0) }</string> </property> <property name="text"> <string>TextLabel</string> </property> </widget> </item> </layout> </widget> <resources/> <connections/> </ui> |
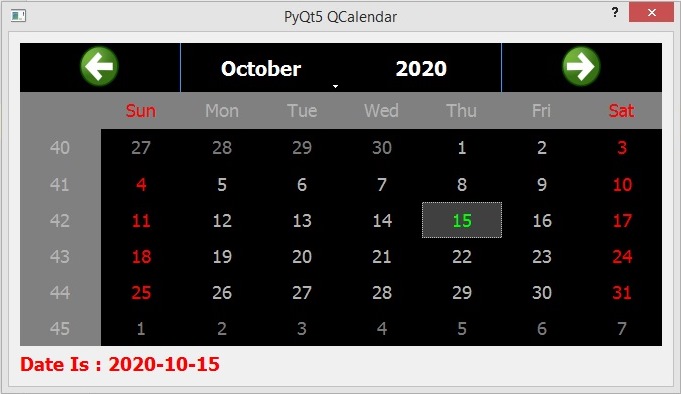
Run the complete code and this is the result.

Subscribe and Get Free Video Courses & Articles in your Email