In this PyQt5 Tutorial we are going to learn about Working with RadioButton, QRadioButton is a class in PyQt5 that provides radio button widget for use in graphical user interfaces (GUIs). radio button is GUI component that allows users to select one option from set of mutually exclusive options.
When several radio buttons are grouped together, only one can be selected at a time. when user selects one radio button, all others in the same group are automatically deselected. Radio buttons are commonly used in GUIs for setting options, preferences or other types of binary choices.
In PyQt5, QRadioButton class inherits from the QAbstractButton class which provides the basic functionality for all types of buttons in the Qt framework. QRadioButton class adds additional functionality specific to radio buttons, such as the ability to group radio buttons together and to retrieve the currently selected radio button in a group.
Learn Programming with Free Video Courses in Geekscoders.com
OK now we want to create our layout using Qt Designer , so you need to open your Qt Designer, you can write pyqt5designer in your terminal, after opening create new Dialog without Buttons window.
Now design your application in these steps
- Add a QVBoxLayout in the Designer
- In the QVBoxLayout add a QGroupBox, change the title and font from the designer
- After that add QHBoxLayout
- In the QHBoxLayout you need to add your three QRadioButton
- Also you need to add a QLabel in the QVBoxLayout
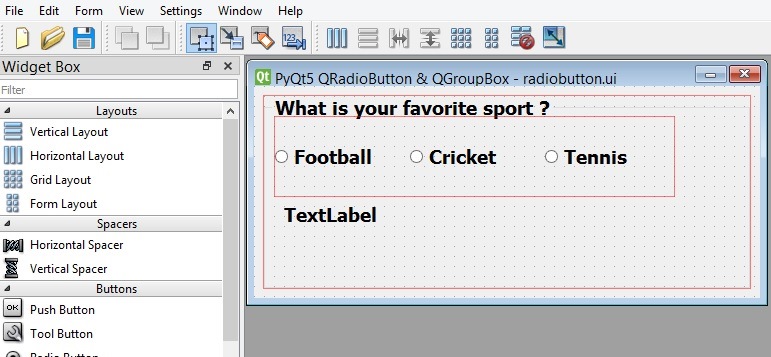
This is the design that we want, you can add the icons in the designer or you can use coding for adding the icons. we will add the icons using coding.
After completing the design you need to save your design, the extension will be .ui file. now it is time to convert our .ui file in to .py file. there are two ways that you can do, first way is loading the ui file, the second way is converting the .ui file to .py file, we want to use the second way. for converting of the ui file to python file we need to use pyuic5 module, this module is located in the Scripts folder of your python installation, you need to copy your ui file in the Scripts folder of your Python installation. after that open the terminal in the Scripts folder, and run this command.
|
1 |
pyuic5 radiobutton.ui -o myradiobuttonexample.py -x |
- How to Create MySQL Database in PyQt5
- How to Insert Data to Mysql Database in PyQt5
- Selecting Data from Mysql Database in QTableWidget
- PyQt5 Simple Login with MySQL Database
This is the converted code. so when you convert, the main class will extends from QObject, but you need to change that manually to QDialog, also we have added our on_selected() method at the bottom, because we have connected this method with toggled() signal of QRadioButton. you need to add some icons manually for your radiobuttons, make sure that you have added some icons in your working directory.
|
1 2 3 4 5 6 7 8 9 10 11 12 13 14 15 16 17 18 19 20 21 22 23 24 25 26 27 28 29 30 31 32 33 34 35 36 37 38 39 40 41 42 43 44 45 46 47 48 49 50 51 52 53 54 55 56 57 58 59 60 61 62 63 64 65 66 67 68 69 70 71 72 73 74 75 76 77 78 79 80 81 82 83 84 85 86 87 88 89 90 91 92 93 |
# -*- coding: utf-8 -*- # Form implementation generated from reading ui file 'radiobutton.ui' # # Created by: PyQt5 UI code generator 5.15.1 # # WARNING: Any manual changes made to this file will # be lost when pyuic5 is # run again. Do not edit this file unless you know what # you are doing. from PyQt5 import QtCore, QtGui, QtWidgets from PyQt5.QtWidgets import QDialog from PyQt5.QtGui import QIcon from PyQt5.QtCore import QSize class Ui_Dialog(QDialog): def setupUi(self, Dialog): Dialog.setObjectName("Dialog") Dialog.resize(506, 212) self.verticalLayout_2 = QtWidgets.QVBoxLayout(Dialog) self.verticalLayout_2.setObjectName("verticalLayout_2") self.verticalLayout = QtWidgets.QVBoxLayout() self.verticalLayout.setObjectName("verticalLayout") self.groupBox = QtWidgets.QGroupBox(Dialog) font = QtGui.QFont() font.setPointSize(14) font.setBold(True) font.setWeight(75) self.groupBox.setFont(font) self.groupBox.setObjectName("groupBox") self.horizontalLayoutWidget = QtWidgets.QWidget(self.groupBox) self.horizontalLayoutWidget.setGeometry(QtCore.QRect(10, 20, 401, 81)) self.horizontalLayoutWidget.setObjectName("horizontalLayoutWidget") self.horizontalLayout = QtWidgets.QHBoxLayout(self.horizontalLayoutWidget) self.horizontalLayout.setContentsMargins(0, 0, 0, 0) self.horizontalLayout.setObjectName("horizontalLayout") self.radioButton_3 = QtWidgets.QRadioButton(self.horizontalLayoutWidget) self.radioButton_3.setObjectName("radioButton_3") self.radioButton_3.setIcon(QIcon('football.png')) self.radioButton_3.setIconSize(QSize(40, 40)) self.radioButton_3.toggled.connect(self.on_selected) self.horizontalLayout.addWidget(self.radioButton_3) self.radioButton_2 = QtWidgets.QRadioButton(self.horizontalLayoutWidget) self.radioButton_2.setObjectName("radioButton_2") self.horizontalLayout.addWidget(self.radioButton_2) self.radioButton_2.setIcon(QIcon('cricket.png')) self.radioButton_2.setIconSize(QSize(40, 40)) self.radioButton_2.toggled.connect(self.on_selected) self.radioButton = QtWidgets.QRadioButton(self.horizontalLayoutWidget) self.radioButton.setObjectName("radioButton") self.radioButton.setIcon(QIcon('tennis.png')) self.radioButton.setIconSize(QSize(40, 40)) self.radioButton.toggled.connect(self.on_selected) self.horizontalLayout.addWidget(self.radioButton) self.label = QtWidgets.QLabel(self.groupBox) self.label.setGeometry(QtCore.QRect(20, 80, 419, 77)) self.label.setObjectName("label") self.verticalLayout.addWidget(self.groupBox) self.verticalLayout_2.addLayout(self.verticalLayout) self.retranslateUi(Dialog) QtCore.QMetaObject.connectSlotsByName(Dialog) def retranslateUi(self, Dialog): _translate = QtCore.QCoreApplication.translate Dialog.setWindowTitle(_translate("Dialog", "PyQt5 QRadioButton & QGroupBox")) self.groupBox.setTitle(_translate("Dialog", "What is your favorite sport ?")) self.radioButton_3.setText(_translate("Dialog", "Football")) self.radioButton_2.setText(_translate("Dialog", "Cricket")) self.radioButton.setText(_translate("Dialog", "Tennis")) self.label.setText(_translate("Dialog", "TextLabel")) def on_selected(self): radio_button = self.sender() if radio_button.isChecked(): self.label.setText("You have selected : " + radio_button.text()) if __name__ == "__main__": import sys app = QtWidgets.QApplication(sys.argv) Dialog = QtWidgets.QDialog() ui = Ui_Dialog() ui.setupUi(Dialog) Dialog.show() sys.exit(app.exec_()) |
This is our method and we have connected this method with the toggled() signal of the radiobuttons, in this method first we get the value from the radiobutton using sender() method. after that we are checking the value for the radiobutton.
|
1 2 3 4 5 |
def on_selected(self): radio_button = self.sender() if radio_button.isChecked(): self.label.setText("You have selected : " + radio_button.text()) |
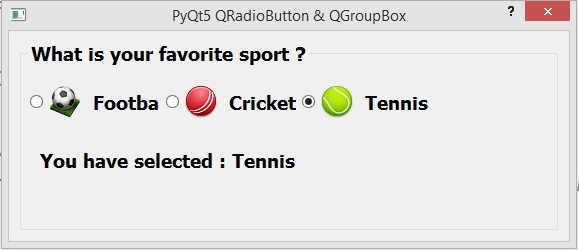
Run the complete code and this is the result.
Subscribe and Get Free Video Courses & Articles in your Email