This is our fifth article in Kivy Crash Course, in this article we are going to learn How to Create CheckBox. CheckBox is a specific two-state button that can be either checked or unchecked. If the CheckBox is in a Group, it becomes a Radio button. As with the ToggleButton, only one Radio button at a time can be selected when the CheckBox.group is set.
Also you can watch the video for this article
Kivy Crash Course Articles
1: Kivy Crash Course Introduction & Installation
2: Introduction to Kv Design Language
So there are two ways that you can create checkbox in kivy, the first way is that you can create checkbox using the kivy.uix.checkbox module, and the second way is using the kivy design language, so first let’s just do the first way. also iam going to show you how to create callbacks for the kivy checkbox.
So now this is the code for creating of checkbox in kivy.
|
1 2 3 4 5 6 7 8 9 10 11 12 13 14 15 16 17 18 19 20 21 22 23 24 25 26 27 28 29 30 31 32 33 34 35 36 37 38 39 40 41 42 43 44 45 46 47 48 49 50 51 52 53 54 55 56 |
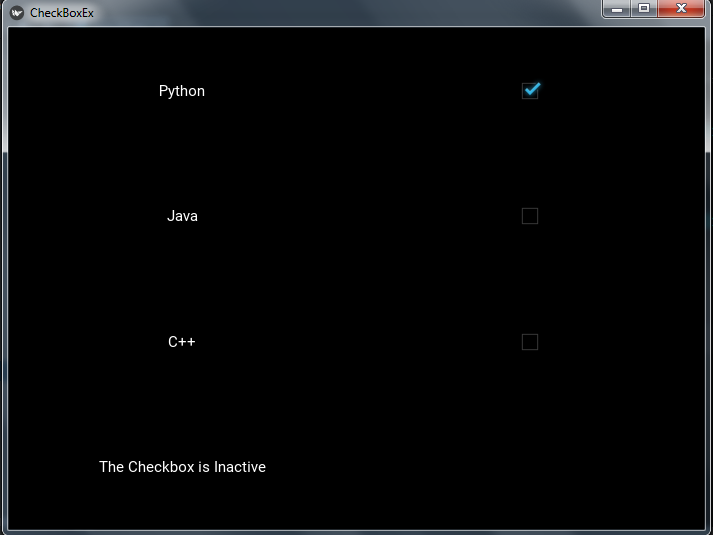
from kivy.app import App from kivy.uix.checkbox import CheckBox from kivy.uix.gridlayout import GridLayout from kivy.uix.label import Label class CheckBoxClass(GridLayout): def __init__(self): super().__init__() self.cols = 2 self.add_widget(Label(text = "Python")) self.check = CheckBox(active = True) self.add_widget(self.check) self.add_widget(Label(text="Java")) self.check = CheckBox(active=True) self.add_widget(self.check) self.add_widget(Label(text="C++")) self.check = CheckBox(active=True) self.add_widget(self.check) self.mylabel = Label(text = "Label") self.add_widget(self.mylabel) self.check.bind(active = self.on_checkbox_active) def on_checkbox_active(self, checkbox, value): if value: self.mylabel.text = "The Checkbox is Active" else: self.mylabel.text = "The Checkbox is Inactive" class CheckBoxEx(App): def build(self): return CheckBoxClass() if __name__ == "__main__": window = CheckBoxEx() window.run() |
So in the above code you can see that we have created a class that extends from GridLayout, and we created our checkboxes and labels in that class, also you can see that i have binded the event with the checkbox like this.
|
1 |
self.check.bind(active = self.on_checkbox_active) |
And this is my method that i have binded with the checkbox.
|
1 2 3 4 5 6 |
def on_checkbox_active(self, checkbox, value): if value: self.mylabel.text = "The Checkbox is Active" else: self.mylabel.text = "The Checkbox is Inactive" |
This method returns the window content. in this case our CheckBoxClass class .
|
1 2 3 4 |
class CheckBoxEx(App): def build(self): return CheckBoxClass() |
So now if you run the code this will be the result.
So now let’s create our checkbox using kivy design language, first of all this is our python code.
|
1 2 3 4 5 6 7 8 9 10 11 12 13 14 15 16 17 18 19 20 21 22 23 24 25 26 27 28 29 30 31 |
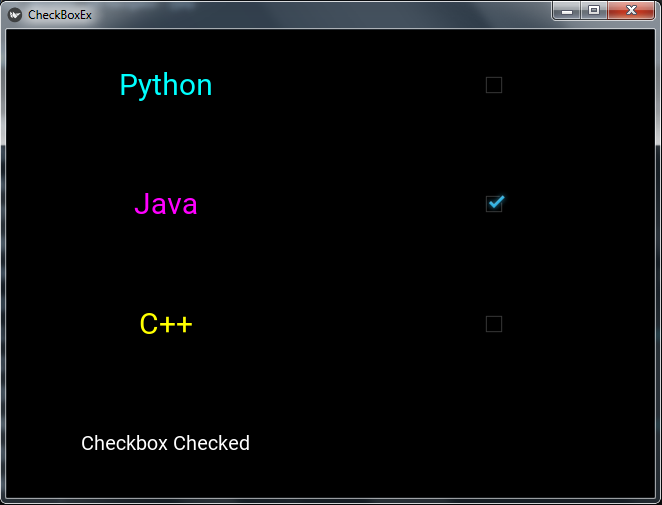
from kivy.app import App from kivy.uix.gridlayout import GridLayout class MyGridLayout(GridLayout): def checkbox_click(self, instance, value): if value is True: self.label.text = "Checkbox Checked" else: self.label.text = "Checkbox Unchecked" class CheckBoxEx(App): def build(self): return MyGridLayout() if __name__ == "__main__": window = CheckBoxEx() window.run() |
So you can see at the top i have created a new class, that class extends from GridLayout class , and also you can see that i have added callback in this class, because i want to use that in my kivy file.
And this is our kivy file, make sure that your kivy file name should be checkboxex.kv, because our main class is CheckBoxEx.
|
1 2 3 4 5 6 7 8 9 10 11 12 13 14 15 16 17 18 19 20 21 22 23 24 25 26 27 28 29 30 31 32 33 34 35 36 37 38 39 40 41 42 |
#:kivy 1.10.0 <MyGridLayout>: label:mylabel cols:2 spacing:10 Label: text:"Python" font_size:30 color:0,1,1,1 CheckBox: on_active:root.checkbox_click(self, self.active) Label: text:"Java" font_size:30 color:1,0,1,1 CheckBox: on_active:root.checkbox_click(self, self.active) Label: text:"C++" font_size:30 color:1,1,0,1 CheckBox: on_active:root.checkbox_click(self, self.active) Label: id:mylabel text:"Label" font_size:20 |
So in the kivy file first of all we have added the kivy version, after that we are going to write the class that we want to define rules, in our case it is MyGridLayout and we add our checkbox and labels in our kivy file, also pay attention in the indentation of code in your kivy file.
And this is the code that we have binded with the kivy file checkbox.
|
1 |
on_active:root.checkbox_click(self, self.active) |
So run the code this will be the result
Subscribe and Get Free Video Courses & Articles in your Email
while doing python example practice TK practice programs are working, output is getting but PyQt5 practice programs are not working output is not get, mistakes are showing, what has to do. Thanking You, Prasad
Can you tell me what is the error and have installed pyqt5 correctly