This is our third article on Kivy Crash Course, in this article we are going to learn Creating Button with Callbacks in Kivy. the Button is a Label with associated actions that are triggered when the button is pressed (or released after a click/touch). To configure the button, the same properties (padding, font_size, etc) and sizing system are used as for the Label class.
Also you can watch the video for this article
Kivy Crash Course Articles
1: Kivy Crash Course Introduction & Installation
2: Introduction to Kv Design Language
So there are two ways that you can create button in kivy, the first way is that you can create button using the kivy.uix.button module, and the second way is using the kivy design language, so first let’s just do the first way. also iam going to show you how to create callbacks for the kivy button.
So now this is the code for creating of button in kivy.
|
1 2 3 4 5 6 7 8 9 10 11 12 13 14 15 16 17 18 19 20 21 22 |
from kivy.app import App from kivy.uix .button import Button class Window(App): def build(self): button = Button(text = "Click Me") button.bind(on_press = self.click_me) return button def click_me(self, value): print("Hello World") if __name__ == "__main__": window = Window() window.run() |
OK in the above code you can see that first we have imported our required classes from kivy, basically we are going to use App class with Button class. after that we have created our Window class that extends from App class. the App class is the starting point of any kivy application.
This is the method that we want when a user clicks on the button, we are going to just print something in the console.
|
1 2 |
def click_me(self, value): print("Hello World") |
This method returns the window content. in this case a simple button, also you can see we have attached a callback to our button. to attach a callback when the button is pressed (clicked/touched), use bind
|
1 2 3 4 |
def build(self): button = Button(text = "Click Me") button.bind(on_press = self.click_me) return button |
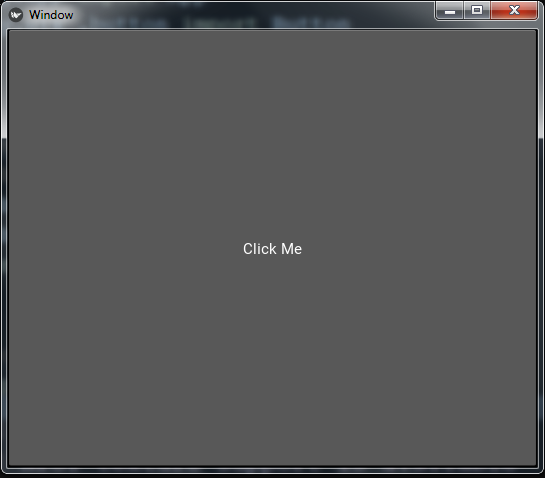
Now if you run the complete code the result will be a big button that covers all the window, it is because we have not specified the button size, we will do that when we have created the button using the kivy design language.
So now let’s create our button using kivy design language, first of all this is our python code.
|
1 2 3 4 5 6 7 8 9 10 11 12 13 14 15 16 17 18 19 20 21 22 23 |
from kivy.app import App from kivy.uix.widget import Widget class MyWidget(Widget): pass class WindowTwo(App): def build(self): return MyWidget() if __name__ == "__main__": window = WindowTwo() window.run() |
So you can see at the top i have created a new class, that class extends from Widget base class, now it is good idea to create our Widget class. and for right now i have not added anything in this class, but we will add our callback for this button in this class, also we have returned this class in our main window class.
And this is our kivy file, make sure that your kivy file name should be windowtwo.kv, because our main class is WindowTwo.
|
1 2 3 4 5 6 7 8 9 10 11 |
#:kivy 1.10.0 <MyWidget>: Button: text: "Click Me" pos: 100, 100 size: 120, 50 color: .5,.7,0,1 font_size: 20 |
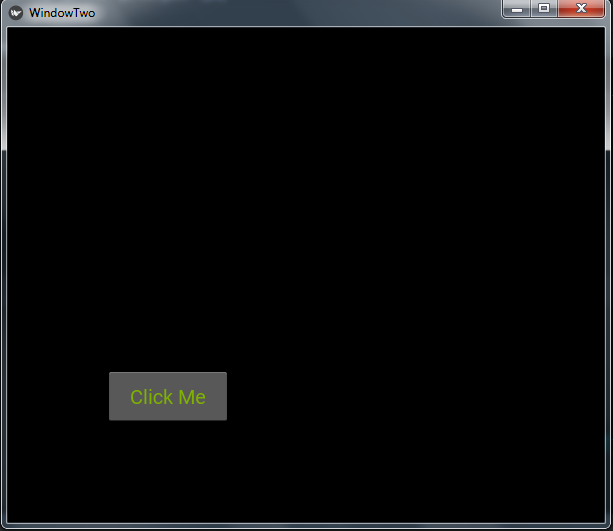
So in the kivy file first of all we have added the kivy version, after that we are going to write the class that we want to define rules, in our case it is MyWidget. and we have added our button with some attributes like position, size, color and font size. also pay attention in your kivy file indentation .
If you run the code this will be the result
Now let’s add callback for our button, let’s change our python file and add a new method in our MyWidget class like this for our callback. we will connect this method in our kivy file with our button.
|
1 2 3 4 5 6 7 8 9 10 11 12 13 14 15 16 17 18 19 20 21 22 23 24 |
from kivy.app import App from kivy.uix.widget import Widget class MyWidget(Widget): def click_me(self): print("You clicked me .. ") self.mylabel.text ="Label Changed After Clicking" class WindowTwo(App): def build(self): return MyWidget() if __name__ == "__main__": window = WindowTwo() window.run() |
So you can see we have added a new method in the class, and when the user clicks on the button the label text will be changed.
Now this is our updated kivy file. so the new thing in this file is that we have added a new widget of label, also we have added an id to the label, after that you need to reference the label in our MyWidget rules. also you can see we have a new thing in our Button, that is on_press.
|
1 2 3 4 5 6 7 8 9 10 11 12 13 14 15 16 17 18 |
#:kivy 1.10.0 <MyWidget>: mylabel:label Button: text: "Click Me" pos: 100, 100 size: 120, 50 color: .5,.7,0,1 font_size: 20 #on_press: print("The Button Is Pressed") on_press: root.click_me() Label: id:label text: "Iam a label" pos:200,200 |
Run the complete code and this will be the result

Subscribe and Get Free Video Courses & Articles in your Email