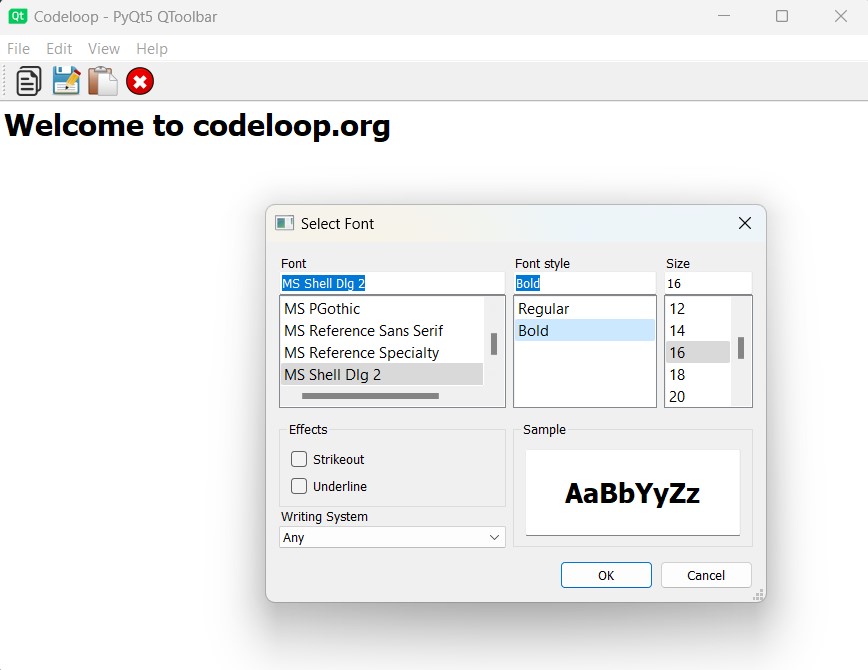
In this article i want to show you How To Create QFontDialog In PyQt5. the QFontDialog class provides a dialog widget for selecting a font. basically we are using our previous examples code of create QMenuBar, QToolBar and QTextEdit.
What is PyQt5 QFontDialog ?
PyQt5 QFontDialog is pre built dialog box that allows users to select a font and its attributes such as size, style and weight. it is standard dialog that is part of the PyQt5 library and can be easily integrated into PyQt5 applications. QFontDialog class provides user friendly interface for selecting fonts. it presents a list of fonts to the user, and the user can choose font by clicking on it. QFontDialog also provides options for selecting the font style (such as bold or italic) and font size.
What is the Benefit of PyQt5 QFontDialog in Application?
by using QFontDialog in your PyQt5 application can help make your application more user friendly by allowing users to select fonts easily and quickly. you can use the selected font in your application’s user interface, or you can use it to customize the appearance of text.
How to Create QFontDialog in PyQt5?
to use QFontDialog in your PyQt5 application, you can create an instance of the QFontDialog class, customize its properties as needed, and then execute it using exec_() method. once the user has selected a font, you can retrieve the selected font using the QFontDialog’s selectedFont() method.
Also you can read more Python GUI articles in the below links
- Kivy GUI Development Tutorials
- TKinter GUI Development Tutorials
- Pyside2 GUI Development
- wxPython GUI Development Tutorials
- PyQt5 GUI Development Tutorials
In the first we need some imports.
|
1 2 3 4 |
from PyQt5 import QtGui from PyQt5.QtWidgets import QApplication, QMainWindow, QAction, QTextEdit, QFontDialog import sys from PyQt5.QtGui import QIcon |
After that we create our Window class and add our window requirements in that class also we are going to create CreateMenu() method and we add our QMenu and QToolBar code in that method also we are going to create another method for creating our QTextEdit. we have used some codes from the previous articles. we are going to just focus on creating QFontdialog.
|
1 2 3 4 5 6 7 8 9 10 11 12 13 14 15 16 17 18 19 20 21 22 23 24 25 26 27 28 29 30 31 32 33 34 35 36 37 38 39 40 41 42 43 44 45 46 47 48 |
class Window(QMainWindow): def __init__(self): super().__init__() self.title = "PyQt5 QToolbar" self.top = 200 self.left = 500 self.width = 680 self.height = 480 self.setWindowIcon(QtGui.QIcon("icon.png")) self.setWindowTitle(self.title) self.setGeometry(self.left, self.top, self.width, self.height) self.createEditor() self.CreateMenu() self.show() def CreateMenu(self): mainMenu = self.menuBar() fileMenu = mainMenu.addMenu('File') editMenu = mainMenu.addMenu('Edit') viewMenu = mainMenu.addMenu('View') helpMenu = mainMenu.addMenu('Help') copyAction = QAction(QIcon("copy.png"), 'Copy', self) copyAction.setShortcut("Ctrl+C") editMenu.addAction(copyAction) saveAction = QAction(QIcon("Save.png"), 'Save', self) saveAction.setShortcut("Ctrl+S") editMenu.addAction(saveAction) pasteAction = QAction(QIcon("Paste.png"), 'Paste', self) pasteAction.setShortcut("Ctrl+P") editMenu.addAction(pasteAction) exiteAction = QAction(QIcon("exit.png"), 'Exit', self) exiteAction.setShortcut("Ctrl+E") exiteAction.triggered.connect(self.exitWindow) fileMenu.addAction(exiteAction) fontAction = QAction(QIcon("font.png"), "Font", self) fontAction.setShortcut("Ctrl+F") fontAction.triggered.connect(self.fontDialog) viewMenu.addAction(fontAction) self.toolbar = self.addToolBar('Toolbar') self.toolbar.addAction(copyAction) self.toolbar.addAction(saveAction) self.toolbar.addAction(pasteAction) self.toolbar.addAction(exiteAction) self.toolbar.addAction(fontAction) def exitWindow(self): self.close() def createEditor(self): self.textEdit = QTextEdit(self) self.setCentralWidget(self.textEdit) |
After that we are going to create our fontDialog() method and in that method we get the font from QFontDialog and we set our font to our QTextEdit.
|
1 2 3 4 |
def fontDialog(self): font, ok = QFontDialog.getFont() if ok: self.textEdit.setFont(font) |
Also every PyQt5 application must create an application object. The sys.argv parameter is a list of arguments from a command line.
|
1 |
App = QApplication(sys.argv) |
Finally, we enter the mainloop of the application. The event handling starts from this point.
|
1 2 |
window = Window() sys.exit(App.exec()) |
Run the complete code and this will be the result

Complete source code for How To Create QFontDialog In PyQt5
|
1 2 3 4 5 6 7 8 9 10 11 12 13 14 15 16 17 18 19 20 21 22 23 24 25 26 27 28 29 30 31 32 33 34 35 36 37 38 39 40 41 42 43 44 45 46 47 48 49 50 51 52 53 54 55 56 57 58 59 60 61 62 63 64 65 66 67 68 69 70 71 72 73 74 75 76 77 78 79 80 81 82 83 84 85 |
from PyQt5 import QtGui from PyQt5.QtWidgets import QApplication, QMainWindow, QAction, QTextEdit, QFontDialog import sys from PyQt5.QtGui import QIcon class Window(QMainWindow): def __init__(self): super().__init__() self.title = "Codeloop - PyQt5 QToolbar" self.top = 200 self.left = 500 self.width = 680 self.height = 480 # Set window icon, title, and geometry self.setWindowIcon(QtGui.QIcon("icon.png")) self.setWindowTitle(self.title) self.setGeometry(self.left, self.top, self.width, self.height) # Create text editor and menu bar self.createEditor() self.CreateMenu() # Display the window self.show() # Method to create the menu bar def CreateMenu(self): mainMenu = self.menuBar() fileMenu = mainMenu.addMenu('File') editMenu = mainMenu.addMenu('Edit') viewMenu = mainMenu.addMenu('View') helpMenu = mainMenu.addMenu('Help') # Add actions to Edit menu copyAction = QAction(QIcon("copy.png"), 'Copy', self) copyAction.setShortcut("Ctrl+C") editMenu.addAction(copyAction) saveAction = QAction(QIcon("Save.png"), 'Save', self) saveAction.setShortcut("Ctrl+S") editMenu.addAction(saveAction) pasteAction = QAction(QIcon("Paste.png"), 'Paste', self) pasteAction.setShortcut("Ctrl+P") editMenu.addAction(pasteAction) # Add action to File menu exiteAction = QAction(QIcon("exit.png"), 'Exit', self) exiteAction.setShortcut("Ctrl+E") exiteAction.triggered.connect(self.exitWindow) fileMenu.addAction(exiteAction) # Add action to View menu fontAction = QAction(QIcon("font.png"), "Font", self) fontAction.setShortcut("Ctrl+F") fontAction.triggered.connect(self.fontDialog) viewMenu.addAction(fontAction) # Create toolbar and add actions self.toolbar = self.addToolBar('Toolbar') self.toolbar.addAction(copyAction) self.toolbar.addAction(saveAction) self.toolbar.addAction(pasteAction) self.toolbar.addAction(exiteAction) self.toolbar.addAction(fontAction) # Method to close the window def exitWindow(self): self.close() # Method to create the text editor def createEditor(self): self.textEdit = QTextEdit(self) self.setCentralWidget(self.textEdit) # Method to open font dialog and set font def fontDialog(self): font, ok = QFontDialog.getFont() if ok: self.textEdit.setFont(font) # Create a PyQt application instance App = QApplication(sys.argv) # Create an instance of Window class window = Window() # Execute the application sys.exit(App.exec()) |
QFontDialog with Other Widgets
Integrating QFontDialog with other widgets such as QLabel or QPushButton can significantly enhance user experience, it allows the users to visualize font changes dynamically before applying them. This interaction provides users with immediate feedback on how their font selections will affect different elements of the application’s interface.
This is how you can achieve this integration:
- QLabel: You can use QFontDialog to allow users to change the font of text displayed in a QLabel dynamically. When the user selects a font using QFontDialog, you can update the QLabel’s font property to reflect the user’s choice.
- QPushButton: Similarly, you can integrate QFontDialog with a QPushButton to change the font of the button’s text dynamically. This allows users to see how different fonts will affect the appearance of buttons in the application.
This is the code
|
1 2 3 4 5 6 7 8 9 10 11 12 13 14 15 16 17 18 19 20 21 22 23 24 25 26 27 28 29 30 31 32 33 34 35 36 37 38 39 40 41 42 43 44 45 46 47 48 49 50 51 52 53 54 55 56 57 58 59 60 61 62 63 |
from PyQt5 import QtGui from PyQt5.QtWidgets import QApplication, QMainWindow, QAction, QTextEdit, QFontDialog, QVBoxLayout, QPushButton, QLabel, QWidget import sys class Window(QMainWindow): def __init__(self): super().__init__() self.title = "PyQt5 QFontDialog Example" self.top = 200 self.left = 500 self.width = 680 self.height = 480 self.setWindowIcon(QtGui.QIcon("icon.png")) self.setWindowTitle(self.title) self.setGeometry(self.left, self.top, self.width, self.height) self.createEditor() self.createFontSelector() self.CreateMenu() self.show() def CreateMenu(self): mainMenu = self.menuBar() fileMenu = mainMenu.addMenu('File') editMenu = mainMenu.addMenu('Edit') viewMenu = mainMenu.addMenu('View') helpMenu = mainMenu.addMenu('Help') exitAction = QAction("Exit", self) exitAction.setShortcut("Ctrl+Q") exitAction.triggered.connect(self.exitWindow) fileMenu.addAction(exitAction) def exitWindow(self): self.close() def createEditor(self): self.textEdit = QTextEdit(self) self.setCentralWidget(self.textEdit) def createFontSelector(self): layout = QVBoxLayout() # QLabel to display text with selected font self.label = QLabel("Codeloop.org") layout.addWidget(self.label) # QPushButton to open QFontDialog self.button = QPushButton("Select Font") self.button.clicked.connect(self.fontDialog) layout.addWidget(self.button) # Add the layout to the main window central_widget = QWidget() central_widget.setLayout(layout) self.setCentralWidget(central_widget) def fontDialog(self): font, ok = QFontDialog.getFont() if ok: self.label.setFont(font) App = QApplication(sys.argv) window = Window() sys.exit(App.exec_()) |
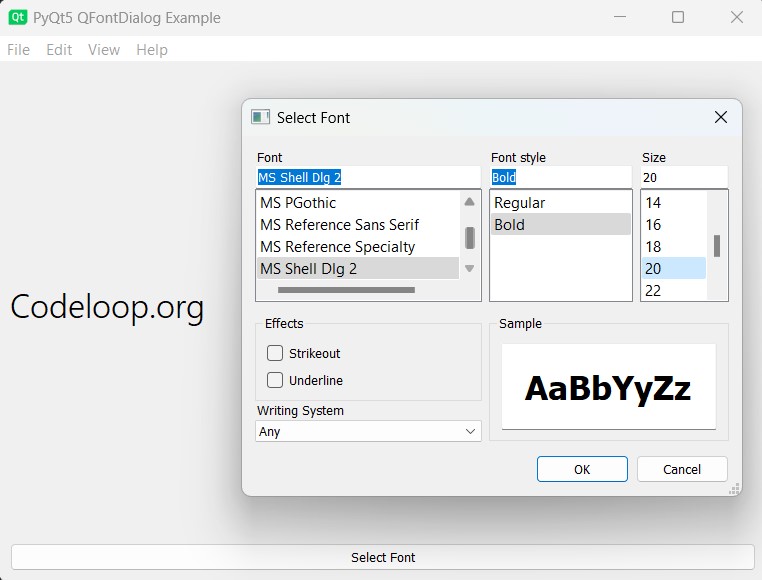
In this example, we have a QLabel displaying some sample text and a QPushButton labeled “Select Font.” When the user clicks the button, it opens a QFontDialog, and it allows them to choose a font. Once a font is selected and the dialog is accepted, the font of QLabel is updated to reflect the user’s choice. This allows users to see the effect of different fonts on the displayed text in real-time, enhancing the interactive experience of the application.
Run the code and this will be the result

Subscribe and Get Free Video Courses & Articles in your Email