In this Python GUI with PyQt6 lesson we are going to learn How to Build Python GUI Application with PyQt6, Python is powerful programming language that can be used to build different types of applications, including graphical user interface (GUI) applications. PyQt6 is popular Python binding for Qt application framework, which provides different tools for building cros -platform GUI applications. In this lesson we want to go through the steps to build simple Python GUI application using PyQt6.
For building Python GUI Application with PyQt6 first we need to install this library.
|
1 |
pip install PyQt6 |
After installation of PyQt6, now let’s create our coding, and we want to create our first window with PyQt6.
|
1 2 3 4 5 6 7 8 9 10 11 12 13 14 15 16 17 18 19 20 21 22 23 24 25 26 27 28 29 30 31 32 33 34 35 36 37 38 39 |
from PyQt6.QtWidgets import QApplication, QMainWindow, QLabel, QLineEdit, QPushButton from PyQt6.QtGui import QFont class MyApplication(QMainWindow): def __init__(self): super().__init__() # Set the window title and size self.setWindowTitle("Codeloop") self.setGeometry(100, 100, 400, 200) # Create the widgets self.label = QLabel("Enter your name:", self) self.label.move(20, 20) self.line_edit = QLineEdit(self) self.line_edit.move(140, 20) self.button = QPushButton("Submit", self) self.button.move(140, 70) self.result_label = QLabel(self) self.result_label.setGeometry(30,80, 200,200) # Connect the button to a method self.button.clicked.connect(self.handle_button_click) def handle_button_click(self): text = self.line_edit.text() self.result_label.setText(f"Hello, {text}!") self.result_label.setFont(QFont("Times", 15)) self.result_label.setStyleSheet('color:red') if __name__ == '__main__': app = QApplication([]) window = MyApplication() window.show() app.exec() |
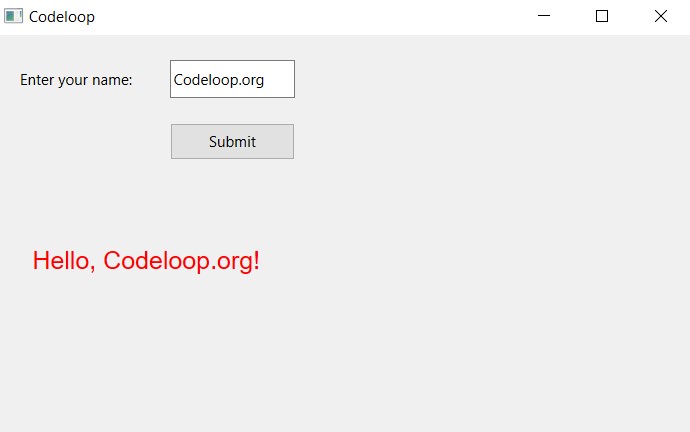
Above code creates main window with label, line edit, button and result label. handle_button_click() method is connected to the button and retrieves the text entered into line edit widget, then displays greeting in the result label.
Note that widgets are created using the relevant PyQt6 classes (QLabel, QLineEdit, QPushButton) and their positions are set using the move() and setGeometry() method. window title and size are set using the setWindowTitle() and setGeometry() methods.
Run the complete code and this will be the result

Now let’s add some more features and PyQt6 widgets to our GUI Application.
|
1 2 3 4 5 6 7 8 9 10 11 12 13 14 15 16 17 18 19 20 21 22 23 24 25 26 27 28 29 30 31 32 33 34 35 36 37 38 39 40 41 42 43 44 45 46 47 48 49 50 51 52 53 54 55 56 57 58 59 60 61 62 |
from PyQt6.QtWidgets import QApplication, QMainWindow, QLabel, QLineEdit, QPushButton, QTextEdit, QCheckBox, QComboBox class MyApplication(QMainWindow): def __init__(self): super().__init__() # Set window title and size self.setWindowTitle("Codeloop") self.setGeometry(100, 100, 500, 300) # Create widgets, this is our label and we moved the label self.label = QLabel("Enter your name:", self) self.label.move(20, 20) # This is our line edit and we moved that to a position self.line_edit = QLineEdit(self) self.line_edit.move(140, 20) # This is our button self.button = QPushButton("Submit", self) self.button.move(140, 70) # This is our label self.result_label = QLabel(self) self.result_label.move(20, 120) # This is our checkbox with x,y postion and width and height self.check_box = QCheckBox("Subscribe to newsletter?", self) self.check_box.setGeometry(50, 100, 150, 150) # This is our text edit and we have a size for that self.text_edit = QTextEdit(self) self.text_edit.move(20, 200) self.text_edit.resize(200, 80) # This is our combobox self.combo_box = QComboBox(self) self.combo_box.addItem("Codeloop 1") self.combo_box.addItem("Codeloop 2") self.combo_box.addItem("Codeloop 3") self.combo_box.move(240, 200) # Connect the button to method or slot self.button.clicked.connect(self.handle_button_click) def handle_button_click(self): text = self.line_edit.text() self.result_label.setText(f"Hello, {text}!") if self.check_box.isChecked(): self.text_edit.append("Subscribed to newsletter!") else: self.text_edit.append("Not subscribed to newsletter.") selected_option = self.combo_box.currentText() self.text_edit.append(f"Selected option: {selected_option}") if __name__ == '__main__': app = QApplication([]) window = MyApplication() window.show() app.exec() |
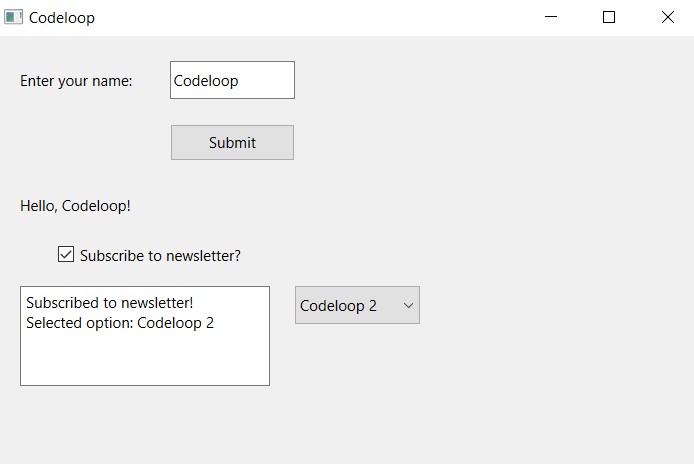
This code adds check box, text edit widget and combo box to our Python PyQt6 GUI Application. handle_button_click() method is updated to display whether or not the user subscribed to newsletter, as well as the currently selected item in the combo box. addItem() method is used to add options to the combo box.
Note that the text edit widget is resized using the resize() method. isChecked() method is used to determine whether or not the check box is checked. currentText() method is used to retrieve the currently selected option from the combo box.
Run the code and you will see this result

Now let’s talk about Layout Managment in Python PyQt6, right now we have our different widgets and we have aligned the widgets using the move() and setGeometry() methods, but it is not good idea to use the move() method, instead we need to use layouts, so layout management in PyQt6 is the process of arranging widgets within parent widget so that they are displayed correctly and effectively and they are using available space in correct manner. layouts allow you to position widgets in a way that is independent of the screen size or resolution. and this makes it easy to create GUI applications that works on different platforms and devices without needing to adjust the layout for each one.
In PyQt6, there are several types of layouts that you can use to manage the position of your widgets:
- QVBoxLayout – arranges widgets vertically, from top to bottom
- QHBoxLayout – arranges widgets horizontally, from left to right
- QGridLayout – arranges widgets in grid of rows and columns
- QFormLayout – arranges widgets in grid like layout where each row has label and widget
- QStackedLayout – allows you to switch between multiple layouts
Each layout has its own advantages and disadvantages depending on the complexity and size of the application. you can choose the layout that best fits your needs, and even combine different layouts within the same application.
Layouts in PyQt6 are created as separate objects, and you add widgets to them using different methods like addWidget(), addLayout() and addSpacing(). you can also set margins and spacing between widgets to improve the overall appearance of the layout.
This is the updated code using Layouts in PyQt6.
|
1 2 3 4 5 6 7 8 9 10 11 12 13 14 15 16 17 18 19 20 21 22 23 24 25 26 27 28 29 30 31 32 33 34 35 36 37 38 39 40 41 42 43 44 45 46 47 48 49 50 51 52 53 54 55 |
from PyQt6.QtWidgets import QApplication, QMainWindow, QLabel, QLineEdit, QPushButton, QTextEdit, QCheckBox, QComboBox, QVBoxLayout, QWidget class MyApplication(QMainWindow): def __init__(self): super().__init__() # Set the window title and size self.setWindowTitle("GeeksCoders") self.setGeometry(100, 100, 500, 300) # Create the widgets self.label = QLabel("Enter your name:") self.line_edit = QLineEdit() self.button = QPushButton("Submit") self.result_label = QLabel() self.check_box = QCheckBox("Subscribe to newsletter?") self.text_edit = QTextEdit() self.combo_box = QComboBox() self.combo_box.addItem("Codeloop 1") self.combo_box.addItem("Codeloop 2") self.combo_box.addItem("Codeloop 3") # Create a layout for the widgets layout = QVBoxLayout() layout.addWidget(self.label) layout.addWidget(self.line_edit) layout.addWidget(self.button) layout.addWidget(self.result_label) layout.addWidget(self.check_box) layout.addWidget(self.text_edit) layout.addWidget(self.combo_box) # Set the layout on a central widget central_widget = QWidget() central_widget.setLayout(layout) self.setCentralWidget(central_widget) # Connect the button to a method self.button.clicked.connect(self.handle_button_click) def handle_button_click(self): text = self.line_edit.text() self.result_label.setText(f"Hello, {text}!") if self.check_box.isChecked(): self.text_edit.append("Subscribed to newsletter!") else: self.text_edit.append("Not subscribed to newsletter.") selected_option = self.combo_box.currentText() self.text_edit.append(f"Selected option: {selected_option}") if __name__ == '__main__': app = QApplication([]) window = MyApplication() window.show() app.exec() |
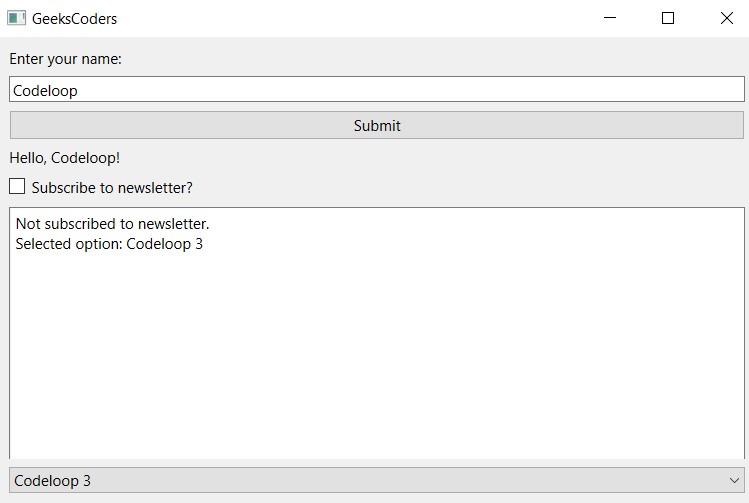
This code uses QVBoxLayout to arrange the widgets vertically. widgets are added to the layout using addWidget() method. after that layout is set on central widget using the setLayout() method. and finally central widget is set as the main widget using the setCentralWidget() method.
Using layouts you can easily manage placement of widgets in your application, and helps ensure that your application looks good on different screen sizes and resolutions.
Run your new code and if you see this screen then you are good to go

FAQS about PyQt6
Q: What is PyQt6?
A: PyQt6 is a set of Python bindings for Qt application framework. Using PyQt6 Python programmers can graphical user interfaces (GUIs) using Qt, Qt is a powerful cross-platform application framework widely used for developing software applications.
Q: Is PyQt6 free to use?
A: PyQt6 is available under the GPL and commercial license. This means that if your project is open source and compatible with the GPL, you can use PyQt6 for free. But if you’re developing commercial application, you’ll need to purchase a commercial license.
Q: What are the main differences between PyQt5 and PyQt6?
A: PyQt6 is the latest release of PyQt, and it introduces different changes and improvements than PyQt5, and the main difference between PyQt5 and PyQt6 is, that there are changes in module names and organization, improved type annotations, and removal of deprecated features.
Q: Can I migrate my PyQt5 code to PyQt6?
A: Yes, you can migrate PyQt5 code to PyQt6, but it may require some modifications due to changes in the API and module organization. PyQt6 provides tools and guides to help with the migration process.
Q: Does PyQt6 support Qt Designer?
A: Yes, PyQt6 includes support for Qt Designer, Qt Designer is a graphical tool for designing and building Qt based GUIs. You can design your UI with Qt Designer and after that you can load the UI file or convert the UI file to PY file.
Q: Is PyQt6 cross-platform?
A: Yes, PyQt6 like Qt itself is cross platform GUI framework. It allows you to develop applications that can run on different operating systems, including Windows, macOS, Linux, and others without significant modifications to the codebase.
Q: How can I install PyQt6?
A: PyQt6 can be installed using pip, you can install it by running pip install PyQt6 in your terminal or command prompt.
Q: Are there any resources available for learning PyQt6?
A: Yes there are a lot of resources available for learning PyQt6, You can use official documentation of PyQt6, tutorials, books and online courses. You can also find helpful community forums and discussion groups where you can ask questions and seek assistance. there is a good course in Udemy on PyQt6 in the name of (PyQt6 GUI Development with Qt Designer ) that you can join.
Learn More
- Working with Qt Designer in PyQt5
- Create CheckBox in PyQt5 with Qt Designer
- PyQt5 Radiobutton in Qt Designer
Subscribe and Get Free Video Courses & Articles in your Email