This is our fifteenth article in Django, in this article we are going to learn about Django Creating Forms with Form Class , so there are two ways that you can create Forms in Django, the first way is that you can use Form class and the second way is by using Model Form class, particularly in this article we are going to use Form Class.
Flask Web Development Tutorials
1: Flask CRUD Application with SQLAlchemy
2: Flask Creating News Web Application
3: Flask Creating REST API with Marshmallow
Python GUI Development Tutorials
1: PyQt5 GUI Development Tutorials
2: Pyside2 GUI Development Tutorials
3: wxPython GUI Development Tutorials
4: Kivy GUI Development Tutorials
5: TKinter GUI Development Tutorials
So now we need to create a New Project in Django, also for django installation and creating New Project you can read this article Django Introduction & Installation. but you can use this command for creating of the New Project.
|
1 |
django-admin startproject DjangoProject |
After creating of the Django Project, you need to migrate your project. make sure that you have changed the directory to the created project.
|
1 |
python manage.py migrate |
Now you will receive this output in the terminal.
|
1 2 3 4 5 6 7 8 9 10 11 12 13 14 15 16 17 18 19 20 |
Operations to perform: Apply all migrations: admin, auth, contenttypes, sessions Running migrations: Applying contenttypes.0001_initial... OK Applying auth.0001_initial... OK Applying admin.0001_initial... OK Applying admin.0002_logentry_remove_auto_add... OK Applying admin.0003_logentry_add_action_flag_choices... OK Applying contenttypes.0002_remove_content_type_name... OK Applying auth.0002_alter_permission_name_max_length... OK Applying auth.0003_alter_user_email_max_length... OK Applying auth.0004_alter_user_username_opts... OK Applying auth.0005_alter_user_last_login_null... OK Applying auth.0006_require_contenttypes_0002... OK Applying auth.0007_alter_validators_add_error_messages... OK Applying auth.0008_alter_user_username_max_length... OK Applying auth.0009_alter_user_last_name_max_length... OK Applying auth.0010_alter_group_name_max_length... OK Applying auth.0011_update_proxy_permissions... OK Applying sessions.0001_initial... OK |
So after doing this, let’s create our Django App, i have already talked about Django App in one of my articles, you can check this Django Apps & URL Routing.
|
1 |
python manage.py startapp MyApp |
After creation of the App, you need to add the created App in your settings.py file INSTALLED_APP section .
|
1 2 3 4 5 6 7 8 9 |
INSTALLED_APPS = [ 'django.contrib.admin', 'django.contrib.auth', 'django.contrib.contenttypes', 'django.contrib.sessions', 'django.contrib.messages', 'django.contrib.staticfiles', 'MyApp', ] |
Now open your models.py in your MyApp App, and add your model, this is a basic model with four fields, you can read my article on django models Django Models Introduction.
|
1 2 3 4 5 6 7 8 9 10 11 12 13 14 15 |
from django.db import models # Create your models here. class RegistrationData(models.Model): username = models.CharField(max_length=100) password = models.CharField(max_length=100) email = models.CharField(max_length=100) phone = models.CharField(max_length=100) def __str__(self): return self.username |
After adding a new model in Django, first you need to create migrations file and after that you need to add your model to the database, by default Django uses Sqlite database, for mysql database connection you can read this article Django Mysql Database Connection. make sure that you have changed directory to your project.
|
1 |
python manage.py makemigrations |
Now you will see this output in the terminal.
|
1 2 3 |
Migrations for 'MyApp': MyApp\migrations\0001_initial.py - Create model RegistrationData |
It is time to add our this model to the database, so for this you need to do migrate.
|
1 |
python manage.py migrate |
After this our model data has been successfully added to the Sqlite database.
OK now let’s just add our model to the Django admin panel, you can read this article for django super user Django Creating Super User. open your admin.py file and add this code.
|
1 2 3 4 5 6 |
from django.contrib import admin from .models import RegistrationData # Register your models here. admin.site.register(RegistrationData) |
It’s time to create our form, now you need to create a new Python file in your app, i have named forms.py, but you can name it what ever you want.
|
1 2 3 4 5 6 7 8 9 |
from django import forms class RegistrationForm(forms.Form): username = forms.CharField(max_length=100) password = forms.CharField(max_length=100) email = forms.EmailField(max_length=100) phone = forms.CharField(max_length=100) |
Before adding our html files, we need to create our views, so open your views.py file and add this code for creating a simple view. and you can see in the view we have passed the form as context variable to the django template.
|
1 2 3 4 5 6 7 8 9 10 11 12 13 |
from django.shortcuts import render from .forms import RegistrationForm # Create your views here. def register(request): context = {"form":RegistrationForm} return render(request, "index.html", context) |
Now we are going to render this form in our html file, so you need to create a new directory in your Django Project called templates, and in the templates folder add two html files, the first one is index.html and the second one is base.html. for django templates you can read this article Django Templates Introduction. also make sure that you have added your templates name in the templates section of settings.py file like this.
|
1 2 3 4 |
TEMPLATES = [ { 'BACKEND': 'django.template.backends.django.DjangoTemplates', 'DIRS': ["templates"], # templates name added here |
This is our base.html file, also you can see that in the base.html we have added the Bootstrap CDN link, because in this article we are going to use from Bootstrap styles. also you can check this article for adding styles to your Django Project Django Adding Bootstrap & CSS.
|
1 2 3 4 5 6 7 8 9 10 11 12 13 14 15 16 17 18 19 |
<!DOCTYPE html> <html lang="en"> <head> <meta charset="UTF-8"> <!-- CSS only --> <link rel="stylesheet" href="https://stackpath.bootstrapcdn.com/bootstrap/4.5.0/css/bootstrap.min.css" integrity="sha384-9aIt2nRpC12Uk9gS9baDl411NQApFmC26EwAOH8WgZl5MYYxFfc+NcPb1dKGj7Sk" crossorigin="anonymous"> <title>{% block title %}{% endblock %}</title> </head> <body> {% block body %} {% endblock %} </body> </html> |
This is our index.html file and we are going to render our simple form in here.
|
1 2 3 4 5 6 7 8 9 10 11 12 13 14 15 16 17 18 19 20 21 22 23 24 25 26 27 |
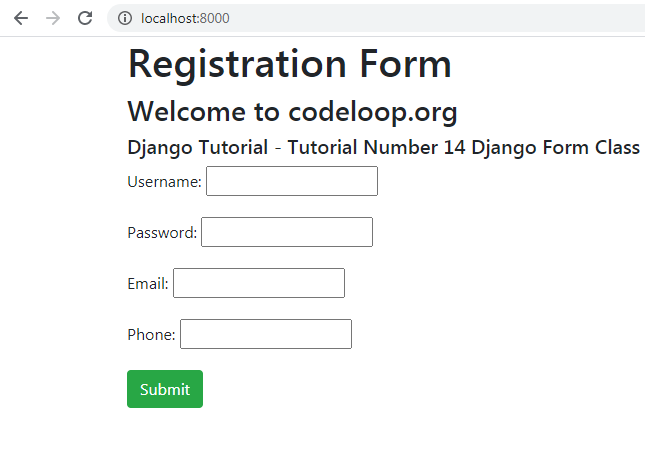
{% extends 'base.html' %} {% block title %} Registration {% endblock %} {% block body %} <div class="container"> <h1>Registration Form</h1> <h3>Welcome to codeloop.org</h3> <h5>Django Tutorial - Tutorial Number 14 Django Form Class</h5> <form action="" method="post"> {{form.as_p}} <input type="submit" class="btn btn-success" value="Submit"/> </form> </div> {% endblock %} |
Also you need to create your urls, you can read this article for url routing Django Apps & URL Routing . but just create a new python file in your MyApp app at name of urls.py and add these codes. you can see that we have added our one url for the registration view in here.
|
1 2 3 4 5 6 7 |
from django.urls import path from .views import register urlpatterns = [ path('', register, name = "register"), ] |
And also you need to include your app urls.py in your project urls.py file.
|
1 2 3 4 5 6 7 8 |
from django.contrib import admin from django.urls import path, include urlpatterns = [ path('admin/', admin.site.urls), path('', include('MyApp.urls')) ] |
Now you can run your project and we have our simple form.
|
1 |
python manage.py runserver |
http://localhost:8000/
Now let’s add some users from our form to our database, OK we have already created our model at the top. open your views.py and add a new view function for adding data . you can see along with our previous view, we have added a new view function. basically we are going to create the object of our form, than we are checking that if our form is valid, if it was valid we are simply adding the data from our form to the database.
|
1 2 3 4 5 6 7 8 9 10 11 12 13 14 15 16 17 18 19 20 21 22 23 24 25 26 27 |
from django.shortcuts import render, redirect from .forms import RegistrationForm from .models import RegistrationData # Create your views here. def register(request): context = {"form":RegistrationForm} return render(request, "index.html", context) def addUser(request): form = RegistrationForm(request.POST) if form.is_valid(): register_user = RegistrationData(username = form.cleaned_data['username'], password=form.cleaned_data['password'], email=form.cleaned_data['email'], phone=form.cleaned_data['phone']) register_user.save() return redirect('register') |
Also you need to add this view function in your urls.py file.
|
1 2 3 4 5 6 7 8 |
from django.urls import path from .views import register, addUser urlpatterns = [ path('', register, name = "register"), path('register/', addUser, name = "addUser"), ] |
Open your index.html and bring some changes, first we have added our new url name to the form action, also when you are going to work with the forms, you need to add csrf_token in your html file.
|
1 2 3 4 5 6 7 8 9 10 11 12 13 14 15 16 17 18 19 20 21 22 23 24 25 26 27 |
{% extends 'base.html' %} {% block title %} Registration {% endblock %} {% block body %} <div class="container"> <h1>Registration Form</h1> <h3>Welcome to codeloop.org</h3> <h5>Django Tutorial - Tutorial Number 14 Django Form Class</h5> <form action="{% url 'addUser' %}" method="post"> {% csrf_token %} {{form.as_p}} <input type="submit" class="btn btn-success" value="Submit"/> </form> </div> {% endblock %} |
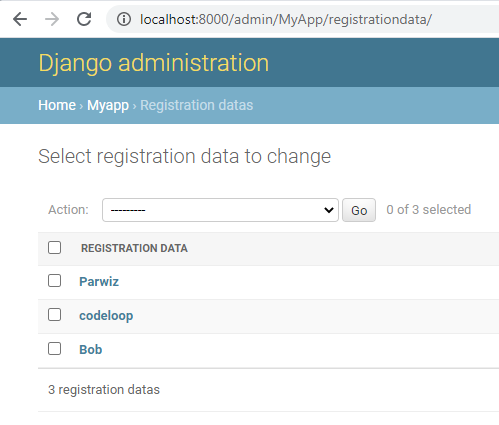
Now you can run your project, add some data using the form. after that check your admin panel you will see the registered users.
|
1 |
python manage.py runserver |
http://localhost:8000/admin/MyApp/registrationdata/
Converting HTML Form to Django Form
If you take a look at our form design it is not looking good, now we are going to add some design from Bootstrap forms and after that we convert our form to Django Form.
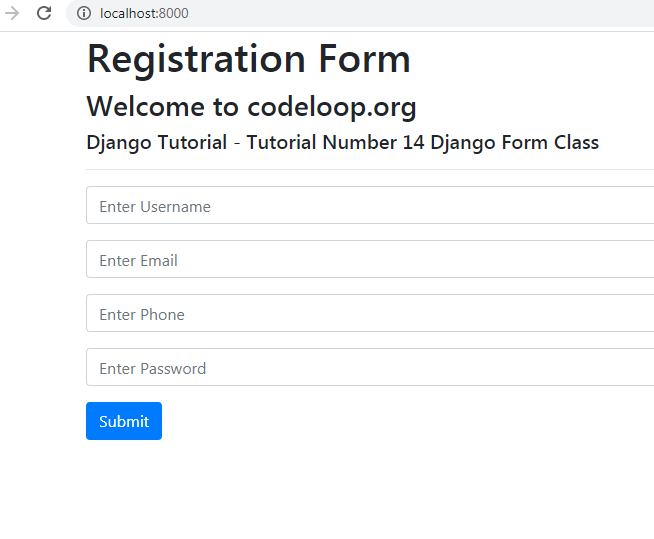
Now we are going to bring some changes in our index.html file, and we need to remove our previous form and add some stylish form from the Bootstrap.
|
1 2 3 4 5 6 7 8 9 10 11 12 13 14 15 16 17 18 19 20 21 22 23 24 25 26 27 28 29 30 31 32 33 34 35 36 37 38 39 40 41 42 43 44 45 46 47 |
{% extends 'base.html' %} {% block title %} Registration {% endblock %} {% block body %} <div class="container"> <h1>Registration Form</h1> <h3>Welcome to codeloop.org</h3> <h5>Django Tutorial - Tutorial Number 14 Django Form Class</h5> <hr/> <form action="{% url 'addUser' %}" method="post"> {% csrf_token %} <div class="form-group"> <input type="text" class="form-control" placeholder="Enter Username"> </div> <div class="form-group"> <input type="email" class="form-control" placeholder="Enter Email"> </div> <div class="form-group"> <input type="number" class="form-control" placeholder="Enter Phone"> </div> <div class="form-group"> <input type="password" class="form-control" placeholder="Enter Password"> </div> <input type="submit" value="Submit" class="btn btn-primary"/> </form> </div> {% endblock %} |
Now if you run the project this will be the result
http://localhost:8000/
Now let’s convert this form to Django form.
First of all open your forms.py file and bring changes to your form like this.
|
1 2 3 4 5 6 7 8 9 10 11 12 13 14 15 16 |
from django import forms class RegistrationForm(forms.Form): username = forms.CharField(max_length=100, widget=forms.TextInput(attrs={'class':'form-control', 'placeholder':'Enter Username'})) password = forms.CharField(max_length=100 , widget=forms.PasswordInput(attrs={'class': 'form-control', 'placeholder': 'Enter Password'})) email = forms.EmailField(max_length=100 , widget=forms.EmailInput(attrs={'class':'form-control', 'placeholder':'Enter Email'})) phone = forms.CharField(max_length=100, widget=forms.NumberInput(attrs={'class':'form-control', 'placeholder':'Enter Phone'})) |
Also you need to bring changes in your index.html, so open that and add this code.
|
1 2 3 4 5 6 7 8 9 10 11 12 13 14 15 16 17 18 19 20 21 22 23 24 25 26 27 28 29 30 31 32 33 34 35 36 37 38 39 40 41 42 43 44 45 46 47 |
{% extends 'base.html' %} {% block title %} Registration {% endblock %} {% block body %} <div class="container"> <h1>Registration Form</h1> <h3>Welcome to codeloop.org</h3> <h5>Django Tutorial - Tutorial Number 14 Django Form Class</h5> <hr/> <form action="{% url 'addUser' %}" method="post"> {% csrf_token %} <div class="form-group"> {{form.username}} </div> <div class="form-group"> {{form.email}} </div> <div class="form-group"> {{form.phone}} </div> <div class="form-group"> {{form.password}} </div> <input type="submit" value="Submit" class="btn btn-primary"/> </form> </div> {% endblock %} |
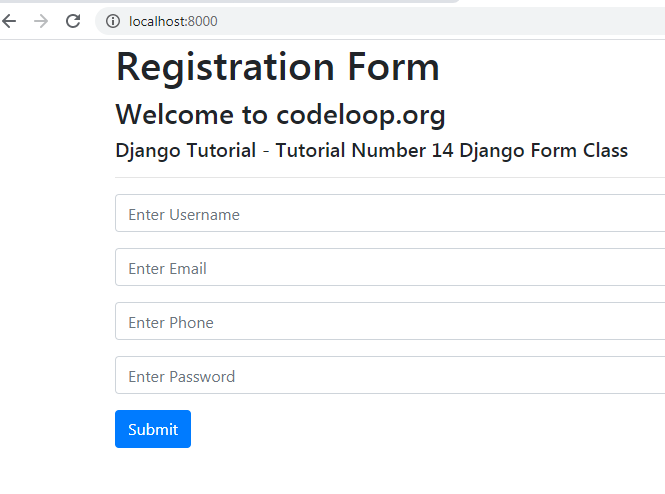
So now run the project and you can see that we have a nice form, but this time it is a Django form not Bootstrap form , and now you can add users to your database.
|
1 |
python manage.py runserver |
http://localhost:8000/
Subscribe and Get Free Video Courses & Articles in your Email
