In this we article we are going to have Introduction To PyQt5 QRadialGradient Color.
The QRadialGradient class is used in combination with QBrush to specify a radial gradient brush.Simple radial gradients interpolate colors between a focal point and end points on a circle surrounding it. Extended radial gradients interpolate colors between a focal circle and a center circle. Points outside the cone defined by the two circles will be transparent. For simple radial gradients the focal point is adjusted to lie inside the center circle, whereas the focal point can have any position in an extended radial gradient.
More article on QPainter class In PyQt5
This the complete code for PyQt5 QRadialGradient Color
|
1 2 3 4 5 6 7 8 9 10 11 12 13 14 15 16 17 18 19 20 21 22 23 24 25 26 27 28 29 30 31 32 33 34 35 36 37 38 39 40 41 42 43 44 45 46 47 48 49 50 51 |
from PyQt5 import QtGui from PyQt5.QtWidgets import QApplication, QMainWindow import sys import sys from PyQt5.QtGui import QPainter, QBrush, QPen, QRadialGradient from PyQt5.QtCore import Qt, QPoint class Window(QMainWindow): def __init__(self): super().__init__() self.title = "Codeloop.org - PyQt5 RadialGradient" self.top = 100 self.left = 100 self.width = 680 self.height = 500 self.InitWindow() def InitWindow(self): self.setWindowIcon(QtGui.QIcon("codeloop.png")) self.setWindowTitle(self.title) self.setGeometry(self.top, self.left, self.width, self.height) self.show() def paintEvent(self, event): painter = QPainter(self) painter.setPen(QPen(Qt.black, 4, Qt.SolidLine)) radialGradient = QRadialGradient(QPoint(100,100), 100) # center point and radious radialGradient.setColorAt(0.4, Qt.white) radialGradient.setColorAt(0.8, Qt.green) radialGradient.setColorAt(1.0, Qt.black) painter.setBrush(QBrush(radialGradient)) painter.drawRect(10,10, 200,200) App = QApplication(sys.argv) window = Window() sys.exit(App.exec()) |
In the above code:
- Setting up PyQt5 Window: We have defined PyQt5 window (Window), this window inherits from QMainWindow. We set properties like window title, position, size and icon.
- Initializing PyQt5 Window: In the InitWindow method, we configure the window properties and display it.
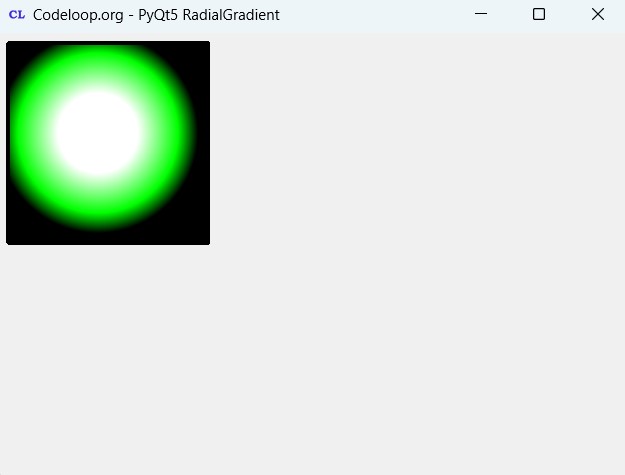
- Drawing the Radial Gradient Rectangle:In the paintEvent method, we use a QPainter to draw shapes and fill colors. We have created QRadialGradient object with specified colors and positions. After that we set this gradient as the brush for the painter and draw a rectangle with the gradient fill.
- Running PyQt5 Application: We create an instance of the QApplication class (App), create an instance of our Window class (window), and run the application event loop with App.exec().
This method is for drawing of our shapes in PyQt5, in this method first we have created a QPainter object and after that we have created QRadialGradient object and we have set the color for QRadialGradient.
|
1 2 3 4 5 6 7 8 9 10 11 12 13 14 |
def paintEvent(self, event): painter = QPainter(self) painter.setPen(QPen(Qt.black, 4, Qt.SolidLine)) radialGradient = QRadialGradient(QPoint(100,100), 100) # center point and radious radialGradient.setColorAt(0.4, Qt.white) radialGradient.setColorAt(0.8, Qt.green) radialGradient.setColorAt(1.0, Qt.black) painter.setBrush(QBrush(radialGradient)) painter.drawRect(10,10, 200,200) |
Run the complete code and this will be the result

FAQs:
What is PyQt5 used for?
PyQt5 is Python binding for Qt framework. PyQt5 is used for creating desktop applications with graphical user interfaces (GUIs). Using PyQt5 you can create cross-platform applications that run on Windows, macOS, Linux and different other platforms.
How to design a GUI using PyQt5?
You can design a GUI using PyQt5 by creating a subclass of QWidget or QMainWindow , and after that you can add different widgets like buttons, labels, text inputs etc. Also you can use Qt Designer in PyQt5 , Qt Designer is visual design tool, and it used to design your GUI by dragging and dropping widgets in to canvas and then convert the .ui file generated by Qt Designer into Python code using pyuic5.
What is the difference between PySide and PyQt?
PySide and PyQt are both Python bindings for Qt framework, using these two libraries we can create GUI applications in Python. The main difference is in their licensing and development. PyQt is developed by Riverbank Computing and it is available under the GNU GPL and also commercial license, but PySide is developed by Qt for Python project (formerly PySide2 by The Qt Company) and is available under the LGPL. both libraries provide similar capabilities, but the choice between them often comes down to licensing requirements and project constraints.
Subscribe and Get Free Video Courses & Articles in your Email
Havіng read this I thought it was very enliɡhtening.
I apprecіаte you spending some time and enerɡy to put
tһis article together. I once again find myseⅼf spending a significant amount of time
both reading and posting comments. But so what, it was still worthwhile!
Thanks from your thought