Creating your first Python GUI application is great way to get started with GUI programming. this is simple example of How to Create Your First Python GUI Application using PyQt6 library, as you know when you want to build Python GUI Application, you have different libraries and choices, for example we have TKinter, PyQt6, PySide6 and wxPython. in this article we want to create our first Python GUI Application using PyQt6 library.
Introduction to GUI Programming
Graphical User Interface (GUI) programming is an important part of modern software development, because using GUI’s, you can create nice and visually appealing interfaces for your applications. Unlike traditional command-line interfaces (CLI), GUIs allow users to interact with software through graphical elements such as buttons, menus, and windows, making applications more accessible and user-friendly.
Python Developers & GUI Programming
Python developers can greatly benefit from learning GUI programming, because it opens up opportunities to create different types of applications with nice and beautiful user interfaces. This is why GUI programming is valuable for Python developers:
- Different Application Development Types: GUI programming allows Python developers to create different types of applications across different domains such as desktop software, web applications, scientific tools, educational software, games and more. With GUI frameworks like PyQt6, Tkinter, PySide6 and wxPython, you have the flexibility to build applications according to your specific needs and target platforms.
- Cross-Platform Compatibility: Many GUI frameworks for Python, such as PyQt6 and Tkinter, offer cross-platform compatibility, and using these GUI Frameworks you can write code once and deploy it on multiple platforms without significant modifications. This makes it easier for developers to reach a broader audience and ensures consistent user experiences across different operating systems.
- Community Support: Python has large and active community, and it provides a lot of support and resources for GUI programming. Developers can find tutorials, documentation, and open-source projects to help them learn and master GUI programming concepts using Python.
What is PyQt6?
PyQt6 is a set of Python bindings for Qt, Qt is a cross-platform application framework. Qt allows you to create applications with a native look and feel for different operating systems, including Windows, macOS, Linux, and mobile platforms using C++ programming language.
PyQt6 enables Python developers to access Qt’s functionality and create graphical user interfaces (GUIs) for their applications using Python. It provides modules and classes that allows you to create windows, dialogs, buttons, menus, and other GUI components, also you can handle events and signals.
PyQt6 Vs PyQt5?
PyQt6 is the latest version of PyQt, It offers support for Qt 6, the newest major version of the Qt framework. Also it provides enhancements and improvements over previous versions, including better compatibility with Qt 6 and Python 3.9. on the other hand PyQt5 is the previous version.
How to Install PyQt6?
You can use pip for the installation of PyQt6, open your command prompt or terminal and write this command.
|
1 |
pip install PyQt6 |
To Create Your First Python GUI Application with Python, you need to follow these steps:
- Import required classes from Python PyQt6 library
|
1 2 |
import sys from PyQt6.QtWidgets import QApplication, QLabel, QMainWindow |
- Create QMainWindow instance
|
1 2 |
window = QMainWindow() window.setWindowTitle("My First GUI App") |
- Create QLabel instance
|
1 2 |
label = QLabel(window) label.setText("Welcome to codeloop.org") |
- Set label position within the main window
|
1 |
label.move(50, 50) |
- Show the main window
|
1 |
window.show() |
- Execute the application’s event loop
|
1 |
sys.exit(app.exec()) |
This is the complete code
|
1 2 3 4 5 6 7 8 9 10 11 12 13 14 15 16 17 18 19 20 21 22 23 24 25 26 |
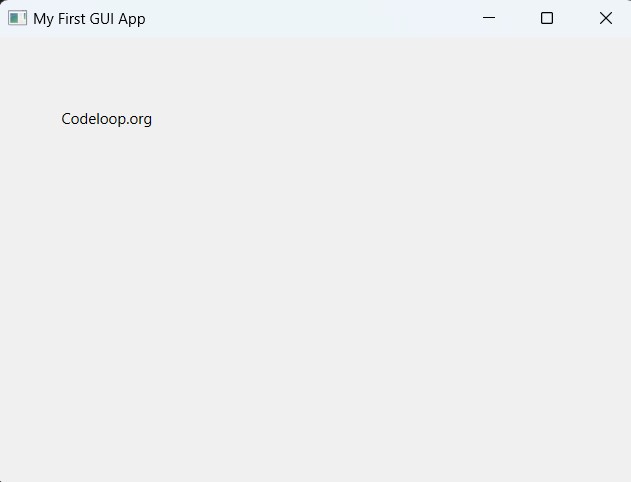
import sys from PyQt6.QtWidgets import QApplication, QLabel, QMainWindow def main(): # Create QApplication instance app = QApplication(sys.argv) # Create QMainWindow instance window = QMainWindow() window.setWindowTitle("My First GUI App") # Create QLabel instance label = QLabel(window) label.setText("Codeloop.org") # Set label position within the main window label.move(50, 50) # Show the main window window.show() # Execute the application's event loop sys.exit(app.exec()) if __name__ == "__main__": main() |
Run the code and this will be the result

Create More Complex GUIs with Python – Build PyQt6 Calculator
Now we have created a basic Python GUI using PyQt6, now let’s create complex Python GUI, and this time we want to create a calculator with Python PyQt6.
How to Build Calculator with Python Code Example
|
1 2 3 4 5 6 7 8 9 10 11 12 13 14 15 16 17 18 19 20 21 22 23 24 25 26 27 28 29 30 31 32 33 34 35 36 37 38 39 40 41 42 43 44 45 46 47 48 49 50 51 52 53 54 55 56 57 58 59 60 61 62 63 64 65 66 67 68 69 70 71 72 73 74 75 76 77 78 79 80 81 82 83 84 85 86 87 88 89 90 91 92 93 94 95 96 97 98 |
import sys from PyQt6.QtWidgets import QApplication, QMainWindow, QWidget, QVBoxLayout, QGridLayout, QPushButton, QLineEdit from PyQt6.QtGui import QIcon class CalculatorApp(QMainWindow): def __init__(self): super().__init__() # Set window title self.setWindowTitle("Codeloop - Calculator") # Set window icon self.setWindowIcon(QIcon('python.png')) # Create central widget self.central_widget = QWidget() # Set central widget self.setCentralWidget(self.central_widget) # Create vertical layout for central widget self.layout = QVBoxLayout(self.central_widget) # Create line edit widget for display self.display = QLineEdit() # Add display widget to layout self.layout.addWidget(self.display) # Create grid layout for buttons buttons_layout = QGridLayout() # Define buttons with their text and position in the grid buttons = [ ("7", 0, 0), ("8", 0, 1), ("9", 0, 2), ("/", 0, 3), ("4", 1, 0), ("5", 1, 1), ("6", 1, 2), ("*", 1, 3), ("1", 2, 0), ("2", 2, 1), ("3", 2, 2), ("-", 2, 3), ("0", 3, 0), (".", 3, 1), ("=", 3, 2), ("+", 3, 3) ] # Create buttons and connect their click # event to on_button_click method for text, row, col in buttons: button = QPushButton(text) buttons_layout.addWidget(button, row, col) button.clicked.connect(self.on_button_click) # Add buttons layout to central widget layout self.layout.addLayout(buttons_layout) def on_button_click(self): # Get the button that triggered the event button = self.sender() if button: # Get the text of the button text = button.text() if text == "=": # Get the expression from the display expression = self.display.text() try: # Evaluate the expression result = eval(expression) # Display the result self.display.setText(str(result)) except Exception as e: # Display error message if evaluation fails self.display.setText("Error") else: # Get current text from display current_text = self.display.text() # Append button text to display text self.display.setText(current_text + text) def main(): # Create application instance app = QApplication(sys.argv) # Create main window instance window = CalculatorApp() # Show main window window.show() # Execute application event loop sys.exit(app.exec()) if __name__ == "__main__": main() |
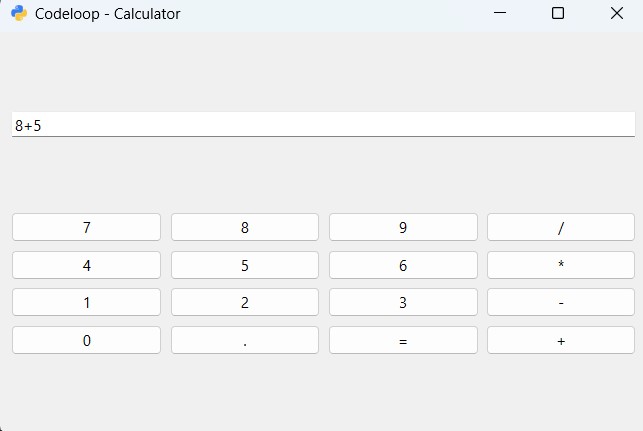
In this example, we have create a simple Python GUI calculator application using PyQt6. this application has a main window with a text input field for displaying the calculation result and a grid of buttons for inputting numbers and operations.
CalculatorApp class inherits from QMainWindow and sets up the main window with a central widget and layout. The calculator display is implemented using a QLineEdit widget, and the buttons are arranged using a QGridLayout.
Each button in the grid corresponds to a digit, arithmetic operation or equals sign. By clicking a button, we appends its text to the display, and it allows users to input numbers and operations. When the equals button is clicked, the expression entered by the user is evaluated using Python eval() function, and the result is displayed in the calculator’s display field.
The main() function creates an instance of the CalculatorApp class, and it shows the main window, and starts the application event loop.
This example demonstrates how to create more complex GUI application with Python & PyQt6, because we have integrated multiple widgets, and also we are handling user interactions to perform calculations. Users can use this calculator to perform basic arithmetic operations inside the GUI environment.
Run the code and this will be the result

Subscribe and Get Free Video Courses & Articles in your Email