In this article i want to show you How to Create QSplitter in PyQt5. the QSplitter is an organizer class widget in PyQt5 , which provides a way to insert child widgets which can then be given varying amounts of space. The amount of space allowed is adjusted by the user using a handle on the Splitter. The widget is commonly seen in File Managers and Web Browsers where the main content may also need to share space with a sidepanel such as a tree view or bookmark list.
What is QSplitter in PyQt5 ?
PyQt5 QSplitter is graphical user interface (GUI) widget provided by the PyQt5 library. it allows the user to resize and adjust the size of two or more child widgets by dragging separator between them. QSplitter widget is commonly used as a user interface control for adjusting the size and layout of different areas of the GUI.
PyQt5 QSplitter widget is typically used in conjunction with other layout managers to create flexible and resizable user interfaces. child widgets can be added to the splitter using addWidget() method and the orientation of the splitter can be set to either horizontal or vertical using the setOrientation() method.
also to its basic functionality PyQt5 QSplitter widget provides several properties and signals that can be used to customize its behavior and respond to user interaction. for example sizes() property returns the current size of each child widget in the splitter, and splitterMoved() signal is emitted whenever user moves the separator to new position.
So we can say that PyQt5 QSplitter is useful widget for creating flexible and resizable user interfaces with multiple areas that can be adjusted by the user.
Also you can read more Python GUI articles in the below links
- Kivy GUI Development Tutorials
- TKinter GUI Development Tutorials
- Pyside2 GUI Development
- wxPython GUI Development Tutorials
- PyQt5 GUI Development Tutorials
First we need some imports
|
1 2 3 4 |
from PyQt5 import QtGui from PyQt5.QtWidgets import QApplication, QWidget, QFrame, QLineEdit, QHBoxLayout, QSplitter import sys from PyQt5.QtCore import Qt |
After that we are going to create our main Window class that extends from QWidget. and in the constructor of the class we need to add some requirements of the window like set window title, window icon and window geometry.
|
1 2 3 4 5 6 7 8 9 10 11 12 13 |
class Window(QWidget): def __init__(self): super().__init__() self.title = "PyQt5 Splitter" self.top = 200 self.left = 500 self.width = 400 self.height = 300 self.setWindowIcon(QtGui.QIcon("icon.png")) self.setWindowTitle(self.title) self.setGeometry(self.left, self.top, self.width, self.height) self.show() |
In here we have created the QHBoxLayout and QFrame object.
|
1 2 |
hbox = QHBoxLayout() left = QFrame() |
Also every PyQt5 application must create an application object. The sys.argv parameter is a list of arguments from a command line.
|
1 |
App = QApplication(sys.argv) |
Finally, we enter the mainloop of the application. The event handling starts from this point. The mainloop receives events from the window system and dispatches them to the application widgets.
|
1 2 |
window = Window() sys.exit(App.exec_()) |
Complete source code for How To Create PyQt5 QSplitter With Example
|
1 2 3 4 5 6 7 8 9 10 11 12 13 14 15 16 17 18 19 20 21 22 23 24 25 26 27 28 29 30 31 32 33 34 35 36 37 |
from PyQt5 import QtGui from PyQt5.QtWidgets import QApplication, QWidget, QFrame, QLineEdit, QHBoxLayout, QSplitter import sys from PyQt5.QtCore import Qt class Window(QWidget): def __init__(self): super().__init__() self.title = "PyQt5 Splitter" self.top = 200 self.left = 500 self.width = 400 self.height = 300 hbox = QHBoxLayout() left = QFrame() left.setFrameShape(QFrame.StyledPanel) bottom = QFrame() bottom.setFrameShape(QFrame.StyledPanel) splitter1 = QSplitter(Qt.Horizontal) splitter1.setStyleSheet('background-color:red') lineedit = QLineEdit() lineedit.setStyleSheet('background-color:green') splitter1.addWidget(left) splitter1.addWidget(lineedit) splitter1.setSizes([200,200]) spliiter2 = QSplitter(Qt.Vertical) spliiter2.addWidget(splitter1) spliiter2.addWidget(bottom) spliiter2.setStyleSheet('background-color:yellow') hbox.addWidget(spliiter2) self.setLayout(hbox) self.setWindowIcon(QtGui.QIcon("icon.png")) self.setWindowTitle(self.title) self.setGeometry(self.left, self.top, self.width, self.height) self.show() App = QApplication(sys.argv) window = Window() sys.exit(App.exec_()) |
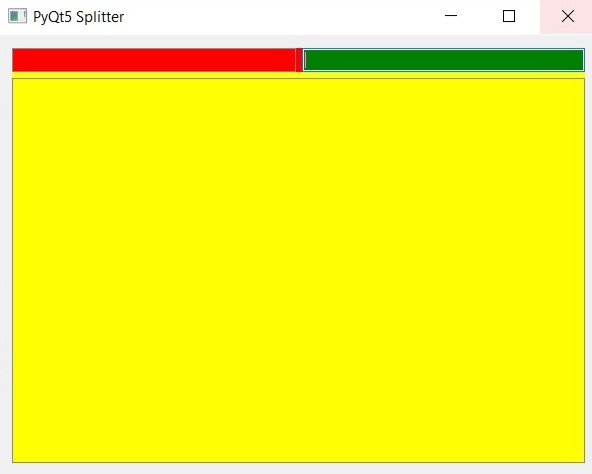
Run complete and this will be the result

Subscribe and Get Free Video Courses & Articles in your Email