Creating Frame in PyQt5 (QFrame): Building a Structured GUI
In this PyQt5 article i want to show you How To Create Frame In PyQt5 (QFrame) with QFrame class, it is a fundamental component in PyQt5 for building graphical user interfaces (GUI) in Python desktop applications.
Introduction to PyQt5 and QFrame
PyQt5 is a widely used Python library for developing desktop applications with a graphical user interface (GUI). It offers a variety of widgets, including frames, which are essential for organizing different elements of the GUI. Frames provide a means to group widgets, facilitating more organized layout.
Installation of PyQt5
So before starting our coding we need to install PyQt5. you can do this using pip, a package manager for Python. Open your terminal and type the following command:
|
1 |
pip install PyQt5 |
Initializing PyQt5 and QFrame
So after installation, now can create our frame, to create a frame, we first need to import the necessary modules. open your Python code editor and add the following code at the top of your file:
|
1 2 3 |
import sys from PyQt5.QtWidgets import QApplication, QFrame, QWidget from PyQt5.QtGui import QColor |
The first line imports the sys module, which is built in module that provides access to some variables used or maintained by the interpreter and to functions that interact strongly with the interpreter. second line imports the QApplication, QFrame and QWidget classes from the PyQt5.QtWidgets module, which is a module that contains different classes for building GUI applications. third line imports the QColor class from the PyQt5.QtGui module, which is a module that contains classes for handling graphical user interface objects and their display.
Creating the Main Window
After that we need to create main window for our application. add the following code:
|
1 2 3 4 5 6 7 8 9 |
class MainWindow(QWidget): def __init__(self): super().__init__() self.initUI() def initUI(self): self.setGeometry(100, 100, 400, 300) self.setWindowTitle('PyQt5 Frame Example') |
This creates new class called MainWindow that inherits from the QWidget class. init() method initializes the class and calls the initUI() method, which sets the size of the window and sets the window title.
Creating the Frame
Now, let’s create the frame. Add the following code:
|
1 2 3 4 5 6 7 8 9 10 11 12 13 14 |
class MainWindow(QWidget): def __init__(self): super().__init__() self.initUI() def initUI(self): self.setGeometry(100, 100, 400, 300) self.setWindowTitle('PyQt5 Frame Example') frame = QFrame(self) frame.setFrameShape(QFrame.StyledPanel) frame.setGeometry(20, 20, 360, 260) frame.setStyleSheet("background-color: #f0f0f0;") |
This creates new QFrame object and sets its shape to StyledPanel. setFrameShape() method sets the shape of the frame, and we have chosen to use the StyledPanel shape. setGeometry() method sets the position and size of the frame. setStyleSheet() method sets the background color of the frame.
Displaying the Window
And finally, we need to show the window. Add the following code:
|
1 2 3 4 5 |
if __name__ == '__main__': app = QApplication(sys.argv) window = MainWindow() window.show() sys.exit(app.exec_()) |
This initializes new QApplication object, creates new MainWindow object, shows the window, and starts the application event loop.
Now that we have created our frame, we can add widgets to it. we can add widgets like buttons, labels and text boxes to the frame just as we would add them to a window. for example to add label to the frame, we would add the following code after creating the frame:
|
1 2 |
label = QLabel('Hello World', frame) label.move( |
This is the complete code for How To Create Frame In PyQt5 (QFrame)
|
1 2 3 4 5 6 7 8 9 10 11 12 13 14 15 16 17 18 19 20 21 22 23 24 25 26 27 28 |
import sys from PyQt5.QtWidgets import QApplication, QMainWindow, QFrame from PyQt5.QtGui import QColor class Example(QMainWindow): def __init__(self): super().__init__() self.initUI() def initUI(self): # create a frame and set its properties frame = QFrame(self) frame.setFrameShape(QFrame.StyledPanel) frame.setStyleSheet("QWidget { background-color: %s }" % QColor(0, 0, 0).name()) frame.setGeometry(50, 50, 200, 200) self.setGeometry(300, 300, 350, 250) self.setWindowTitle('Frame Example') self.show() if __name__ == '__main__': app = QApplication(sys.argv) ex = Example() sys.exit(app.exec_()) |
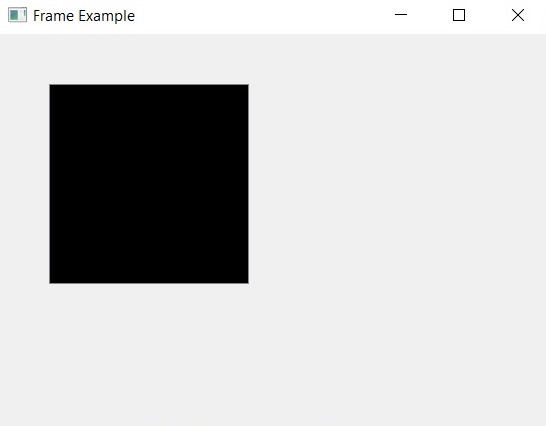
In this code we have created simple frame with black background color. we have used the QFrame class to create the frame and set its properties. after that we have set the frame’s geometry and added it to the main window. Finally, we have set the main window’s title and size and showed it on the screen.
You can customize the frame’s properties, such as its shape, border width, and color, according to your needs.
Run the code and this will be the output

Nesting Frames to Other Frames
Nesting frames inside other frames is a powerful technique in PyQt5 GUI development, because it allows you to create complex and structured layouts. This approach enables the creation of hierarchical structures inside a GUI, where frames serve as containers for organizing and grouping related widgets.
This is the complete code for PyQt5 Nested Frames
|
1 2 3 4 5 6 7 8 9 10 11 12 13 14 15 16 17 18 19 20 21 22 23 24 25 26 27 28 29 30 31 32 33 34 35 36 37 38 39 |
import sys from PyQt5.QtWidgets import QApplication, QMainWindow, QFrame, QLabel class NestedExample(QMainWindow): def __init__(self): super().__init__() self.setGeometry(100, 100, 400, 300) self.setWindowTitle('Codeloop - Nested Frames') # Create the main frame main_frame = QFrame(self) main_frame.setFrameShape(QFrame.StyledPanel) main_frame.setGeometry(50, 50, 300, 200) # Create nested frames within the main frame nested_frame1 = QFrame(main_frame) nested_frame1.setFrameShape(QFrame.StyledPanel) nested_frame1.setGeometry(20, 20, 120, 100) nested_frame2 = QFrame(main_frame) nested_frame2.setFrameShape(QFrame.StyledPanel) nested_frame2.setGeometry(160, 20, 120, 100) # Add labels to the nested frames label1 = QLabel('Nested Frame 1', nested_frame1) label1.move(10, 10) label2 = QLabel('Nested Frame 2', nested_frame2) label2.move(10, 10) self.show() if __name__ == '__main__': app = QApplication(sys.argv) ex = NestedExample() sys.exit(app.exec_()) |
In this example, we have created a main window (QMainWindow) with a title, also we have added a size of 400×300 pixels. Inside the main window, we’ve added a main frame (main_frame) using QFrame. This main frame serves as the outer container.
Inside the main frame, we have created two nested frames (nested_frame1 and nested_frame2). These nested frames are positioned within the boundaries of the main frame, and this creates hierarchical structure. Each nested frame has its own size and position relative to the main frame.
Event Handling in PyQt5 Frame
For handling events and interactions inside PyQt5 frames, we need to connect signals that is emitted by widgets to slots, slots are functions that respond to those signals. this functionality allows you to create interactive GUIs that respond to user input , such as mouse clicks or keyboard input.
Let’s create an example how to handle these events inside frames
|
1 2 3 4 5 6 7 8 9 10 11 12 13 14 15 16 17 18 19 20 21 22 23 24 25 26 27 28 29 30 31 32 33 34 |
import sys from PyQt5.QtWidgets import QApplication, QMainWindow, QFrame, QPushButton class EventExample(QMainWindow): def __init__(self): super().__init__() self.setGeometry(100, 100, 400, 300) self.setWindowTitle('Event Handling Example') # Create main frame main_frame = QFrame(self) main_frame.setFrameShape(QFrame.StyledPanel) main_frame.setGeometry(50, 50, 300, 200) # Create button within the main frame button = QPushButton('Click Me', main_frame) button.setGeometry(100, 50, 100, 30) # Connect button clicked signal to slot button.clicked.connect(self.buttonClicked) self.show() def buttonClicked(self): print('Button clicked') if __name__ == '__main__': app = QApplication(sys.argv) ex = EventExample() sys.exit(app.exec_()) |
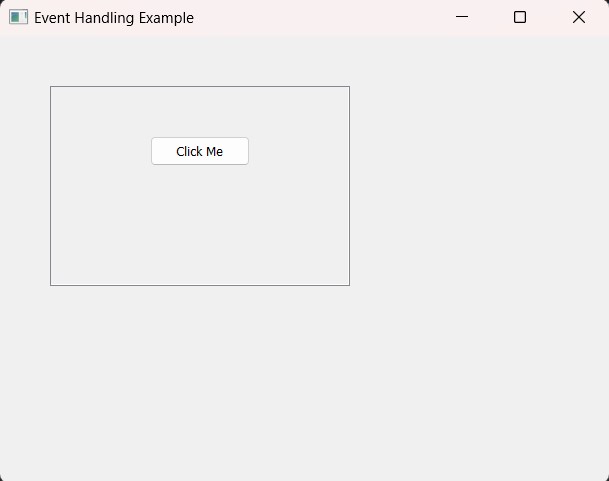
In the above example, we’ve created a main window (QMainWindow) with a title, also we have added a size of 400×300 pixels. inside this main window, we have added a main frame (main_frame) using QFrame. Inside the main frame, we’ve created a button (button) using QPushButton.
We’ve connected the clicked signal of the button to a slot called buttonClicked using the clicked.connect() method. When the button is clicked, the buttonClicked function will be called.
Run the code and this will be the result

FAQs:
What is frame in Qt?
In Qt, a frame is a visual element used for grouping and organizing other widgets inside a window or dialog. It provides a rectangular area with a border and background color, and it allows you to create structured layouts in their applications. Frames can be customized with different shapes, borders, and background styles.
More Python GUI Articles
- Kivy GUI Development Tutorials
- TKinter GUI Development Tutorials
- Psyide2 GUI Development
- wxPython GUI Development Tutorials
- PyQt5 GUI Development Tutorials
Subscribe and Get Free Video Courses & Articles in your Email