This is our eleventh article in Django, in this article we are going to learn about Django MySQL Database Connection Example. so as you know django comes with default setting for SQLite database, but you can change that and you can add your favorite database, particularly in this article we are going to use MySQL Database, also for this purpose we are using a virtual server called WAMP Server.
Flask Web Development Tutorials
1: Flask CRUD Application with SQLAlchemy
2: Flask Creating News Web Application
3: Flask Creating REST API with Marshmallow
Python GUI Development Tutorials
1: PyQt5 GUI Development Tutorials
2: Pyside2 GUI Development Tutorials
3: wxPython GUI Development Tutorials
4: Kivy GUI Development Tutorials
5: TKinter GUI Development Tutorials
What is MySQL Database ?
MySQL is an open-source relational database management system. Its name is a combination of “My”, the name of co-founder Michael Widenius’s daughter, and “SQL”, the abbreviation for Structured Query Language.
OK first of all you need to create a project in Django, we have already covered the creation of the Django project in our previous article Django Introduction & Installation. but you can use this command for creating of Django Project.
|
1 |
django-admin startproject MyProject |
Now you need to create a database in the WAMP Server, so my Database name is codeloop. but you can give what ever you want for the database name.
As we have created our Django Project, now we need to open settings.py file in Django Project and bring some changes in the DATABASE section, by default if you see we have SQLite3 database. but we want to use MySQL Database. for this purpose you need to add some configuration of your mysql database, for example like database name, port, username, password and database host.
|
1 2 3 4 5 6 7 8 9 10 |
DATABASES = { 'default': { 'ENGINE': 'django.db.backends.mysql', 'NAME': 'codeloop', 'USER': 'root', 'PASSWORD': '', 'HOST': 'localhost', 'PORT': '3306', } } |
After adding these configurations in your settings.py file, you need to migrate your project, because we have added a new database configuration.
|
1 2 |
cd MyProject python manage.py migrate |
After doing migrate, you will see this result in your terminal.
|
1 2 3 4 5 6 7 8 9 10 11 12 13 14 15 16 17 18 19 20 |
Apply all migrations: admin, auth, contenttypes, news, sessions Running migrations: Applying contenttypes.0001_initial... OK Applying auth.0001_initial... OK Applying admin.0001_initial... OK Applying admin.0002_logentry_remove_auto_add... OK Applying admin.0003_logentry_add_action_flag_choices... OK Applying contenttypes.0002_remove_content_type_name... OK Applying auth.0002_alter_permission_name_max_length... OK Applying auth.0003_alter_user_email_max_length... OK Applying auth.0004_alter_user_username_opts... OK Applying auth.0005_alter_user_last_login_null... OK Applying auth.0006_require_contenttypes_0002... OK Applying auth.0007_alter_validators_add_error_messages... OK Applying auth.0008_alter_user_username_max_length... OK Applying auth.0009_alter_user_last_name_max_length... OK Applying auth.0010_alter_group_name_max_length... OK Applying auth.0011_update_proxy_permissions... OK Applying news.0001_initial... OK Applying sessions.0001_initial... OK |
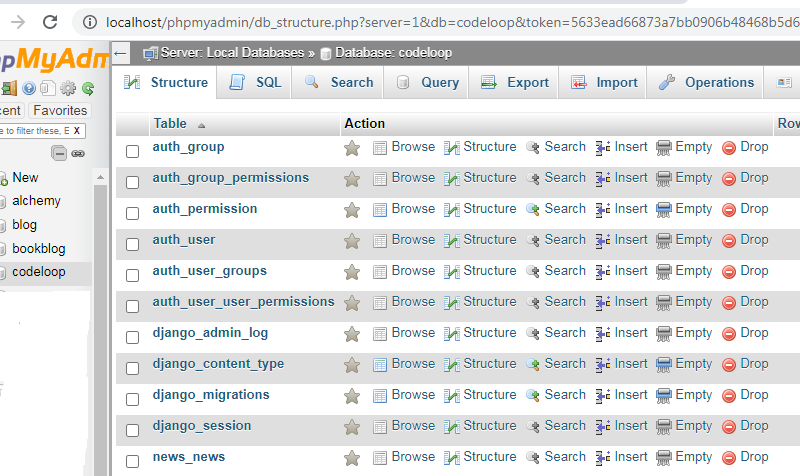
Now if you check your WAMP Server mysql database, you will see the migrations file in your mysql database.

Subscribe and Get Free Video Courses & Articles in your Email