This is our fourteenth article in Django, in this article we are going to learn about Django Adding CSS & Bootstrap Styles. so when you are going to develop a website or web application you want to give design for your website, you can use custom CSS Styles or you can use Bootstrap.
Flask Web Development Tutorials
1: Flask CRUD Application with SQLAlchemy
2: Flask Creating News Web Application
3: Flask Creating REST API with Marshmallow
Python GUI Development Tutorials
1: PyQt5 GUI Development Tutorials
2: Pyside2 GUI Development Tutorials
3: wxPython GUI Development Tutorials
4: Kivy GUI Development Tutorials
5: TKinter GUI Development Tutorials
We need to create a Project in Django, also for django installation you can read this article Django Introduction & Installation .
|
1 |
django-admin startproject MyProject |
Now you need to create a database in the WAMP Server, so my Database name is codeloop. but you can give what ever you want for the database name.
As we have created our Django Project, now we need to open settings.py file in Django Project and bring some changes in the DATABASE section, by default if you see we have SQLite3 database. but we want to use MySQL Database. for this purpose you need to add some configuration of your mysql database, for example like database name, port, username, password and database host.
|
1 2 3 4 5 6 7 8 9 10 |
DATABASES = { 'default': { 'ENGINE': 'django.db.backends.mysql', 'NAME': 'codeloop', 'USER': 'root', 'PASSWORD': '', 'HOST': 'localhost', 'PORT': '3306', } } |
After adding these configurations in your settings.py file, you need to migrate your project
|
1 |
python manage.py migrate |
Adding CSS Styles
So for adding CSS Styles you need to create a new directory in your project, the name of the directory should be static, in the static folder you can add your static files like CSS, JavaScript, Bootstrap and Images. after that you need to create a file called style.css, basically we are going to change the color of our h1 and p tag in all our pages.
|
1 2 3 4 5 6 7 8 9 10 11 |
h1 { color:red; } p { color:green } |
Now we need to create our Django App, i have already talked about Django Apps in details in one of my previous articles, you can check this Django Apps & URL Routing. make sure that you have added your newly created App in the INSTALLED_APP of settings.py
|
1 |
python manage.py startapp news |
So now we need to create our templates, we have already talked about templates in Django, you can read this article Django Templates Introduction. but you need to just create a templates folder in your project and you need to add some html files. also make sure that you have added your templates folder in your settings.py DIRS section.
This is our navbar.html, and we have already included this file in to our base.html, you can check this article for How to Include Template Tag in Django Django Include Template Tag. also we have used url template tag for linking of the views with our navbar, you can read this article for that Django URL Template Tag.
|
1 2 3 4 5 6 7 8 9 10 11 12 13 |
<div class="container"> <nav> <ul> <li><a href="{% url 'home' %}" >Home</a></li> <li><a href="{% url 'contact' %}" >Contact</a></li> <li><a href="{% url 'about' %}" >About</a></li> </ul> </nav> </div> |
OK now we need to link our created CSS in our base.html, and we are going to add the link of that file in our base.html. also at the top you need to add {% load static %}.
|
1 2 3 4 5 6 7 8 9 10 11 12 13 14 15 16 17 18 19 20 |
<!DOCTYPE html> {% load static %} <html lang="en"> <head> <meta charset="UTF-8"> <title>{% block title %}{% endblock %}</title> <link rel="stylesheet" type="text/css" href="{% static 'style.css'%}"/> </head> {% include 'navbar.html' %} <body> {% block body %} {% endblock %} </body> </html> |
Also you need to open your settings.py file and add this code at the end of file, because right now our Django Project does not know about the static folder that we have created, after adding this you notify Django about your static folder.
|
1 2 3 |
STATICFILES_DIRS = [ os.path.join(BASE_DIR, 'static'), ] |
This is our models.py, we have already talked about django models, you can read this article Django Models Introduction.
|
1 2 3 4 5 6 7 8 9 10 11 12 13 14 |
from django.db import models from django.utils import timezone # Create your models here. class News(models.Model): author = models.CharField(max_length=100) title = models.CharField(max_length=100) description = models.TextField() pub_date = models.DateField(default=timezone.now()) #newly added def __str__(self): return self.title |
After adding your model, you need to do migrations like this.
|
1 |
python manage.py makemigrations |
|
1 |
python manage.py migrate |
This is our views.py file, and we have some views in here.
|
1 2 3 4 5 6 7 8 9 10 11 12 13 14 15 16 17 18 19 20 21 22 23 24 25 26 27 28 29 30 |
from django.shortcuts import render from .models import News def home(request): obj = News.objects.all() context = {"object":obj} return render(request, "home.html", context) def news_year(request, year): a_list = News.objects.filter(pub_date__year = year) context = { 'year':year, 'article_list':a_list } return render(request, "details.html", context) def about(request): return render(request, "about.html") def contact(request): return render(request, "contact.html") |
And these are our html files for the views.
templates/home.html , in here we have retrieved our data from mysql database, you can read this article Django Rendering Data from Mysql Database.
|
1 2 3 4 5 6 7 8 9 10 11 12 13 14 15 16 17 18 19 20 21 22 23 24 25 26 27 |
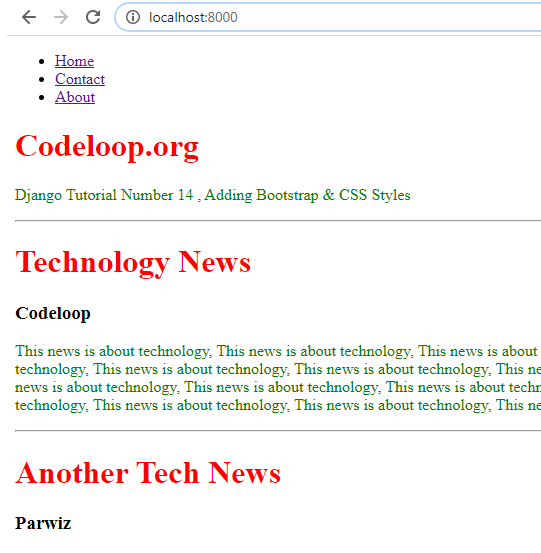
{% extends 'base.html' %} {% block title %} Home {% endblock %} {% block body %} <h1>Codeloop.org</h1> <p>Django Tutorial Number 14 , Adding Bootstrap & CSS Styles</p> <hr/> {% for news in object %} <div> <h1>{{news.title}}</h1> <h3>{{news.author}}</h3> <p>{{news.description}}</p> <hr/> </div> {% endfor %} {% endblock %} |
templates/details.html, in here we have retrieved the filtered data, you can read this article Django Retrieving Filtered Data .
|
1 2 3 4 5 6 7 8 9 10 11 12 13 14 15 16 17 18 19 20 21 22 23 24 25 26 27 28 |
{% extends 'base.html' %} {% block title %} {{year}} {% endblock %} {% block body %} <h1>Codeloop.org</h1> <p>Django Tutorial Number 14 , Adding Bootstrap & CSS Styles</p> <hr/> {% for news in article_list %} <div> <h1>{{news.title}}</h1> <h4>{{news.pub_date}}</h4> <h3>{{news.author}}</h3> <p>{{news.description}}</p> <hr/> </div> {% endfor %} {% endblock %} |
templates/about.html
|
1 2 3 4 5 6 7 8 9 10 11 |
{% extends 'base.html' %} {% block title %} About {% endblock %} {% block body %} <h1>Codeloop.org, this is our about page</h1> <p>Django Tutorial Number 14 , Adding Bootstrap & CSS Styles</p> {% endblock %} |
templates/contact.html
|
1 2 3 4 5 6 7 8 9 10 11 |
{% extends 'base.html' %} {% block title %} Contact {% endblock %} {% block body %} <h1>Codeloop.org, this is our contact page</h1> <p>Django Tutorial Number 14 , Adding Bootstrap & CSS Styles</p> {% endblock %} |
Also you need to create your urls, you can read this article for url routing Django Apps & URL Routing . but just create a new python file in your news app at name of urls.py and add these codes. you can see that we have added our new url for details.
|
1 2 3 4 5 6 7 8 9 10 11 |
from django.urls import path from .views import home, about,contact, news_year urlpatterns = [ path('', home, name = 'home'), path('year/<int:year>/', news_year, name = 'details'), path('about/', about, name = 'about'), path('contact/', contact, name = 'contact'), ] |
And also you need to include your app urls.py in your project urls.py file.
|
1 2 3 4 5 6 7 8 |
from django.contrib import admin from django.urls import path,include urlpatterns = [ path('admin/', admin.site.urls), path('', include('news.urls')), ] |
Now you can run the project and you can see that the color of h1 and p tags are changed in our pages.
|
1 |
python manage.py runserver |
http://localhost:8000/
Adding Bootstrap To Django Project
Bootstrap is a free and open-source CSS framework directed at responsive, mobile-first front-end web development. It contains CSS- and JavaScript-based design templates for typography, forms, buttons, navigation, and other interface components. there are two ways that you can add Bootstrap in your Django Project, the first way is that you can download Bootstrap from their official website, and add that to your static folder, and you can link that the same as we have done for custom CSS. the second way is that you can use Bootstrap CDN Links. we are going to use Bootstrap CDN Links.
So now open your base.html and add the links. basically we have added the the CSS Styles with JavaScript.
|
1 2 3 4 5 6 7 8 9 10 11 12 13 14 15 16 17 18 19 20 21 22 23 24 25 26 27 28 29 |
<!DOCTYPE html> {% load static %} <html lang="en"> <head> <meta charset="UTF-8"> <title>{% block title %}{% endblock %}</title> <!-- Bootstrap CSS only --> <link rel="stylesheet" href="https://stackpath.bootstrapcdn.com/bootstrap/4.5.0/css/bootstrap.min.css" integrity="sha384-9aIt2nRpC12Uk9gS9baDl411NQApFmC26EwAOH8WgZl5MYYxFfc+NcPb1dKGj7Sk" crossorigin="anonymous"> <!-- Custom CSS --> <link rel="stylesheet" type="text/css" href="{% static 'style.css'%}"/> </head> {% include 'navbar.html' %} <body> {% block body %} {% endblock %} <!-- JS, Popper.js, and jQuery --> <script src="https://code.jquery.com/jquery-3.5.1.slim.min.js" integrity="sha384-DfXdz2htPH0lsSSs5nCTpuj/zy4C+OGpamoFVy38MVBnE+IbbVYUew+OrCXaRkfj" crossorigin="anonymous"></script> <script src="https://cdn.jsdelivr.net/npm/popper.js@1.16.0/dist/umd/popper.min.js" integrity="sha384-Q6E9RHvbIyZFJoft+2mJbHaEWldlvI9IOYy5n3zV9zzTtmI3UksdQRVvoxMfooAo" crossorigin="anonymous"></script> <script src="https://stackpath.bootstrapcdn.com/bootstrap/4.5.0/js/bootstrap.min.js" integrity="sha384-OgVRvuATP1z7JjHLkuOU7Xw704+h835Lr+6QL9UvYjZE3Ipu6Tp75j7Bh/kR0JKI" crossorigin="anonymous"></script> </body> </html> |
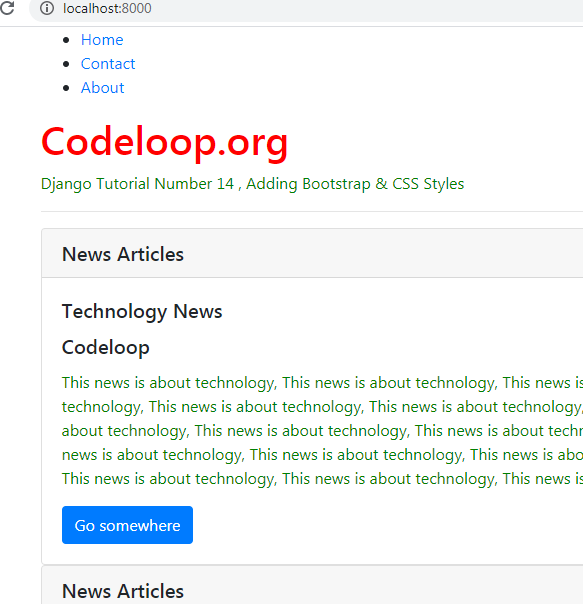
Also we are going to add some styles in our home.html, so now open that html file and add these codes. for example in here for every retrieved data from the database i have added a Bootstrap Card.
|
1 2 3 4 5 6 7 8 9 10 11 12 13 14 15 16 17 18 19 20 21 22 23 24 25 26 27 28 29 30 31 32 33 34 35 |
{% extends 'base.html' %} {% block title %} Home {% endblock %} {% block body %} <div class="container"> <h1>Codeloop.org</h1> <p>Django Tutorial Number 14 , Adding Bootstrap & CSS Styles</p> <hr/> </div> {% for news in object %} <div class = "container "> <div class="card"> <h5 class="card-header">News Articles</h5> <div class="card-body"> <h5 class="card-title">{{news.title}}</h5> <h5 class="card-title">{{news.author}}</h5> <p class="card-text">{{news.description}}</p> <a href="#" class="btn btn-primary">Go somewhere</a> </div> </div> </div> {% endfor %} {% endblock %} |
So now if you go to http://localhost:8000/ , this will be the result.
Subscribe and Get Free Video Courses & Articles in your Email