In this lesson we want to learn how to Create Python PySide6 QLabel, One of the most commonly used widgets in PySide6 is the QLabel, which can display text and images in a window or dialog. In this lesson, we will discuss how to work with the Python PySide6 QLabel widget to create labels and customize their appearance.
Creating PySide6 QLabel
To create a QLabel in PySide6, we first need to import the QtWidgets module
|
1 |
from PySide6.QtWidgets import QLabel |
We can then create a new QLabel object by calling its constructor
|
1 |
label = QLabel("Hello, Codeloop.org") |
This creates a new label with the text “Hello, Codeloop.org”.
We can add this label to our application’s layout using the addWidget() method of a layout object. For example, if we have a QVBoxLayout object called layout, we can add the label to it like this.
|
1 |
layout.addWidget(label) |
We can also set the text of the label using the setText() method
|
1 |
label.setText("New text") |
This changes the label’s text to “New text”.
Displaying Images
We can also use a QLabel to display images in our application. To do this, we first need to create a QPixmap object that contains the image.
|
1 2 3 |
from PySide6.QtGui import QPixmap pixmap = QPixmap("image.png") |
This creates a QPixmap object that contains the image in the file “image.png”. We can then set this pixmap as the label’s image using the setPixmap() method.
|
1 |
label.setPixmap(pixmap) |
This displays the image in the label.
Customizing Appearance
We can also customize the appearance of a QLabel by setting various properties such as the font, color, and alignment. For example, we can set the font of a label using the setFont() method.
|
1 2 3 4 |
from PySide6.QtGui import QFont font = QFont("Arial", 12) label.setFont(font) |
This sets the font of the label to Arial with a size of 12.
We can also set the color of the label’s text using the setStyleSheet() method:
|
1 |
label.setStyleSheet("color: red") |
This sets the color of the label’s text to red.
We can align the text of the label using the setAlignment() method:
|
1 |
label.setAlignment(Qt.AlignCenter) |
This centers the text of the label within its bounding rectangle.
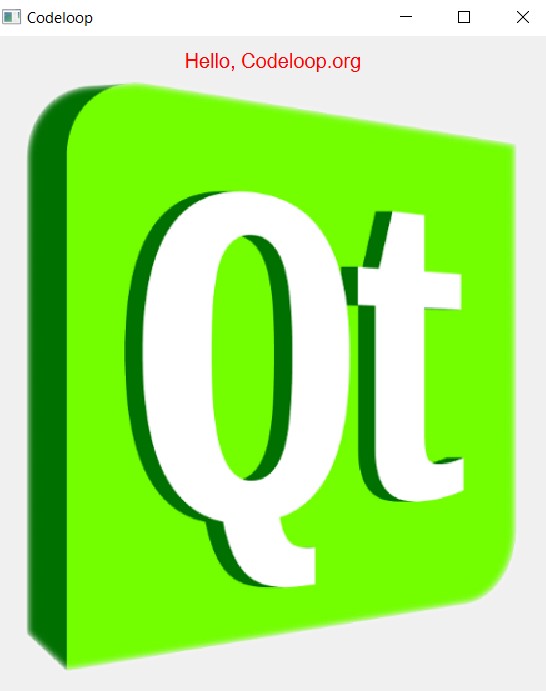
This is the complete code for Python PySide6 QLabel.
|
1 2 3 4 5 6 7 8 9 10 11 12 13 14 15 16 17 18 19 20 21 22 23 24 25 26 27 28 29 30 31 32 33 34 35 36 |
import sys from PySide6.QtWidgets import QApplication, QWidget, QVBoxLayout, QLabel from PySide6.QtGui import QPixmap, QFont from PySide6.QtCore import Qt class MainWindow(QWidget): def __init__(self): super().__init__() self.setWindowTitle("Codeloop") self.setGeometry(100, 100, 300, 200) # Create a vertical layout and add it to the main window layout = QVBoxLayout() # Create a new QLabel with text and add it to the layout label1 = QLabel("Hello, Codeloop.org") font = QFont("Arial", 12) label1.setFont(font) label1.setStyleSheet("color: red") label1.setAlignment(Qt.AlignCenter) layout.addWidget(label1) # Create a new QLabel with an image and add it to the layout label2 = QLabel() pixmap = QPixmap("qt.png") label2.setPixmap(pixmap) layout.addWidget(label2) self.setLayout(layout) if __name__ == '__main__': app = QApplication(sys.argv) window = MainWindow() window.show() sys.exit(app.exec()) |
Run the code and this will be the result

Final Thoughts
PySide6 QLabel widget is a powerful tool for displaying text and images in graphical user interfaces. We can create new labels, set their text and images, and customize their appearance using various properties and methods. With these tools, we can create informative and visually appealing graphical user interfaces that communicate important information to users.