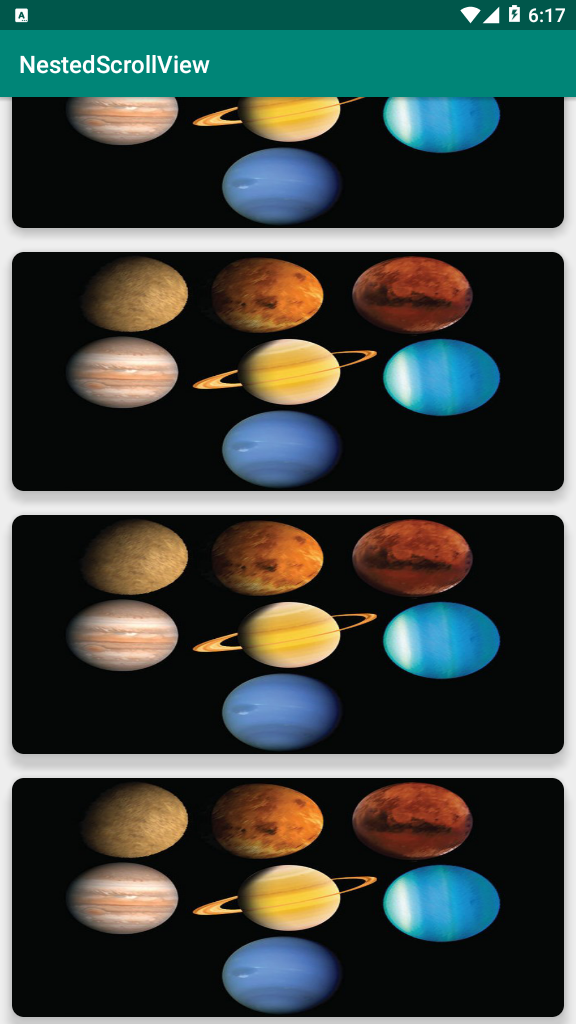
In this Android Studio article iam going to show you Creating Nested ScrollView.
Also you can read more android development articles
1: Android Development Articles
So now lets get started !
1: First of all create a new project in your Android Studio, and choose Empty Activity
also iam using API 20 for this project
2: After that open your build.gradle (Module:app) and in the dependencies section
you need to add this library, after adding sync your project.
|
1 |
implementation 'com.android.support:cardview-v7:28.0.0' |
So after adding that your gradle file will look like this.
|
1 2 3 4 5 6 7 8 9 10 11 12 13 14 15 16 17 18 19 20 21 22 23 24 25 26 27 28 29 30 31 32 |
apply plugin: 'com.android.application' android { compileSdkVersion 28 defaultConfig { applicationId "com.forogh.parwiz.nestedscrollview" minSdkVersion 20 targetSdkVersion 28 versionCode 1 versionName "1.0" testInstrumentationRunner "android.support.test.runner.AndroidJUnitRunner" } buildTypes { release { minifyEnabled false proguardFiles getDefaultProguardFile('proguard-android.txt'), 'proguard-rules.pro' } } } dependencies { implementation fileTree(dir: 'libs', include: ['*.jar']) implementation 'com.android.support:appcompat-v7:28.0.0' implementation 'com.android.support:cardview-v7:28.0.0' implementation 'com.android.support.constraint:constraint-layout:1.1.3' testImplementation 'junit:junit:4.12' androidTestImplementation 'com.android.support.test:runner:1.0.2' androidTestImplementation 'com.android.support.test.espresso:espresso-core:3.0.2' implementation 'com.android.support:cardview-v7:28.0.0' } |
Learn How to Create Custom Spinner in Android Studio .
3: You need to add an image in your drawable folder, i have already added in my working
directory and iam using this image.

4: The next step is to open your activity_main.xml from your layout folder.
you need to change the root element from Constraint Layout to NestedScrollView.
also we are going to add a LinearLayout in our xml file, in the LinearLayout iam going to
add a CardView, OK now my xml file looks like this.
|
1 2 3 4 5 6 7 8 9 10 11 12 13 14 15 16 17 18 19 20 21 22 23 24 25 26 27 28 29 30 31 32 33 34 35 36 37 38 39 40 41 42 43 44 45 46 47 48 49 50 51 52 53 54 55 56 57 58 59 60 61 62 63 64 65 66 67 68 69 70 71 72 73 74 75 76 77 78 79 80 81 82 83 84 85 86 87 88 89 90 91 92 93 94 95 96 97 98 99 100 101 102 103 104 105 106 107 108 109 110 111 112 113 114 115 116 117 118 119 120 121 122 123 124 125 126 127 128 129 130 131 132 133 134 135 136 137 138 139 140 141 142 143 144 145 146 147 148 149 150 151 152 153 154 155 156 157 158 159 160 161 162 163 164 165 166 167 168 169 170 171 172 173 174 175 176 177 178 179 180 181 182 183 184 185 186 187 188 189 190 191 192 193 194 195 196 197 198 199 200 201 202 203 204 205 206 207 208 209 210 211 212 213 214 215 216 217 218 219 220 221 222 223 224 225 226 |
<?xml version="1.0" encoding="utf-8"?> <android.support.v4.widget.NestedScrollView xmlns:android="http://schemas.android.com/apk/res/android" xmlns:tools="http://schemas.android.com/tools" xmlns:app="http://schemas.android.com/apk/res-auto" android:layout_width="match_parent" android:layout_height="match_parent" tools:context=".MainActivity"> <LinearLayout android:layout_width="match_parent" android:layout_height="200dp" android:orientation="vertical" > <android.support.v7.widget.CardView android:layout_width="match_parent" android:layout_height="200dp" app:cardCornerRadius="10dp" app:cardElevation="10dp" android:layout_margin="10dp" > <ImageView android:layout_width="match_parent" android:layout_height="200dp" android:background="@drawable/pic" /> </android.support.v7.widget.CardView> <android.support.v7.widget.CardView android:layout_width="match_parent" android:layout_height="200dp" app:cardCornerRadius="10dp" app:cardElevation="10dp" android:layout_margin="10dp" > <ImageView android:layout_width="match_parent" android:layout_height="200dp" android:background="@drawable/pic" /> </android.support.v7.widget.CardView> <android.support.v7.widget.CardView android:layout_width="match_parent" android:layout_height="200dp" app:cardCornerRadius="10dp" app:cardElevation="10dp" android:layout_margin="10dp" > <ImageView android:layout_width="match_parent" android:layout_height="200dp" android:background="@drawable/pic" /> </android.support.v7.widget.CardView> <android.support.v7.widget.CardView android:layout_width="match_parent" android:layout_height="200dp" app:cardCornerRadius="10dp" app:cardElevation="10dp" android:layout_margin="10dp" > <ImageView android:layout_width="match_parent" android:layout_height="200dp" android:background="@drawable/pic" /> </android.support.v7.widget.CardView> <android.support.v7.widget.CardView android:layout_width="match_parent" android:layout_height="200dp" app:cardCornerRadius="10dp" app:cardElevation="10dp" android:layout_margin="10dp" > <ImageView android:layout_width="match_parent" android:layout_height="200dp" android:background="@drawable/pic" /> </android.support.v7.widget.CardView> <android.support.v7.widget.CardView android:layout_width="match_parent" android:layout_height="200dp" app:cardCornerRadius="10dp" app:cardElevation="10dp" android:layout_margin="10dp" > <ImageView android:layout_width="match_parent" android:layout_height="200dp" android:background="@drawable/pic" /> </android.support.v7.widget.CardView> <android.support.v7.widget.CardView android:layout_width="match_parent" android:layout_height="200dp" app:cardCornerRadius="10dp" app:cardElevation="10dp" android:layout_margin="10dp" > <ImageView android:layout_width="match_parent" android:layout_height="200dp" android:background="@drawable/pic" /> </android.support.v7.widget.CardView> <android.support.v7.widget.CardView android:layout_width="match_parent" android:layout_height="200dp" app:cardCornerRadius="10dp" app:cardElevation="10dp" android:layout_margin="10dp" > <ImageView android:layout_width="match_parent" android:layout_height="200dp" android:background="@drawable/pic" /> </android.support.v7.widget.CardView> <android.support.v7.widget.CardView android:layout_width="match_parent" android:layout_height="200dp" app:cardCornerRadius="10dp" app:cardElevation="10dp" android:layout_margin="10dp" > <ImageView android:layout_width="match_parent" android:layout_height="200dp" android:background="@drawable/pic" /> </android.support.v7.widget.CardView> </LinearLayout> </android.support.v4.widget.NestedScrollView> |
So now run the complete code and this will be the result.

Also you can watch the complete video for this article
Subscribe and Get Free Video Courses & Articles in your Email
