In this Python Tutorial we are going to learn how to Create MessageBox with Pyside2, The QMessageBox class provides a modal dialog for informing the user or for asking the user a question and receiving an answer.
Also you can check more Python GUI Development tutorial in different libraries.
1: PyQt5 GUI Development Tutorials
2: TKinter GUI Development Tutorials
3: wxPython GUI Development Tutorials
4: Kivy GUI Development Tutorials
What is QMessageBox ?
A message box displays a primary text to alert the user to a situation, an informative text to further explain the alert or to ask the user a question, and an optional detailed text to provide even more data if the user requests it. A message box can also display an icon and standard buttons for accepting a user response.
Two APIs for using QMessageBox are provided, the property-based API, and the static functions. Calling one of the static functions is the simpler approach, but it is less flexible than using the property-based API, and the result is less informative. Using the property-based API is recommended.
So now this is the complete source code for this article
|
1 2 3 4 5 6 7 8 9 10 11 12 13 14 15 16 17 18 19 20 21 22 23 24 25 26 27 28 29 30 31 32 33 34 35 36 37 38 39 40 41 42 43 44 45 46 47 48 49 50 51 52 53 54 55 56 57 58 59 60 61 62 63 64 65 66 67 68 69 70 71 72 73 74 75 76 77 |
from PySide2.QtWidgets import QApplication, QWidget, QPushButton, QMessageBox, QVBoxLayout, QLabel import sys from PySide2.QtGui import QIcon class Window(QWidget): def __init__(self): super().__init__() self.setWindowTitle("Pyside2 MessageBox") self.setGeometry(300,200,300,200) self.setIcon() self.create_button() self.show() def setIcon(self): appIcon = QIcon("icon.png") self.setWindowIcon(appIcon) def create_button(self): vbox = QVBoxLayout() btn1 = QPushButton("Open About MessageBox") btn1.clicked.connect(self.show_about) btn2 = QPushButton("Open Warning MessageBox") btn2.clicked.connect(self.show_warning) btn3 = QPushButton("Open Information MessageBox") btn3.clicked.connect(self.show_info) self.label = QLabel() btn4 = QPushButton("Open Question MessageBox") btn4.clicked.connect(self.show_question) vbox.addWidget(btn1) vbox.addWidget(btn2) vbox.addWidget(btn3) vbox.addWidget(btn4) vbox.addWidget(self.label) self.setLayout(vbox) def show_about(self): QMessageBox.about(self, "AboutBox", "This is about application") def show_warning(self): QMessageBox.warning(self, "Warning", "This is Warning") def show_info(self): QMessageBox.information(self, "Info", "This is Information") def show_question(self): reply = QMessageBox.question(self, "Question MessageBox", "Do You Like Pyside2", QMessageBox.Yes | QMessageBox.No) if reply == QMessageBox.Yes: self.label.setText("I Like Pyside2") elif reply == QMessageBox.No: self.label.setText("I Dont Like Pyside2") myapp = QApplication(sys.argv) window = Window() myapp.exec_() sys.exit() |
OK now in here we are going to set our window title, also we need to set the geometry of the window, like x and y position of the window, also width and height of the window .
|
1 2 |
self.setWindowTitle("Pyside2 MessageBox") self.setGeometry(300,200,300,200) |
In here we have created our QVBoxLayout, also we have created some QPushButtons with QLabel. you can see that we have connected the clicked signal of every button with the specific method that we will create later.
|
1 2 3 4 5 6 7 8 9 10 11 12 13 14 15 |
vbox = QVBoxLayout() btn1 = QPushButton("Open About MessageBox") btn1.clicked.connect(self.show_about) btn2 = QPushButton("Open Warning MessageBox") btn2.clicked.connect(self.show_warning) btn3 = QPushButton("Open Information MessageBox") btn3.clicked.connect(self.show_info) self.label = QLabel() btn4 = QPushButton("Open Question MessageBox") btn4.clicked.connect(self.show_question) |
Also you need to add your widgets in the vbox layout.
|
1 2 3 4 5 |
vbox.addWidget(btn1) vbox.addWidget(btn2) vbox.addWidget(btn3) vbox.addWidget(btn4) vbox.addWidget(self.label) |
The important point about the layout is when you create layout, after adding widgets to the layout, you need to set the layout for the main window like this.
|
1 |
self.setLayout(vbox) |
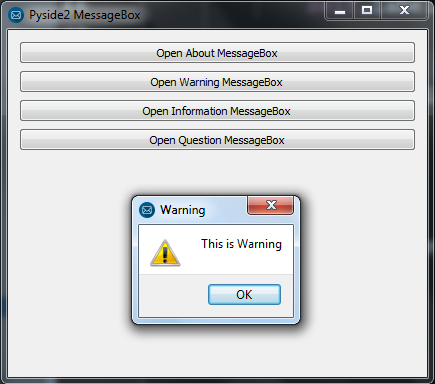
These are the methods for about, warning and information message boxes, and we have already connected these methods with clicked signals of QPushButton at the top.
|
1 2 3 4 5 6 7 8 |
def show_about(self): QMessageBox.about(self, "AboutBox", "This is about application") def show_warning(self): QMessageBox.warning(self, "Warning", "This is Warning") def show_info(self): QMessageBox.information(self, "Info", "This is Information") |
And this is the question message box method.
|
1 2 3 4 5 6 7 8 9 10 |
def show_question(self): reply = QMessageBox.question(self, "Question MessageBox", "Do You Like Pyside2", QMessageBox.Yes | QMessageBox.No) if reply == QMessageBox.Yes: self.label.setText("I Like Pyside2") elif reply == QMessageBox.No: self.label.setText("I Dont Like Pyside2") |
Finally, we have entered to the main loop of the application. The event handling starts from this point. also we have created the object of our Window and QApplication.
|
1 2 3 4 |
myapp = QApplication(sys.argv) window = Window() myapp.exec_() sys.exit() |
Run the complete code and this will be the result
Also you can watch the complete video for this article
Subscribe and Get Free Video Courses & Articles in your Email
