In this Python TKinter GUI article i want talk about GUI Buttons in TKinter, and also we are going to handle click events for the Button. so first of all let’s talk that What are TKinter Buttons?
What are TKinter Buttons?
Tkinter Buttons are graphical user interface (GUI) elements, and that is used in Python Tkinter library to create interactive buttons, using buttons users can click to trigger actions or events. Buttons typically appear as rectangular or square widgets with text or images on them.In Tkinter, Buttons are created using the Button widget class. They can be customized with different attributes such as text, font, colors, images, and command functions.
So this is the complete code for Python TKinter GUI Creating Buttons
|
1 2 3 4 5 6 7 8 9 10 11 12 13 14 15 16 17 18 19 20 21 22 23 24 25 26 27 28 29 30 31 32 33 34 35 |
import tkinter as tk from tkinter import ttk # Create the main application window window = tk.Tk() # Set minimum size of the window window.minsize(600, 400) # Set title of the window window.title("Codeloop.org - Tkinter Button") # Create label widget to display text label = ttk.Label(window, text="Hello Tkinter") label.grid(column=1, row=0) # Place the label in the grid layout # Define function to be called when the button is clicked def clickMe(): # Change the label text label.configure(text="Welcome to Codeloop - Tkinter Tutorial") # Change the label text color label.configure(foreground='green') # Change the button text button.configure(text="The Button Has Been Clicked") # Create a button widget with a command button = ttk.Button(window, text="Click Me", command=clickMe) # Place the button in the grid layout button.grid(column=0, row=0) # Start the Tkinter event loop window.mainloop() |
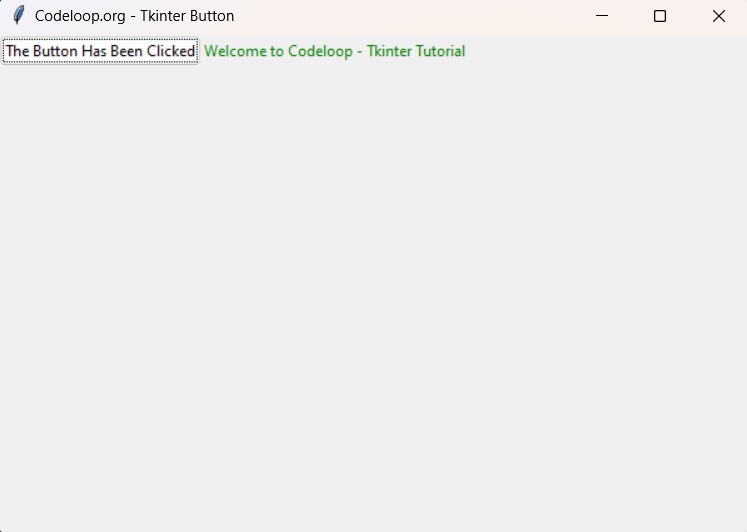
In the above code first, we import tkinter and ttk, where ttk enhances the GUI’s appearance. Then, we create a window with a minimum size of 600×400 and set its title. Next, we create a label using ttk.Label() with specified text and position it in a grid layout. The clickMe() method establishes the relationship between the label and button, modifying the label’s text and color upon button click using label.configure(). We create a button with ttk.Button() and assign the clickMe() method to its command parameter. Finally, we start the main event loop for the window to handle user interactions.
Run the complete code and this will be the result

Add Images to TKinter GUI Buttons
Now we want to add images in our TKinter Buttons, Using images on buttons can enhance the visual appeal of a GUI and make the interface more beautiful for users. Let’s walk through a practical example of how to use images on buttons in a Tkinter application:
|
1 2 3 4 5 6 7 8 9 10 11 12 13 14 15 16 17 18 19 20 21 22 23 24 25 26 27 28 29 30 31 32 33 34 35 36 |
import tkinter as tk from tkinter import ttk from PIL import Image, ImageTk # Create main application window window = tk.Tk() window.title("Codeloop - Button") # Load images button_image = Image.open("python.png") # Resize image button_image = button_image.resize((50, 50)) # Convert image to PhotoImage button_photo = ImageTk.PhotoImage(button_image) # Define function to be called when the button is clicked def clickMe(): label.configure(text="Button was clicked") # Create button with image only image_button = ttk.Button(window, image=button_photo, command=clickMe) image_button.grid(row=0, column=0, padx=10, pady=10) # Create button with both image and text text_image_button = ttk.Button(window, text="Click Me", image=button_photo, compound=tk.LEFT, command=clickMe) text_image_button.grid(row=0, column=1, padx=10, pady=10) # Create label to display button click feedback label = ttk.Label(window, text="") label.grid(row=1, columnspan=2) # Start Tkinter event loop window.mainloop() |
In this example, first we have imported the necessary modules from tkinter and pillow library, make sure that you have installed pillow library (pip install pillow).
After that we load an image file using PIL’s Image.open() function, we resize it to the desired dimensions, and then convert it to Tkinter PhotoImage object using ImageTk.PhotoImage(). This image will be used as the button’s icon.
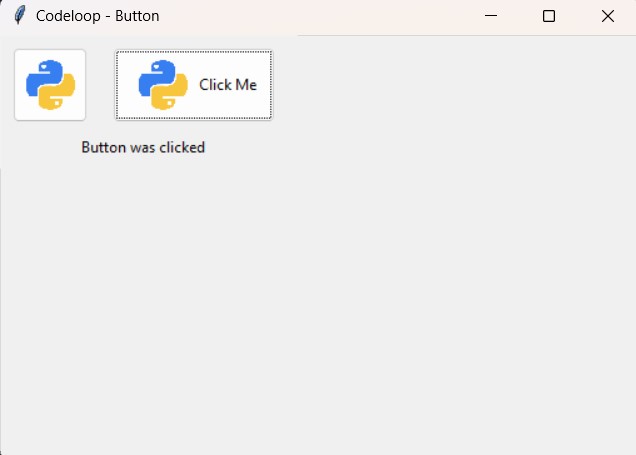
After that we creates two buttons: image_button and text_image_button. image_button displays only the image, while text_image_button displays both the image and text. The compound=tk.LEFT option specifies that the image should be positioned to the left of the text on the button. Both buttons are configured with a command to call the clickMe() function when clicked.
Run the complete code and this will be the result

Subscribe and Get Free Video Courses & Articles in your Email