In this article, we explore Python library PyQt5 with an introduction to its features, use cases, and installation process. We will answer the question: What is PyQt5? and provide examples to illustrate its capabilities. Python is one of the most popular programming languages, and PyQt5 is one of the key libraries for building robust and powerful GUI applications
What is PyQt5?
Now let ‘s have Introduction to PyQt5, so PyQt5 is a set of Python bindings for Qt libraries, Qt is written in C++, using Qt you can build GUI applications with C++ programming language. on the other hand PyQt5 is suitable for creating everything from simple desktop tools to complex data driven applications using Python programming language. PyQt5 is a big library, using PyQt5 you can design and build cross platform desktop applications that not only look professional but also provide easy user experience.
Key Features of PyQt5
- Cross-Platform Compatibility: You can use PyQt5 applications in multiple operating systems, including Windows, macOS and Linux, you don’t need to bring any changes in the code base, because PyQt5 is cross platform library.
- Rich Widgets Set: PyQt5 provides different widgets, and it can be used for creating highly interactive user interfaces. These include buttons, text fields, tables and more.
- Integrated Development: PyQt5 also has Qt Designer, Qt Designer is a tool that you can easily design your GUI application, after the you can convert your UI file to PY file easily.
- Event Handling: PyQt5 simplifies the process of event handling, PyQt5 allows you to respond to user actions, such as clicks or key presses with custom logic.
How to Install PyQt5?
You can easily install PyQt5 using pip command, open your command prompt or terminal and write this command.
|
1 |
pip install PyQt5 |
Getting Started with PyQt5
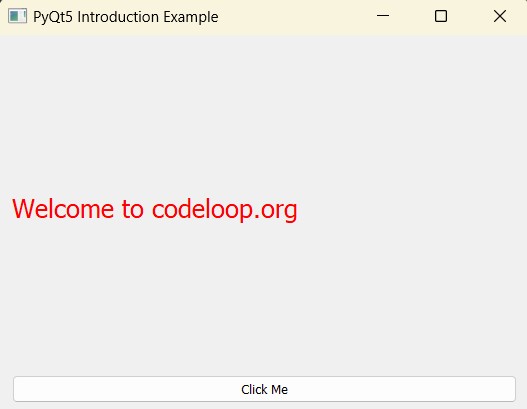
Now we have installed Python PyQt5, now it is time to create our first example in PyQt5.we are going to create a basic window with a button that changes the text on a label when clicked.
|
1 2 3 4 5 6 7 8 9 10 11 12 13 14 15 16 17 18 19 20 21 22 23 24 25 26 27 28 29 30 31 32 33 34 35 36 37 38 |
import sys from PyQt5.QtWidgets import QApplication, QLabel, QPushButton, QVBoxLayout, QWidget from PyQt5.QtGui import QFont # Define function to handle button click event # change the text # change the color # Change the font of the text def on_button_click(): label.setText("Welcome to codeloop.org") label.setFont(QFont("Times", 15)) label.setStyleSheet('color:red') # Initialize application app = QApplication(sys.argv) # Create the main window window = QWidget() window.setWindowTitle('PyQt5 Introduction Example') # Create a label and a button label = QLabel('Hello') button = QPushButton('Click Me') # Connect button click to event handler button.clicked.connect(on_button_click) # Arrange label and button vertically layout = QVBoxLayout() layout.addWidget(label) layout.addWidget(button) window.setLayout(layout) # Show the window window.show() # Run the application event loop sys.exit(app.exec_()) |
In this example, we have created a simple PyQt5 application that displays a window with a label and a button. When the button is clicked, the text on the label changes, also it changes the color and font size of the text, This basic example demonstrates how to create widgets, arrange them using layouts, and handle events in PyQt5.
Run the complete code and this will be the result

Advanced Features of PyQt5
Now let’s create some advanced examples in PyQt5
Creating Custom Widgets in PyQt5: PyQt5 allows you to create custom widgets by subclassing existing ones. This is useful when you need a widget with behavior or appearance not provided by the standard set.
|
1 2 3 4 5 6 |
from PyQt5.QtWidgets import QWidget, QLabel class CustomLabel(QLabel): def __init__(self, text): super().__init__(text) self.setStyleSheet("color: red; font-size: 20px;") |
Working with Dialogs in PyQt5: PyQt5 provides different built-in dialogs such as file dialogs, color pickers, and message boxes. These dialogs can be easily integrated into your applications.
|
1 2 3 4 5 6 |
from PyQt5.QtWidgets import QMessageBox def show_message(): msg_box = QMessageBox() msg_box.setText("This is a message box.") msg_box.exec_() |
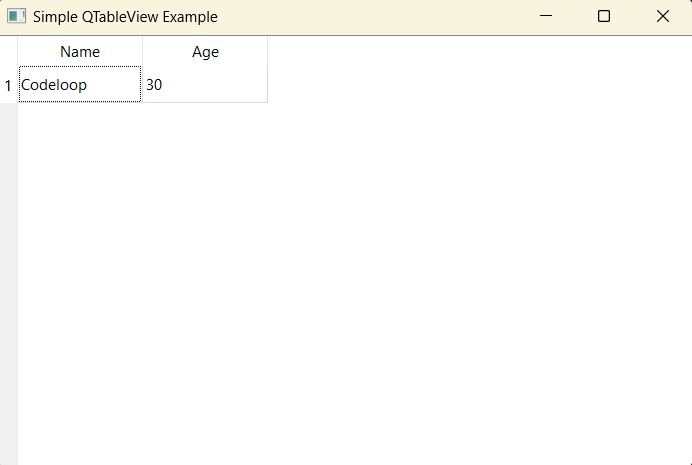
Model-View-Controller (MVC) Pattern: PyQt5 supports MVC pattern, which is essential for creating complex applications. The framework provides model classes like QStandardItemModel and view classes like QTableView to help organize data and its presentation.
|
1 2 3 4 5 6 7 8 9 10 11 12 13 14 15 16 17 18 19 20 21 22 23 24 25 26 27 28 |
import sys from PyQt5.QtWidgets import QApplication, QTableView from PyQt5.QtGui import QStandardItemModel, QStandardItem # Initialize application app = QApplication(sys.argv) # Create model and set the header labels model = QStandardItemModel() model.setHorizontalHeaderLabels(['Name', 'Age']) # Add data to the model item1 = QStandardItem('Codeloop') item2 = QStandardItem('30') model.appendRow([item1, item2]) # Create QTableView and set the model view = QTableView() view.setModel(model) # Show view view.setWindowTitle("Simple QTableView Example") view.resize(400, 200) view.show() # Run the application event loop sys.exit(app.exec_()) |
Run the code and this will be the result

Threading and Asynchronous Operations: PyQt5 offers support for threading, and using that you to run long tasks in the background without freezing the GUI. This is critical for creating responsive applications.
|
1 2 3 4 5 6 7 8 9 10 11 12 |
from PyQt5.QtCore import QThread, pyqtSignal class Worker(QThread): progress = pyqtSignal(int) def run(self): for i in range(100): self.progress.emit(i) QThread.sleep(1) worker = Worker() worker.start() |
Subscribe and Get Free Video Courses & Articles in your Email