In this Python OpenCV article iam going to show you Working with Keyboards. also we will learn how you can write or save an image in OpenCV, so first of all let’s talk about OpenCV.
What is Python OpenCV ?
Python OpenCV (Open Source Computer Vision) is a library for computer vision and image processing tasks. it is an open source computer vision and machine learning software library written in C++ with bindings for Python, Java and C#. it provides different functions and algorithms for image and video analysis, object detection, face recognition and machine learning.
OpenCV was originally developed by Intel and later supported by Willow Garage and Itseez. this library has large community of developers and users, and it is widely used in industry, academia and research.
Python OpenCV provides comprehensive set of tools for working with images and video streams, including reading and writing image files, manipulating images, applying filters and transformations, performing feature detection and matching and many more. it also provides support for real time video processing and camera control.
Key Features of Python OpenCV ?
OpenCV (Open Source Computer Vision) is popular computer vision and machine learning library that has extensive support for Python. these are some key features of Python OpenCV:
- Image and Video Processing: Python OpenCV provides different functions and algorithms to manipulate images and videos, including basic image operations, filtering, feature detection and object recognition.
- Object Detection: OpenCV has several pre trained classifiers for object detection tasks such as face detection, eye detection and pedestrian detection. these classifiers are based on machine learning algorithms like Haar cascades and deep neural networks.
- Machine Learning: OpenCV provides set of tools and libraries for machine learning tasks such as classification, clustering and regression. it also includes support for popular machine learning frameworks like TensorFlow and PyTorch.
- Real-time Processing: OpenCV has support for real time processing of video streams, making it useful for applications like surveillance, robotics and video analysis.
- Cross-platform Support: Python OpenCV is cross platform and can be used on different operating systems like Windows, Linux and macOS. it also supports different programming languages such as Python, C++ and Java.
- Integration with Other Libraries: OpenCV can be integrated with other popular libraries such as NumPy and Matplotlib to perform advanced image processing and visualization tasks.
In result we can say that Python OpenCV is powerful library for computer vision and machine learning tasks. it has rich set of features and it is easy of use.
Also you can check Python GUI Development Tutorials in the below link.
- PyQt5 GUI Development Tutorials
- TKinter GUI Development Tutorials
- Pyside2 GUI Development Tutorials
- Kivy GUI Development Tutorials
So this is the complete source code for this article
|
1 2 3 4 5 6 7 8 9 10 11 12 13 14 15 |
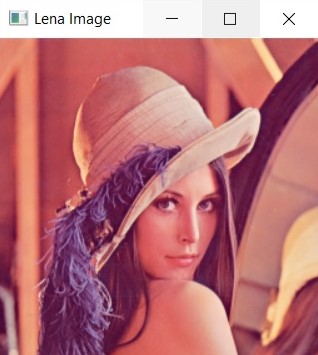
import cv2 # Creating A Simple Application img = cv2.imread("lena.tif") cv2.imshow("Lena Image", img) k= cv2.waitKey(0) if k == 27: # wait for esckey to exit cv2.destroyAllWindows() elif k == ord('s'): # wait for s key to save and exit cv2.imwrite("JPGNewImage.jpg", img) cv2.destroyAllWindows() |
in the first we have imported OpenCV, after that read the image and show the image. in the if statements we are going to check some conditions the first condition if k==27 it means that we are waiting for the escape key to exit and in elif == ord(‘s’) it means that wait for s key to save and exit.
This is the code that we are checking for the keyboard input, if it was escape key we are going to destroy the window. and if it was the ‘s’ key we are saving our image, you can see that in the cv2.imwrite() we are giving the image name with our image.
|
1 2 3 4 5 6 |
if k == 27: # wait for esckey to exit cv2.destroyAllWindows() elif k == ord('s'): # wait for s key to save and exit cv2.imwrite("JPGNewImage.jpg", img) cv2.destroyAllWindows() |
Run the complete code and this will be the result.
User Interface Design for OpenCV with TKinter
Now let’s add a user interface to our Python OpenCV, and we want to use Python TKinter GUI library, using TKinter you can build GUI applications with Python, TKiner is already installed with Python, and you don’t need to install it.
Let’s create a simple example of an OpenCV application with a user-friendly interface that incorporates keyboard interaction using the Tkinter library for GUI development.
|
1 2 3 4 5 6 7 8 9 10 11 12 13 14 15 16 17 18 19 20 21 22 23 24 25 26 27 28 29 30 31 32 33 34 35 36 37 38 39 |
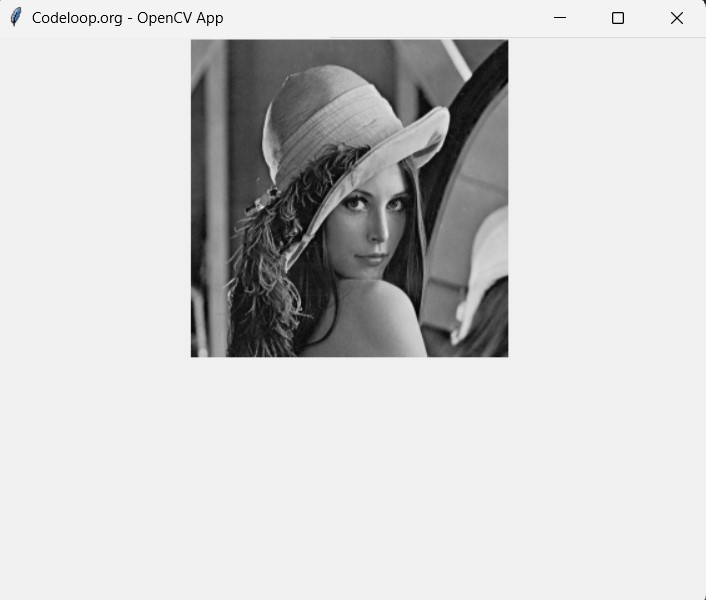
import cv2 import tkinter as tk from PIL import Image, ImageTk class OpenCVApp: def __init__(self, master): self.master = master self.master.title("Codeloop.org - OpenCV App") self.image = cv2.imread("lena.tif") # Load an example image self.display_image = cv2.cvtColor(self.image, cv2.COLOR_BGR2RGB) self.photo = ImageTk.PhotoImage(image=Image.fromarray(self.display_image)) self.canvas = tk.Canvas(self.master, width=self.display_image.shape[1], height=self.display_image.shape[0]) self.canvas.pack() self.canvas.create_image(0, 0, anchor=tk.NW, image=self.photo) self.master.bind('<Escape>', self.exit_application) self.master.bind('s', self.save_image) def exit_application(self, event): self.master.quit() def save_image(self, event): cv2.imwrite("JPGNewImage.jpg", self.image) print("Image saved as 'JPGNewImage.jpg'") def main(): root = tk.Tk() app = OpenCVApp(root) root.mainloop() if __name__ == "__main__": main() |
In the above example:
- We have created OpenCVApp class that initializes a Tkinter window (master) with a canvas for displaying the OpenCV image.
- The example image “lena.tif” is loaded using OpenCV.
- Keyboard bindings are set up: pressing ‘s’ will save the current image, and pressing ‘Escape’ will exit the application.
- We’ve used PIL (Python Imaging Library) alongside ImageTk to correctly load the image and display it within the Tkinter canvas.
- The image is loaded using cv2.imread() as before, converted to RGB format using cv2.cvtColor(), after that converted to PIL image using Image.fromarray().
- Finally, the PIL image is converted to a Tkinter-compatible image using ImageTk.PhotoImage() and displayed on the canvas.
Run the complete code and this will be the result
FAQs:
Which is better, PyTorch or OpenCV?
PyTorch and OpenCV serve different purposes and are not directly comparable in terms of better” or worse. PyTorch is a deep learning framework , and it is used for building and training neural networks, particularly in the field of artificial intelligence and machine learning. On the other hand OpenCV is a library for computer vision and image processing tasks. It provides different functions and algorithms for image and video analysis, object detection, feature extraction and more.
Is OpenCV good for machine learning?
OpenCV is primarily a computer vision library, but it also includes support for machine learning tasks. even tough OpenCV is not a dedicated library for machine learning like TensorFlow or PyTorch, but it provides tools and libraries for basic machine learning tasks such as classification, clustering and regression. You can use OpenCV with other machine learning libraries and frameworks to build computer vision and machine learning pipelines.
What programming language does OpenCV use?
OpenCV (Open Source Computer Vision Library) is primarily written in C++. But it provides bindings for different programming languages including Python, Java and C#. This allows developers to use OpenCV functionalities in their preferred programming language.
How does OpenCV work?
OpenCV provides a collection of algorithms and functions for different computer vision and image processing tasks. It works by using these algorithms to analyze and manipulate images or video streams. OpenCV can perform tasks such as image filtering, edge detection, object detection, feature extraction, image stitching and many more.
Subscribe and Get Free Video Courses & Articles in your Email