In this Python Modern Opengl article iam going to talk about Texturing Rotating Cube. so a texture is a 2D image (even 1D and 3D textures exist) used to add detail to an object, think of a texture as a piece of paper with a nice brick image (for example) on it neatly folded over your 3D house so it looks like your house has a stone exterior. Because we can insert a lot of detail in a single image, we can give the illusion the object is extremely detailed without having to specify extra vertices.
you need an image texture that should be 512 x 512 in your project directory. also you need to install a library that is called pip install pillow
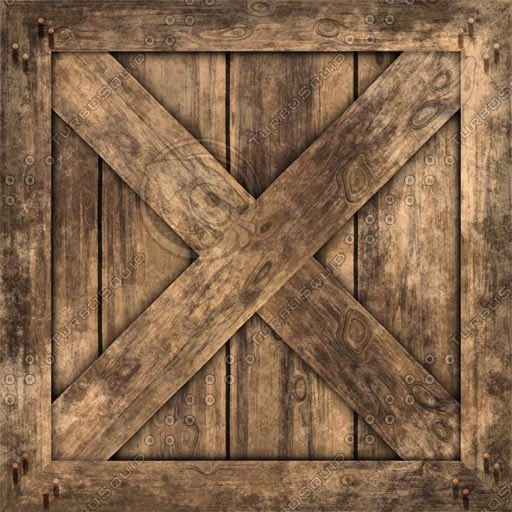
Iam using this image for Texturing
You can check my previous articles on Python Modern Opengl Programming
1: Python Opengl Introduction And Creating Window
2: Python Opengl Drawing Teapot
3: Python Modern Opengl Drawing Rectangle
4: Python Modern Opengl GLFW Window
5: Python Modern Opengl Triangle With GLFW Window
6: Python Modern Opengl Coloring Triangle
7: Python Modern Opengl Drawing Rectangle
8: Python Modern Opengl Rotating Cube
9: Python Modern Opengl Texturing Rectangle
So now this is the complete code for Python Modern Opengl Texturing Rotating Cube
|
1 2 3 4 5 6 7 8 9 10 11 12 13 14 15 16 17 18 19 20 21 22 23 24 25 26 27 28 29 30 31 32 33 34 35 36 37 38 39 40 41 42 43 44 45 46 47 48 49 50 51 52 53 54 55 56 57 58 59 60 61 62 63 64 65 66 67 68 69 70 71 72 73 74 75 76 77 78 79 80 81 82 83 84 85 86 87 88 89 90 91 92 93 94 95 96 97 98 99 100 101 102 103 104 105 106 107 108 109 110 111 112 113 114 115 116 117 118 119 120 121 122 123 124 125 126 127 128 129 130 131 132 133 134 135 136 137 138 139 140 141 142 143 144 145 146 147 148 149 150 151 152 153 154 155 156 157 158 159 160 161 162 163 164 165 166 167 168 169 170 171 172 173 174 175 176 177 178 179 180 181 182 183 184 185 186 187 188 189 190 191 |
import glfw from OpenGL.GL import * import OpenGL.GL.shaders import numpy as np import pyrr from PIL import Image def main(): if not glfw.init(): return window = glfw.create_window(720, 600, "Pyopengl Texturing Cube", None, None) if not window: glfw.terminate() return glfw.make_context_current(window) # positions colors texture coords cube = [-0.5, -0.5, 0.5, 1.0, 0.0, 0.0, 0.0, 0.0, 0.5, -0.5, 0.5, 0.0, 1.0, 0.0, 1.0, 0.0, 0.5, 0.5, 0.5, 0.0, 0.0, 1.0, 1.0, 1.0, -0.5, 0.5, 0.5, 1.0, 1.0, 1.0, 0.0, 1.0, -0.5, -0.5, -0.5, 1.0, 0.0, 0.0, 0.0, 0.0, 0.5, -0.5, -0.5, 0.0, 1.0, 0.0, 1.0, 0.0, 0.5, 0.5, -0.5, 0.0, 0.0, 1.0, 1.0, 1.0, -0.5, 0.5, -0.5, 1.0, 1.0, 1.0, 0.0, 1.0, 0.5, -0.5, -0.5, 1.0, 0.0, 0.0, 0.0, 0.0, 0.5, 0.5, -0.5, 0.0, 1.0, 0.0, 1.0, 0.0, 0.5, 0.5, 0.5, 0.0, 0.0, 1.0, 1.0, 1.0, 0.5, -0.5, 0.5, 1.0, 1.0, 1.0, 0.0, 1.0, -0.5, 0.5, -0.5, 1.0, 0.0, 0.0, 0.0, 0.0, -0.5, -0.5, -0.5, 0.0, 1.0, 0.0, 1.0, 0.0, -0.5, -0.5, 0.5, 0.0, 0.0, 1.0, 1.0, 1.0, -0.5, 0.5, 0.5, 1.0, 1.0, 1.0, 0.0, 1.0, -0.5, -0.5, -0.5, 1.0, 0.0, 0.0, 0.0, 0.0, 0.5, -0.5, -0.5, 0.0, 1.0, 0.0, 1.0, 0.0, 0.5, -0.5, 0.5, 0.0, 0.0, 1.0, 1.0, 1.0, -0.5, -0.5, 0.5, 1.0, 1.0, 1.0, 0.0, 1.0, 0.5, 0.5, -0.5, 1.0, 0.0, 0.0, 0.0, 0.0, -0.5, 0.5, -0.5, 0.0, 1.0, 0.0, 1.0, 0.0, -0.5, 0.5, 0.5, 0.0, 0.0, 1.0, 1.0, 1.0, 0.5, 0.5, 0.5, 1.0, 1.0, 1.0, 0.0, 1.0] # convert to 32bit float cube = np.array(cube, dtype=np.float32) indices = [0, 1, 2, 2, 3, 0, 4, 5, 6, 6, 7, 4, 8, 9, 10, 10, 11, 8, 12, 13, 14, 14, 15, 12, 16, 17, 18, 18, 19, 16, 20, 21, 22, 22, 23, 20] indices = np.array(indices, dtype=np.uint32) VERTEX_SHADER = """ #version 330 in vec3 position; in vec3 color; in vec2 InTexCoords; out vec3 newColor; out vec2 OutTexCoords; uniform mat4 transform; void main() { gl_Position = transform * vec4(position, 1.0f); newColor = color; OutTexCoords = InTexCoords; } """ FRAGMENT_SHADER = """ #version 330 in vec3 newColor; in vec2 OutTexCoords; out vec4 outColor; uniform sampler2D samplerTex; void main() { outColor = texture(samplerTex, OutTexCoords); } """ # Compile The Program and shaders shader = OpenGL.GL.shaders.compileProgram(OpenGL.GL.shaders.compileShader(VERTEX_SHADER, GL_VERTEX_SHADER), OpenGL.GL.shaders.compileShader(FRAGMENT_SHADER, GL_FRAGMENT_SHADER)) # Create Buffer object in gpu VBO = glGenBuffers(1) # Bind the buffer glBindBuffer(GL_ARRAY_BUFFER, VBO) glBufferData(GL_ARRAY_BUFFER, cube.itemsize * len(cube), cube, GL_STATIC_DRAW) # Create EBO EBO = glGenBuffers(1) glBindBuffer(GL_ELEMENT_ARRAY_BUFFER, EBO) glBufferData(GL_ELEMENT_ARRAY_BUFFER, indices.itemsize * len(indices), indices, GL_STATIC_DRAW) # get the position from shader position = glGetAttribLocation(shader, 'position') glVertexAttribPointer(position, 3, GL_FLOAT, GL_FALSE, cube.itemsize * 8, ctypes.c_void_p(0)) glEnableVertexAttribArray(position) # get the color from shader color = glGetAttribLocation(shader, 'color') glVertexAttribPointer(color, 3, GL_FLOAT, GL_FALSE, cube.itemsize * 8, ctypes.c_void_p(12)) glEnableVertexAttribArray(color) texCoords = glGetAttribLocation(shader, "InTexCoords") glVertexAttribPointer(texCoords, 2, GL_FLOAT, GL_FALSE, cube.itemsize * 8, ctypes.c_void_p(24)) glEnableVertexAttribArray(texCoords) #Texture Creation texture = glGenTextures(1) glBindTexture(GL_TEXTURE_2D, texture) # Set the texture wrapping parameters glTexParameteri(GL_TEXTURE_2D, GL_TEXTURE_WRAP_S, GL_REPEAT) glTexParameteri(GL_TEXTURE_2D, GL_TEXTURE_WRAP_T, GL_REPEAT) # Set texture filtering parameters glTexParameteri(GL_TEXTURE_2D, GL_TEXTURE_MIN_FILTER, GL_LINEAR) glTexParameteri(GL_TEXTURE_2D, GL_TEXTURE_MAG_FILTER, GL_LINEAR) # load image image = Image.open("wood.jpg") img_data = np.array(list(image.getdata()), np.uint8) glTexImage2D(GL_TEXTURE_2D, 0, GL_RGB, image.width, image.height, 0, GL_RGB, GL_UNSIGNED_BYTE, img_data) glEnable(GL_TEXTURE_2D) glUseProgram(shader) glClearColor(0.0, 0.0, 0.0, 1.0) glEnable(GL_DEPTH_TEST) while not glfw.window_should_close(window): glfw.poll_events() glClear(GL_COLOR_BUFFER_BIT | GL_DEPTH_BUFFER_BIT) rot_x = pyrr.Matrix44.from_x_rotation(0.5 * glfw.get_time()) rot_y = pyrr.Matrix44.from_y_rotation(0.8 * glfw.get_time()) transformLoc = glGetUniformLocation(shader, "transform") glUniformMatrix4fv(transformLoc, 1, GL_FALSE, rot_x * rot_y) # Draw Cube glDrawElements(GL_TRIANGLES, 36, GL_UNSIGNED_INT, None) glfw.swap_buffers(window) glfw.terminate() if __name__ == "__main__": main() |
So if you have followed my previous articles on Python Modern Opengl Programming, most of these codes will be familiar to you.but i will explain again some of them if you need to know more about these codes you can check my previous articles, i have given the link at the top.
These are the rectangle values and also different color for the values with texture coordinates, also we have converted the values to 32bit value.
|
1 2 3 4 5 6 7 8 9 10 11 12 13 14 15 16 17 18 19 20 21 22 23 24 25 26 27 28 29 30 31 32 33 34 35 |
# positions colors texture coords cube = [-0.5, -0.5, 0.5, 1.0, 0.0, 0.0, 0.0, 0.0, 0.5, -0.5, 0.5, 0.0, 1.0, 0.0, 1.0, 0.0, 0.5, 0.5, 0.5, 0.0, 0.0, 1.0, 1.0, 1.0, -0.5, 0.5, 0.5, 1.0, 1.0, 1.0, 0.0, 1.0, -0.5, -0.5, -0.5, 1.0, 0.0, 0.0, 0.0, 0.0, 0.5, -0.5, -0.5, 0.0, 1.0, 0.0, 1.0, 0.0, 0.5, 0.5, -0.5, 0.0, 0.0, 1.0, 1.0, 1.0, -0.5, 0.5, -0.5, 1.0, 1.0, 1.0, 0.0, 1.0, 0.5, -0.5, -0.5, 1.0, 0.0, 0.0, 0.0, 0.0, 0.5, 0.5, -0.5, 0.0, 1.0, 0.0, 1.0, 0.0, 0.5, 0.5, 0.5, 0.0, 0.0, 1.0, 1.0, 1.0, 0.5, -0.5, 0.5, 1.0, 1.0, 1.0, 0.0, 1.0, -0.5, 0.5, -0.5, 1.0, 0.0, 0.0, 0.0, 0.0, -0.5, -0.5, -0.5, 0.0, 1.0, 0.0, 1.0, 0.0, -0.5, -0.5, 0.5, 0.0, 0.0, 1.0, 1.0, 1.0, -0.5, 0.5, 0.5, 1.0, 1.0, 1.0, 0.0, 1.0, -0.5, -0.5, -0.5, 1.0, 0.0, 0.0, 0.0, 0.0, 0.5, -0.5, -0.5, 0.0, 1.0, 0.0, 1.0, 0.0, 0.5, -0.5, 0.5, 0.0, 0.0, 1.0, 1.0, 1.0, -0.5, -0.5, 0.5, 1.0, 1.0, 1.0, 0.0, 1.0, 0.5, 0.5, -0.5, 1.0, 0.0, 0.0, 0.0, 0.0, -0.5, 0.5, -0.5, 0.0, 1.0, 0.0, 1.0, 0.0, -0.5, 0.5, 0.5, 0.0, 0.0, 1.0, 1.0, 1.0, 0.5, 0.5, 0.5, 1.0, 1.0, 1.0, 0.0, 1.0] # convert to 32bit float cube = np.array(cube, dtype=np.float32) |
Because we are working with EBO (Element Buffer Object) , we need to create indices for our Cube, also we have converted to 32bit int.
|
1 2 3 4 5 6 7 8 |
indices = [0, 1, 2, 2, 3, 0, 4, 5, 6, 6, 7, 4, 8, 9, 10, 10, 11, 8, 12, 13, 14, 14, 15, 12, 16, 17, 18, 18, 19, 16, 20, 21, 22, 22, 23, 20] indices = np.array(indices, dtype=np.uint32) |
These are the vertex and fragment shaders
|
1 2 3 4 5 6 7 8 9 10 11 12 13 14 15 16 17 18 19 20 21 22 23 24 25 26 27 28 29 30 31 32 33 34 35 36 37 38 39 40 |
VERTEX_SHADER = """ #version 330 in vec3 position; in vec3 color; in vec2 InTexCoords; out vec3 newColor; out vec2 OutTexCoords; uniform mat4 transform; void main() { gl_Position = transform * vec4(position, 1.0f); newColor = color; OutTexCoords = InTexCoords; } """ FRAGMENT_SHADER = """ #version 330 in vec3 newColor; in vec2 OutTexCoords; out vec4 outColor; uniform sampler2D samplerTex; void main() { outColor = texture(samplerTex, OutTexCoords); } """ |
So at the top of vertex shader we have the version for the shader , and we have three input values for our position, color and texture coordinates. and we have two output value for our color and texture coordinates. in the fragment shader we have two input value for our new color and the texture coordinates, and also we have and output value for color with uniform variable.
What is Uniform Variable ?
So a uniform is a global Shader variable declared with the “uniform” storage qualifier. These act as parameters that the user of a shader program can pass to that program. Their values are stored in a program object. Uniforms are so named because they do not change from one shader invocation to the next within a particular rendering call. This makes them unlike shader stage inputs and outputs, which are often different for each invocation of a shader stage.
What Are Shaders ?
Shaders are little programs that rest on the GPU. These programs are run for each specific section of the graphics pipeline. So In a basic sense, shaders are nothing more than programs transforming inputs to outputs. Shaders are also very isolated programs.
Vertex Shader
The vertex shader is a program on the graphics card that processes each vertex and its attributes as they appear in the vertex array.
Its duty is to output the final vertex position in device coordinates and to output any data the fragment shader requires.
That’s why the 3D transformation should take place here. The fragment shader depends on attributes like the color and texture coordinates, which will usually be passed from input to output without any calculations.
Remember that our vertex position is already specified as device coordinates and no other attributes exist, so the vertex shader will be fairly bare bones.
Fragment Shader
the output from the vertex shader is interpolated over all the pixels on the screen covered by a primitive. These pixels are called fragments and this is what the fragment shader operates on. Just like the vertex shader it has one mandatory output, the final color of a fragment. It’s up to you to write the code for computing this color from vertex colors, texture coordinates and any other data coming from the vertex shader.
Compile the program and shaders
|
1 2 |
shader = OpenGL.GL.shaders.compileProgram(OpenGL.GL.shaders.compileShader(VERTEX_SHADER, GL_VERTEX_SHADER), OpenGL.GL.shaders.compileShader(FRAGMENT_SHADER, GL_FRAGMENT_SHADER)) |
The next step is to upload this vertex data to the graphics card. This is important because the memory on your graphics card is much faster and you won’t have to send the data again every time your scene needs to be rendered (about 60 times per second).
This is done by creating a Vertex Buffer Object (VBO):
|
1 2 3 |
VBO = glGenBuffers(1) glBindBuffer(GL_ARRAY_BUFFER, VBO) glBufferData(GL_ARRAY_BUFFER, cube.itemsize * len(cube), cube, GL_STATIC_DRAW) |
Now it is time to create EBO
|
1 2 3 |
EBO = glGenBuffers(1) glBindBuffer(GL_ELEMENT_ARRAY_BUFFER, EBO) glBufferData(GL_ELEMENT_ARRAY_BUFFER, indices.itemsize * len(indices), indices, GL_STATIC_DRAW) |
Also get the position
|
1 2 3 |
position = glGetAttribLocation(shader, 'position') glVertexAttribPointer(position, 3, GL_FLOAT, GL_FALSE, cube.itemsize * 8, ctypes.c_void_p(0)) glEnableVertexAttribArray(position) |
Also we are getting the color and texture coordinates from shader
|
1 2 3 4 5 6 7 8 |
color = glGetAttribLocation(shader, 'color') glVertexAttribPointer(color, 3, GL_FLOAT, GL_FALSE, cube.itemsize * 8, ctypes.c_void_p(12)) glEnableVertexAttribArray(color) texCoords = glGetAttribLocation(shader, "InTexCoords") glVertexAttribPointer(texCoords, 2, GL_FLOAT, GL_FALSE, cube.itemsize * 8, ctypes.c_void_p(24)) glEnableVertexAttribArray(texCoords) |
So now we are creating the texture
|
1 2 |
texture = glGenTextures(1) glBindTexture(GL_TEXTURE_2D, texture) |
Also do param wrapping on textures
|
1 2 |
glTexParameteri(GL_TEXTURE_2D, GL_TEXTURE_WRAP_S, GL_REPEAT) glTexParameteri(GL_TEXTURE_2D, GL_TEXTURE_WRAP_T, GL_REPEAT) |
So now we do texture filtering
|
1 2 |
glTexParameteri(GL_TEXTURE_2D, GL_TEXTURE_MIN_FILTER, GL_LINEAR) glTexParameteri(GL_TEXTURE_2D, GL_TEXTURE_MAG_FILTER, GL_LINEAR) |
Texture Wrapping
Texture coordinates usually range from (0,0) to (1,1) but what happens if we specify coordinates outside this range? The default behavior of OpenGL is to repeat the texture images (we basically ignore the integer part of the floating point texture coordinate),
but there are more options OpenGL offers:
- GL_REPEAT: The default behavior for textures. Repeats the texture image.
- GL_MIRRORED_REPEAT: Same as GL_REPEAT but mirrors the image with each repeat.
- GL_CLAMP_TO_EDGE: Clamps the coordinates between
0and1. The result is that higher coordinates become clamped to the edge, resulting in a stretched edge pattern. - GL_CLAMP_TO_BORDER: Coordinates outside the range are now given a user-specified border color.
Texture Filtering
So texture coordinates do not depend on resolution but can be any floating point value, thus OpenGL has to figure out which texture pixel (also known as a texel ) to map the texture coordinate to. This becomes especially important if you have a very large object and a low resolution texture.
You probably guessed by now that OpenGL has options for this texture filtering as well. There are several options available but for now we’ll discuss the most important options: GL_NEAREST and GL_LINEAR.
GL_NEAREST (also known as nearest neighbor filtering) is the default texture filtering method of OpenGL. When set to GL_NEAREST, OpenGL selects the pixel which center is closest to the texture coordinate.
Below you can see 4 pixels where the cross represents the exact texture coordinate. The upper-left texel has its center closest to the texture coordinate and is therefore chosen as the sampled color:
Also in here we are going to load our texture using pillow library
|
1 2 3 4 |
image = Image.open("wood.jpg") img_data = np.array(list(image.getdata()), np.uint8) glTexImage2D(GL_TEXTURE_2D, 0, GL_RGB, image.width, image.height, 0, GL_RGB, GL_UNSIGNED_BYTE, img_data) glEnable(GL_TEXTURE_2D) |
So these lines of codes are for cube rotation in x and y positions
|
1 2 3 4 5 |
rot_x = pyrr.Matrix44.from_x_rotation(0.5 * glfw.get_time()) rot_y = pyrr.Matrix44.from_y_rotation(0.8 * glfw.get_time()) transformLoc = glGetUniformLocation(shader, "transform") glUniformMatrix4fv(transformLoc, 1, GL_FALSE, rot_x * rot_y) |
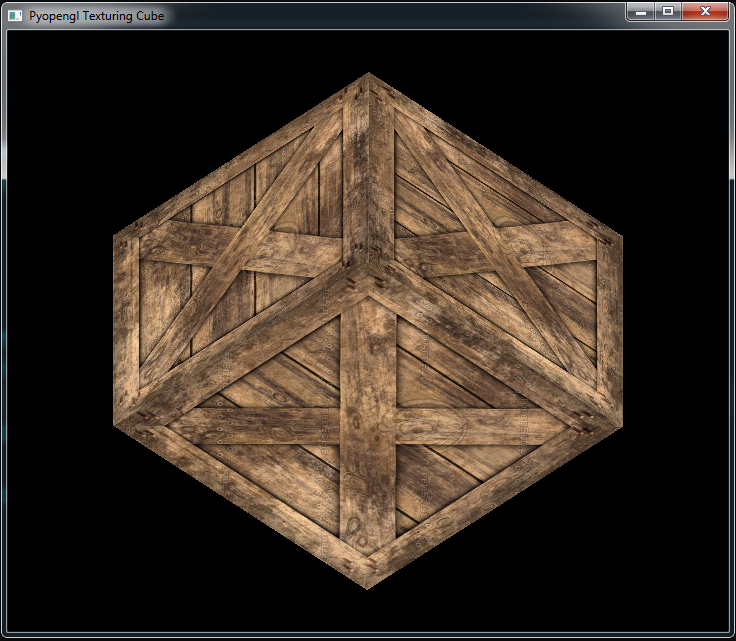
Run the complete code and you will see a rotating cube with textures
Subscribe and Get Free Video Courses & Articles in your Email
Why have you declared the vertices for all faces separately instead of utilizing the indices to call them ?
how do I add lighting to this?
This examle did not run here.
I figured why:
here:
(( https://stackoverflow.com/questions/15639957/glgetattriblocation-returns-1-when-retrieving-existing-shader-attribute ))
————————
so i remove :
position = glGetAttribLocation(shader, ‘position’)
color = glGetAttribLocation(shader, ‘color’)
texCoords = glGetAttribLocation(shader, “InTexCoords”)
—
instead:
position = 0
color = 1
texCoords = 2
glBindAttribLocation( shader, position, ‘position’ )
glBindAttribLocation( shader, color, ‘color’ )
glBindAttribLocation( shader, texCoords, ‘InTexCoords’ )
—–