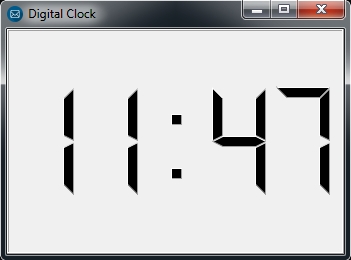
In this Python article iam going to show you How To Create Digital Clock With Pyside2, basically we are using QLCDNumber With QTimer for this article.
Check Python GUI Development With Pyside2
1: Getting Started With Pyside2 | Qt For Python
2: Pyside2 GUI Creating First Window
3: Pyside2 GUI Creating Window Icon
4: Pyside2 GUI How To Create Icon Modes
5: Pyside2 GUI How To Create Tooltip
6: Pyside2 GUI QPushButton With Signal And Slot
7: Pyside2 GUI Making Center The Window
8: Python GUI How To Create AboutBox
So now this is the complete code for Python How To Create Digital Clock With Pyside2
|
1 2 3 4 5 6 7 8 9 10 11 12 13 14 15 16 17 18 19 20 21 22 23 24 25 26 27 28 29 30 31 32 33 34 35 36 37 38 39 40 41 42 43 |
from PySide2.QtWidgets import QApplication, QWidget, QLCDNumber from PySide2.QtCore import QTime, QTimer, SIGNAL import sys from PySide2.QtGui import QIcon class DigitalClock(QLCDNumber): def __init__(self, parent = None): super(DigitalClock, self).__init__(parent) self.setSegmentStyle(QLCDNumber.Filled) timer = QTimer(self) self.connect(timer, SIGNAL('timeout()'), self.showTime) timer.start(1000) self.showTime() self.setWindowTitle("Digital Clock") self.resize(300, 200) self.setIcon() def setIcon(self): appIcon = QIcon("icon.png") self.setWindowIcon(appIcon) def showTime(self): time = QTime.currentTime() text = time.toString('hh:mm') if(time.second() % 2) == 0: text = text[:2] + ' ' + text[3:] self.display(text) myapp = QApplication(sys.argv) window = DigitalClock() window.show() myapp.exec_() sys.exit() |
OK in the above code first we have imported our classes from Pyside2 library
|
1 2 3 4 |
from PySide2.QtWidgets import QApplication, QWidget, QLCDNumber from PySide2.QtCore import QTime, QTimer, SIGNAL import sys from PySide2.QtGui import QIcon |
And this is our main window class that inherits from QLCDNumber, in that class we re going to create the object of QTimer class and also we have connected the timeout signal of QTimer with showTime slot that we are going to create this.
also you can check Python Object Oriented Programming Articles in this link. Python Object Oreinted Programming. also we have added the setIcon() and pushButton() methods in this class.
What is QLCDNumber ?
It can display a number in just about any size. It can display decimal, hexadecimal, octal or binary numbers. It is easy to connect to data sources using the display() slot, which is overloaded to take any of five argument types.
There are also slots to change the base with setMode() and the decimal point with setSmallDecimalPoint().
QLCDNumber emits the overflow() signal when it is asked to display something beyond its range. The range is set by setDigitCount(), but setSmallDecimalPoint() also influences it. If the display is set to hexadecimal, octal or binary, the integer equivalent of the value is displayed.
These digits and other symbols can be shown: 0/O, 1, 2, 3, 4, 5/S, 6, 7, 8, 9/g, minus, decimal point, A, B, C, D, E, F, h, H, L, o, P, r, u, U, Y, colon, degree sign (which is specified as single quote in the string) and space. QLCDNumber substitutes spaces for illegal characters.
It is not possible to retrieve the contents of a QLCDNumber object, although you can retrieve the numeric value with value(). If you really need the text, we recommend that you connect the signals that feed the display() slot to another slot as well and store the value there.
Incidentally, QLCDNumber is the very oldest part of Qt, tracing its roots back to a BASIC program on the Sinclair Spectrum.
What is QTimer Class ?
The QTimer class provides a high-level programming interface for timers. To use it, create a QTimer, connect its timeout() signal to the appropriate slots, and call start(). From then on, it will emit the timeout() signal at constant intervals.
and also this method is for setting our window icon
|
1 2 3 |
def setIcon(self): appIcon = QIcon("icon.png") self.setWindowIcon(appIcon) |
Also this is the slot that we have already connected this with timeout() signal of QTimer
|
1 2 3 4 5 6 7 |
def showTime(self): time = QTime.currentTime() text = time.toString('hh:mm') if(time.second() % 2) == 0: text = text[:2] + ' ' + text[3:] self.display(text) |
So in here every Pyside2 application must create an application object. The sys.argv parameter is a list of arguments from a command line.
|
1 |
myapp = QApplication(sys.argv) |
Finally, we enter the mainloop of the application. The event handling starts from this point. The mainloop receives events from the window system and dispatches them to the application widgets.
|
1 2 |
myapp.exec_() sys.exit() |
So now run the complete code and this will be the result

Also you can watch the complete video for this article
Subscribe and Get Free Video Courses & Articles in your Email