In this Python GUI article we are going to learn Pyside2 QGraphicsView & QGraphicsScene,
so the QGraphicsScene class provides a surface for managing a large number of 2D graphical
items.
Also you can check more Python GUI Development tutorials with different libraries.
1: PyQt5 GUI Development Tutorials
2: TKinter GUI Development Tutorials
3: wxPython GUI Development Tutorials
4: Kivy GUI Development Tutorials
What is QGraphicsScene ?
According to Qt For Python Documentation , the QGraphicsScene class serves as a container
for QGraphicsItems. It is used together with QGraphicsView for visualizing graphical items,
such as lines, rectangles, text, or even custom items, on a 2D surface. QGraphicsScene also
provides functionality that lets you efficiently determine both the location of items, and for
determining what items are visible within an arbitrary area on the scene. With the QGraphicsView
widget, you can either visualize the whole scene, or zoom in and view only parts of the scene.
Note: QGraphicsScene has no visual appearance of its own; it only manages the items. You
need to create a QGaphicsView widget to visualize the scene.
Complete source code for Python GUI – Pyside2 QGraphicsView & QGraphicsScene
|
1 2 3 4 5 6 7 8 9 10 11 12 13 14 15 16 17 18 19 20 21 22 23 24 25 26 27 28 29 30 31 32 33 34 35 36 37 38 39 40 41 42 43 44 45 46 47 48 49 50 51 52 53 54 55 56 57 58 59 60 61 62 63 64 65 66 67 |
from PySide2.QtWidgets import QApplication, QMainWindow, QGraphicsScene, QPushButton , QGraphicsView, QGraphicsItem from PySide2.QtGui import QBrush, QPen, QFont from PySide2.QtCore import Qt import sys class Window(QMainWindow): def __init__(self): super().__init__() self.setWindowTitle("Pyside2 QGraphic View") self.setGeometry(300,200,640,520) self.create_ui() self.show() def create_ui(self): button =QPushButton("Rotate - ", self) button.setGeometry(200,450, 100,50) button.clicked.connect(self.rotate_minus) button2 = QPushButton("Rotate + ", self) button2.setGeometry(320, 450, 100, 50) button2.clicked.connect(self.rotate_plus) scene = QGraphicsScene(self) greenBrush = QBrush(Qt.green) blueBrush = QBrush(Qt.blue) blackPen = QPen(Qt.black) blackPen.setWidth(5) ellipse = scene.addEllipse(10,10, 200,200, blackPen, greenBrush) rect = scene.addRect(-100,-100, 200,200, blackPen, blueBrush) scene.addText("Codeloop.org", QFont("Sanserif", 15)) ellipse.setFlag(QGraphicsItem.ItemIsMovable) rect.setFlag(QGraphicsItem.ItemIsMovable) self.view = QGraphicsView(scene, self) self.view.setGeometry(0,0,640, 440) def rotate_minus(self): self.view.rotate(-14) def rotate_plus(self): self.view.rotate(14) app = QApplication(sys.argv) window = Window() sys.exit(app.exec_()) |
So these are the import that we need for this article, you can see that we have imported QGraphicsView and QGraphicsScene classes.
|
1 2 3 4 |
from PySide2.QtWidgets import QApplication, QMainWindow, QGraphicsScene, QPushButton , QGraphicsView, QGraphicsItem from PySide2.QtGui import QBrush, QPen, QFont from PySide2.QtCore import Qt import sys |
When you are going to develop GUI applications, you need to give title for the window and
also you need to set the x and y position of the window with the width and height of the window.
|
1 2 |
self.setWindowTitle("Pyside2 QGraphic View") self.setGeometry(300,200,640,520) |
These are the two QPushButtons that we are going to use, also you can see that we have
connected the clicked signal of the buttons with the methods or slots that we will create.
|
1 2 3 4 5 6 7 |
button =QPushButton("Rotate - ", self) button.setGeometry(200,450, 100,50) button.clicked.connect(self.rotate_minus) button2 = QPushButton("Rotate + ", self) button2.setGeometry(320, 450, 100, 50) button2.clicked.connect(self.rotate_plus) |
In here we have created the object of QGraphicsScene.
|
1 |
scene = QGraphicsScene(self) |
These are the brush colors and the pen style that we will use.
|
1 2 3 4 5 |
greenBrush = QBrush(Qt.green) blueBrush = QBrush(Qt.blue) blackPen = QPen(Qt.black) blackPen.setWidth(5) |
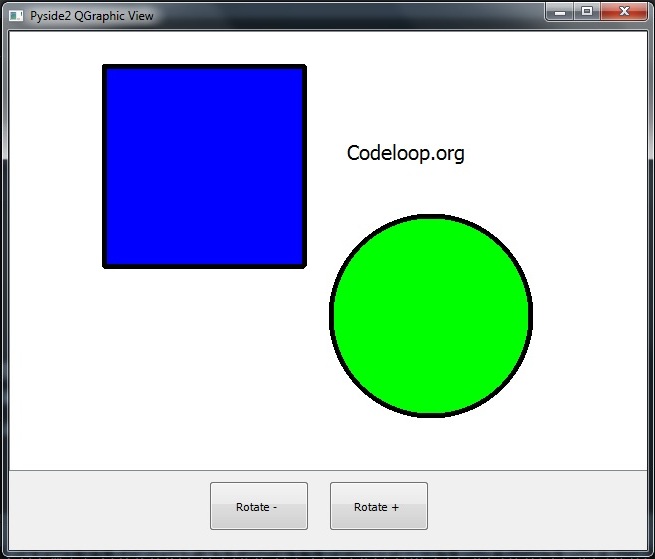
As i have said that QGraphicsScene is used for adding items, in here we are adding three
items to our scene, an ellipse, a rectangle and a text.
|
1 2 3 4 5 |
ellipse = scene.addEllipse(10,10, 200,200, blackPen, greenBrush) rect = scene.addRect(-100,-100, 200,200, blackPen, blueBrush) scene.addText("Codeloop.org", QFont("Sanserif", 15)) |
If you want to move your items by clicking, you can use ItemIsMovable flag, as we want to
make movable our rectangle and ellipse.
|
1 2 |
ellipse.setFlag(QGraphicsItem.ItemIsMovable) rect.setFlag(QGraphicsItem.ItemIsMovable) |
As i have said that for visualizing QGraphicsScene you need to add your scene in the
QGraphicsView. in here we have created the object of QGraphicsView, also we have set the
geometry (x,y,width, height) for our view.
|
1 2 |
self.view = QGraphicsView(scene, self) self.view.setGeometry(0,0,640, 440) |
These are the methods that we have already connected this with the clicked signal of
our QPushButtons, these methods are just for rotating of the view.
|
1 2 3 4 5 6 |
def rotate_minus(self): self.view.rotate(-14) def rotate_plus(self): self.view.rotate(14) |
For every Pyside2 application we need to create the object of QApplication.
|
1 |
app = QApplication(sys.argv) |
And this is the starting point of the loop.
|
1 |
sys.exit(app.exec_()) |
Run the complete code and this will be the result.
Also you can watch the complete video for this article.
Subscribe and Get Free Video Courses & Articles in your Email
