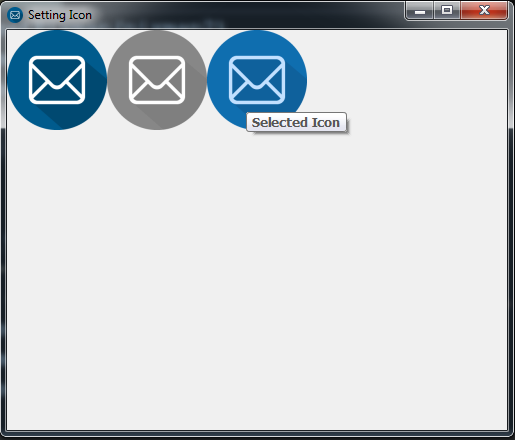
In this Pyside2 GUI Development i want to show you How To Create Tooltip , so before this we had some articles on Pyside2 GUI Development, you can check them in the below links.
Check Python GUI Development With Pyside2
1: Getting Started With Pyside2 | Qt For Python
2: Pyside2 GUI Creating First Window
3: Pyside2 GUI Creating Window Icon
4: Pyside2 GUI How To Create Icon Modes
What is QTooltip ?
The tip is a short piece of text reminding the user of the widget’s function. It is drawn immediately below the given position in a distinctive black-on-yellow color combination. The tip can be any rich text formatted string.
So now this is the complete code for Pyside2 GUI How To Create Tooltip
|
1 2 3 4 5 6 7 8 9 10 11 12 13 14 15 16 17 18 19 20 21 22 23 24 25 26 27 28 29 30 31 32 33 34 35 36 37 38 39 40 41 42 43 44 45 46 47 48 49 50 51 52 53 54 55 56 57 58 59 60 61 62 63 |
from PySide2.QtWidgets import QApplication, QWidget, QLabel, QToolTip import sys from PySide2.QtGui import QIcon, QPixmap, QFont class Window(QWidget): def __init__(self): super().__init__() self.setWindowTitle("Icon Modes") self.setGeometry(300,300, 500,400) QToolTip.setFont(QFont("Decorative", 10, QFont.Bold)) self.setToolTip('Our Main Window') def setIcon(self): appIcon = QIcon("icon.png") self.setWindowIcon(appIcon) def setIconModes(self): icon1 = QIcon("icon.png") label1 = QLabel('Sample', self) pixmap1 = icon1.pixmap(100,100, QIcon.Active, QIcon.On) label1.setPixmap(pixmap1) label1.setToolTip("Active Icon") icon2 = QIcon("icon.png") label2 = QLabel('Sample', self) pixmap2 = icon2.pixmap(100, 100, QIcon.Disabled, QIcon.Off) label2.setPixmap(pixmap2) label2.move(100,0) label2.setToolTip("Disable Icon") icon3 = QIcon("icon.png") label3 = QLabel('Sample', self) pixmap3 = icon3.pixmap(100, 100, QIcon.Selected, QIcon.On) label3.setPixmap(pixmap3) label3.move(200, 0) label3.setToolTip("Selected Icon") myApp = QApplication(sys.argv) window = Window() window.setIcon() window.setIconModes() window.show() myApp.exec_() sys.exit(0) |
OK in the above code first we have imported our classes from Pyside2 library
|
1 2 3 |
from PySide2.QtWidgets import QApplication, QWidget, QLabel, QToolTip import sys from PySide2.QtGui import QIcon, QPixmap, QFont |
And this is our main window class that inherits from QWidget, in that class we are going to add the window title , window geometry and minimum width and height for the window.
also you can check Python Object Oriented Programming Articles in the link. Python Object Oreinted Programming. also we have set the tooltip for the window
|
1 2 3 4 5 6 7 8 9 |
class Window(QWidget): def __init__(self): super().__init__() self.setWindowTitle("Icon Tooltip") self.setGeometry(300,300, 500,400) QToolTip.setFont(QFont("Decorative", 10, QFont.Bold)) self.setToolTip('Our Main Window') |
This is the method that we are going to set our icon, make sure that you have an icon in your working directory, as i have already added an icon to
my working directory. so in here first you need to create the QIcon object and after that you set the window icon by using setWindowIcon().
|
1 2 3 |
def setIcon(self): appIcon = QIcon("icon.png") self.setWindowIcon(appIcon) |
And in here we are going to set our three different type icon modes, also we add tooltip for every of our icon using setTooltip() , basically A QIcon can generate smaller, larger, active, and disabled pixmaps from the set of pixmaps it is given. Such pixmaps are used by Qt widgets to show an icon representing a particular action. make sure that you have an icon in your working directory.
|
1 2 3 4 5 6 7 8 9 10 11 12 13 14 15 16 17 18 19 20 |
def setIconModes(self): icon1 = QIcon("icon.png") label1 = QLabel('Sample', self) pixmap1 = icon1.pixmap(100,100, QIcon.Active, QIcon.On) label1.setPixmap(pixmap1) label1.setToolTip("Active Icon") icon2 = QIcon("icon.png") label2 = QLabel('Sample', self) pixmap2 = icon2.pixmap(100, 100, QIcon.Disabled, QIcon.Off) label2.setPixmap(pixmap2) label2.move(100,0) label2.setToolTip("Disable Icon") icon3 = QIcon("icon.png") label3 = QLabel('Sample', self) pixmap3 = icon3.pixmap(100, 100, QIcon.Selected, QIcon.On) label3.setPixmap(pixmap3) label3.move(200, 0) label3.setToolTip("Selected Icon") |
So in here every Pyside2 application must create an application object. The sys.argv parameter is a list of arguments from a command line.
Python scripts can be run from the shell. It is a way how we can control the startup of our scripts.
|
1 |
myApp = QApplication(sys.argv) |
Finally, we enter the mainloop of the application. The event handling starts from this point. The mainloop receives events from the window system and dispatches them to the application widgets. The mainloop ends if we call the exit() method or the main widget is destroyed. The sys.exit() method ensures a clean exit. The environment will be informed how the application ended.
The exec_() method has an underscore. It is because the exec is a Python keyword. And thus, exec_() was used instead.
|
1 2 |
myApp.exec_() sys.exit(0) |
So now run the complete code and this will be the result

Also you can watch the complete video for this article
Subscribe and Get Free Video Courses & Articles in your Email