In this PyQt5 QtQuick article i want to show you Writing Text In Window.
So before this we have learned that How To Create Window In QtQuick.
Python GUI Development Tutorials
OK now let’s write our code.
This is our main.qml file.
|
1 2 3 4 5 6 7 8 9 10 11 12 13 14 15 16 17 18 19 20 21 22 23 24 25 26 27 28 29 30 31 32 33 34 35 36 37 38 39 40 41 42 43 44 45 46 47 48 49 50 51 52 53 54 |
import QtQuick.Window 2.2 import QtQuick 2.3 Window { visible:true width:600 height:400 color:"yellow" title: "PyQt5 QML Window" Rectangle { id:blueRect color:"blue" width:450 height:64 //x:80 //y:80 anchors.centerIn:parent border.color:"black" border.width:6 radius:15 } Text { id:text1 text:"Hello QtQuick Application" font.pixelSize:30 font.bold:true color:"white" anchors.centerIn:parent } } |
And this is the main.py for loading our main.qml, i have described this file in my previous article.
|
1 2 3 4 5 6 7 8 9 10 11 12 13 14 15 16 17 18 19 20 21 22 23 24 |
from PyQt5.QtQml import QQmlApplicationEngine from PyQt5.QtWidgets import QApplication from PyQt5.QtGui import QIcon import sys def runQML(): app =QApplication(sys.argv) engine = QQmlApplicationEngine() app.setWindowIcon(QIcon("icon.png")) engine.load('main.qml') if not engine.rootObjects(): return -1 return app.exec_() if __name__ == "__main__": sys.exit(runQML()) |
So in the above code we have created our main Window element with width, height,
name and color of the window. also you can see we have given a title for the window.
|
1 2 3 4 5 6 7 |
Window { visible:true width:600 height:400 color:"yellow" title: "PyQt5 QML Window" |
This is the rectangle that we want to draw in the window. basically we have given the
width and height for the rectangle and also with border.
|
1 2 3 4 5 6 7 8 9 10 11 12 13 14 15 16 17 18 |
Rectangle { id:blueRect color:"blue" width:450 height:64 //x:80 //y:80 anchors.centerIn:parent border.color:"black" border.width:6 radius:15 } |
And here is the main topic writing text using Text element in QtQuick. this is just a basic text.
we have given the text, font size and also color for the text.
|
1 2 3 4 5 6 7 8 9 10 11 12 13 14 |
Text { id:text1 text:"Hello QtQuick Application" font.pixelSize:30 font.bold:true color:"white" anchors.centerIn:parent } |
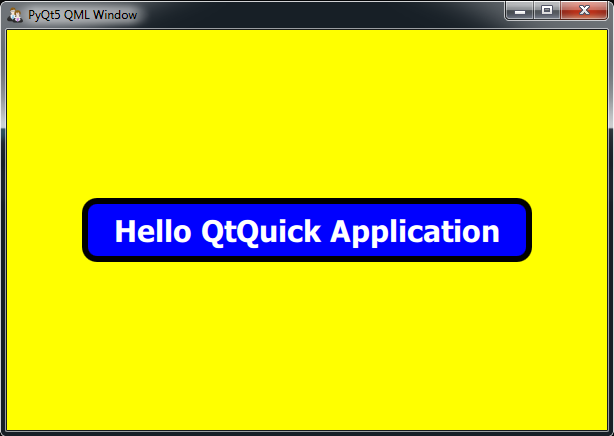
So run the complete source code this will be the result.
Also you can watch the complete video for this article.
Subscribe and Get Free Video Courses & Articles in your Email
