In this PyQt5 article i want to show you creating of QProgressbar With QThread Practical Example, also we are going to use QThread class for this article. A progress bar is used to give the user an indication of the progress of an operation and to reassure them that the application is still running.
What is PyQt5 QProgressbar ?
QProgressBar widget consists of horizontal or vertical bar that fills up gradually to indicate the progress of a task. it is often used in applications that involve time consuming operations, such as file uploads or downloads, software installations or any other process that may take a while to complete.
QProgressBar widget can be customized to display different colors, fonts, and sizes. It also provides various properties and methods that allow developers to control its behavior, such as the minimum and maximum values, the current value, and the orientation of the bar.
Overall, the QProgressBar widget is a useful tool for providing visual feedback to users on the progress of a task and can help make applications more user-friendly and intuitive.
Also you can read more Python GUI articles in the below links
- Kivy GUI Development Tutorials
- TKinter GUI Development Tutorials
- Pyside2 GUI Development
- wxPython GUI Development Tutorials
- PyQt5 GUI Development Tutorials
These are the imports that we need for example
|
1 2 3 4 5 |
from PyQt5 import QtGui from PyQt5.QtWidgets import QApplication, QDialog, QProgressBar, QPushButton, QVBoxLayout import sys from PyQt5.QtCore import Qt, QThread, pyqtSignal import time |
This is our thread class and this class extends from QThread, a QThread object manages one thread of control within the program. QThreads begin executing in run(). By default, run() starts the event loop by calling exec() and runs a Qt event loop inside the thread.
|
1 2 3 4 5 6 7 8 9 |
class MyThread(QThread): # Create a counter thread change_value = pyqtSignal(int) def run(self): cnt = 0 while cnt < 100: cnt+=1 time.sleep(0.3) self.change_value.emit(cnt) |
After we create our Window class that extends from QDialog and in that class we add the requirements of our window like title, geometry and icon with QProgresBar and also a QPushButton. also we have used some style and design for our progressbar.
|
1 2 3 4 5 6 7 8 9 10 11 12 13 14 15 16 17 18 19 20 21 22 23 24 25 26 27 |
class Window(QDialog): def __init__(self): super().__init__() self.title = "PyQt5 ProgressBar" self.top = 200 self.left = 500 self.width = 300 self.height = 100 self.setWindowIcon(QtGui.QIcon("icon.png")) self.setWindowTitle(self.title) self.setGeometry(self.left, self.top, self.width, self.height) vbox = QVBoxLayout() self.progressbar = QProgressBar() #self.progressbar.setOrientation(Qt.Vertical) self.progressbar.setMaximum(100) self.progressbar.setStyleSheet("QProgressBar {border: 2px solid grey;border-radius:8px;padding:1px}" "QProgressBar::chunk {background:yellow}") #qlineargradient(x1: 0, y1: 0.5, x2: 1, y2: 0.5, stop: 0 red, stop: 1 white); #self.progressbar.setStyleSheet("QProgressBar::chunk {background: qlineargradient(x1: 0, y1: 0.5, x2: 1, y2: 0.5, stop: 0 red, stop: 1 white); }") #self.progressbar.setTextVisible(False) vbox.addWidget(self.progressbar) self.button = QPushButton("Start Progressbar") self.button.clicked.connect(self.startProgressBar) self.button.setStyleSheet('background-color:yellow') vbox.addWidget(self.button) self.setLayout(vbox) self.show() |
These are the methods that we are going to use for starting and setting the value of the QProgressBar.
|
1 2 3 4 5 6 7 |
def startProgressBar(self): self.thread = MyThread() self.thread.change_value.connect(self.setProgressVal) self.thread.start() def setProgressVal(self, val): self.progressbar.setValue(val) |
Also every PyQt5 application must create an application object.
|
1 |
App = QApplication(sys.argv) |
Finally, we enter the mainloop of the application. The event handling starts from this point.
|
1 2 |
window = Window() sys.exit(App.exec_()) |
Complete source code for QProgressbar with QThread
|
1 2 3 4 5 6 7 8 9 10 11 12 13 14 15 16 17 18 19 20 21 22 23 24 25 26 27 28 29 30 31 32 33 34 35 36 37 38 39 40 41 42 43 44 45 46 47 48 49 50 51 52 53 54 55 56 57 58 59 |
from PyQt5 import QtGui from PyQt5.QtWidgets import QApplication, QDialog, QProgressBar, QPushButton, QVBoxLayout import sys from PyQt5.QtCore import Qt, QThread, pyqtSignal import time class MyThread(QThread): # Create a counter thread change_value = pyqtSignal(int) def run(self): cnt = 0 while cnt < 100: cnt+=1 time.sleep(0.3) self.change_value.emit(cnt) class Window(QDialog): def __init__(self): super().__init__() self.title = "PyQt5 ProgressBar" self.top = 200 self.left = 500 self.width = 300 self.height = 100 self.setWindowIcon(QtGui.QIcon("icon.png")) self.setWindowTitle(self.title) self.setGeometry(self.left, self.top, self.width, self.height) vbox = QVBoxLayout() self.progressbar = QProgressBar() #self.progressbar.setOrientation(Qt.Vertical) self.progressbar.setMaximum(100) self.progressbar.setStyleSheet("QProgressBar {border: 2px solid grey;border-radius:8px;padding:1px}" "QProgressBar::chunk {background:yellow}") #qlineargradient(x1: 0, y1: 0.5, x2: 1, y2: 0.5, stop: 0 red, stop: 1 white); #self.progressbar.setStyleSheet("QProgressBar:: # chunk {background: # qlineargradient(x1: 0, y1: 0.5, x2: 1, y2: 0.5, stop: 0 red, stop: 1 white); }") #self.progressbar.setTextVisible(False) vbox.addWidget(self.progressbar) self.button = QPushButton("Start Progressbar") self.button.clicked.connect(self.startProgressBar) self.button.setStyleSheet('background-color:yellow') vbox.addWidget(self.button) self.setLayout(vbox) self.show() def startProgressBar(self): self.thread = MyThread() self.thread.change_value.connect(self.setProgressVal) self.thread.start() def setProgressVal(self, val): self.progressbar.setValue(val) App = QApplication(sys.argv) window = Window() sys.exit(App.exec_()) |
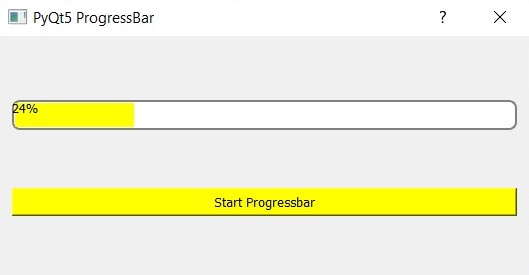
This will be the result of the code for the PyQt5 QProgressBar.

Advanced Customization Options for PyQt5 QProgressBar
Now let’s talk about some advances customizations options in PyQt5 ProgressBar.
Customizing Appearance of PyQt5 ProressBar with Style Sheets:
- PyQt5’s QProgressBar widget can be customized using style sheets, and using style sheets you can modify its appearance to match the application’s design.
- Style sheets enable customization of properties such as background color, progress bar color, border styles, and more.
- This is is an example demonstrating how to customize the appearance of a QProgressBar using style sheets:
|
1 2 3 4 5 6 7 8 9 10 |
self.progressbar.setStyleSheet(""" QProgressBar { border: 2px solid grey; border-radius: 8px; padding: 1px; } QProgressBar::chunk { background-color: yellow; } """) |
Adding Animations or Effects to PyQt5 QProgressBar
- You can enhance the visual design of the progress bar by using animations or effects to provide more engaging user experience.
- Animations can be added using PyQt5 animation framework or by adding external libraries such as QPropertyAnimation.
- This is an example that shows how to add a smooth animation effect to the progress bar’s value changes:
|
1 2 3 4 5 6 7 8 |
from PyQt5.QtCore import QPropertyAnimation # Inside the setProgressVal method animation = QPropertyAnimation(self.progressbar, b"value") animation.setDuration(500) # Set animation duration in milliseconds animation.setStartValue(old_value) animation.setEndValue(val) animation.start() |
Implementing PyQt5 Custom Progress Indicators or Markers
- You can implement custom progress indicators or markers to provide additional visual information to users.
- Custom indicators can include icons, labels or graphical elements embedded inside the progress bar.
- This is an example that shows how to add a custom indicator to the progress bar:
|
1 2 3 4 5 6 7 8 |
from PyQt5.QtWidgets import QLabel # Inside the Window class initialization self.progress_label = QLabel("0%") vbox.addWidget(self.progress_label) # Inside the setProgressVal method self.progress_label.setText(f"{val}%") |
Now this is the complete code
|
1 2 3 4 5 6 7 8 9 10 11 12 13 14 15 16 17 18 19 20 21 22 23 24 25 26 27 28 29 30 31 32 33 34 35 36 37 38 39 40 41 42 43 44 45 46 47 48 49 50 51 52 53 54 55 56 57 58 59 60 61 62 63 64 65 66 67 68 69 70 71 72 73 74 75 76 77 78 79 80 81 82 83 84 85 86 87 88 89 90 91 92 93 94 95 96 97 98 99 100 |
from PyQt5 import QtGui from PyQt5.QtWidgets import QApplication, QDialog, QProgressBar, QPushButton, QVBoxLayout, QLabel from PyQt5.QtCore import Qt, QThread, pyqtSignal, QPropertyAnimation import sys import time class MyThread(QThread): # Create a signal to communicate progress changes change_value = pyqtSignal(int) def run(self): cnt = 0 while cnt < 100: cnt += 1 time.sleep(0.1) # Simulating a time-consuming task # Emit signal with current progress value self.change_value.emit(cnt) class Window(QDialog): def __init__(self): super().__init__() # Set up window properties self.title = "Codeloop - PyQt5 ProgressBar" self.top = 200 self.left = 500 self.width = 300 self.height = 150 self.setWindowIcon(QtGui.QIcon("icon.png")) self.setWindowTitle(self.title) self.setGeometry(self.left, self.top, self.width, self.height) # Create a vertical layout for widgets vbox = QVBoxLayout() # Create a progress bar widget self.progressbar = QProgressBar() self.progressbar.setMaximum(100) self.progressbar.setMinimum(0) self.progressbar.setValue(0) # Apply style sheet to customize appearance self.progressbar.setStyleSheet(""" QProgressBar { border: 2px solid grey; border-radius: 8px; padding: 1px; } QProgressBar::chunk { background-color: yellow; } """) # Add progress bar widget to layout vbox.addWidget(self.progressbar) # Create a label to display progress percentage self.progress_label = QLabel("0%") vbox.addWidget(self.progress_label) # Create a button to start the progress bar self.button = QPushButton("Start Progressbar") self.button.clicked.connect(self.startProgressBar) self.button.setStyleSheet('background-color: yellow') vbox.addWidget(self.button) # Set layout for the window self.setLayout(vbox) # Display the window self.show() def startProgressBar(self): # Create and start a thread for progress updates self.thread = MyThread() self.thread.change_value.connect(self.setProgressVal) self.thread.start() def setProgressVal(self, val): # Update progress bar value and label text self.progressbar.setValue(val) self.progress_label.setText(f"{val}%") # Animate progress bar value change self.animateProgressChange() def animateProgressChange(self): # Create animation for progress bar value change animation = QPropertyAnimation(self.progressbar, b"value") animation.setDuration(300) # Set animation duration in milliseconds animation.setStartValue(self.progressbar.value() - 10) # Animate from previous value animation.setEndValue(self.progressbar.value()) # Start the animation animation.start() if __name__ == "__main__": # Create the application instance app = QApplication(sys.argv) # Create and show the window window = Window() # Start the application event loop sys.exit(app.exec_()) |
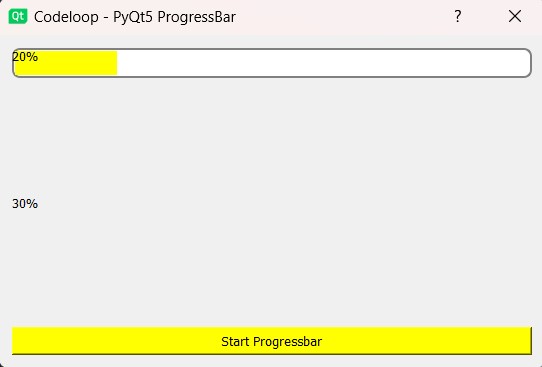
Run the code and this will be the result

Subscribe and Get Free Video Courses & Articles in your Email
the best! Good forum.
google
797hg98798gh7kh9g7k9g
Thanks
your welcome
This approach has significant drawbacks. For example, imagine you wanted to perform two such loops in parallel calling one of them would effectively halt the other until the first one is finished (so you can’t distribute computing power among different tasks). It also makes the application react with delays to events. Furthermore the code is difficult to read and analyze, therefore this solution is only suited for short and simple problems that are to be processed in a single thread, such as splash screens and the monitoring of short operations.
The clearest tutorial I have found on this topic!