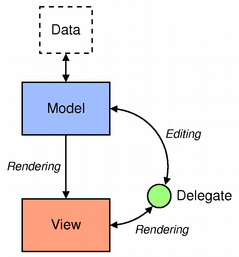
In this PyQt5 QML article we are going to talk about Model View Programming, also we are going to create a simple example. Simply put, applications need to form data and display the data. Qt Quick has the notion of models, views, and delegates to display data. they modularize the visualization of data in order to give the developer or designer control over the different aspects of the data. a developer can swap a list view with a grid view with little changes to the data. Similarly, encapsulating an instance of the data in a delegate allows the developer to dictate how to present or handle the data.

- Model – contains the data and its structure. There are several QML types for creating models.
- View – a container that displays the data. The view might display the data in a list or a grid.
- Delegate – dictates how the data should appear in the view. The delegate takes each data in the model and encapsulates it. The data is accessible through the delegate. The delegate can also write data back into editable models (e.g. in a TextField’s onAccepted Handler).
To visualize data, bind the view’s model property to a model and the delegate property to a component or another compatible type.
Also you can check more Python articles in the below links
1: Kivy GUI Development Tutorials
2: Python TKinter GUI Development
5: PyQt5 GUI Development Course
So now this is our three QML files, we have a delegate file, model and also model project
|
1 2 3 4 5 6 7 8 9 10 11 12 13 14 15 16 17 18 19 20 21 22 23 24 25 26 27 28 29 30 31 32 |
import QtQuick.Window 2.2 import QtQuick 2.3 Window { visible:true width:Screen.width/2 height:Screen.height/2 ListView { width:Screen.width/2 height:Screen.height/2 // Point to the model model:mod delegate:MyDel{} } MyModel{id:mod} } |
This is MyModel.qml
|
1 2 3 4 5 6 7 8 9 10 11 12 13 14 15 16 17 18 19 20 21 22 23 24 25 26 27 28 29 30 31 32 33 34 |
import QtQuick 2.3 ListModel { ListElement { name: "Cats" c:"black" price:5 } ListElement { name: "Dogs" c:"red" price:4 } ListElement { name: "Tiger" c:"green" price:8 } } |
And this is our delegate file.
|
1 2 3 4 5 6 7 8 9 10 11 12 13 14 15 16 17 18 19 20 21 22 23 24 25 26 27 28 29 |
import QtQuick 2.3 import QtQuick.Window 2.2 Item { width:Screen.width/2 height:Screen.height/10 Rectangle { id:rect color:c width:Screen.width/2 height:Screen.height/10 Text { text:name anchors.centerIn:rect font.pixelSize:20 } } } |
So now we need to load our main Model Project in python using this code.
|
1 2 3 4 5 6 7 8 9 10 11 12 13 14 15 16 17 18 19 20 21 22 23 24 |
from PyQt5.QtQml import QQmlApplicationEngine from PyQt5.QtWidgets import QApplication from PyQt5.QtGui import QIcon import sys def runQML(): app =QApplication(sys.argv) engine = QQmlApplicationEngine() app.setWindowIcon(QIcon("icon.png")) engine.load('ModelPro.qml') if not engine.rootObjects(): return -1 return app.exec_() if __name__ == "__main__": sys.exit(runQML()) |
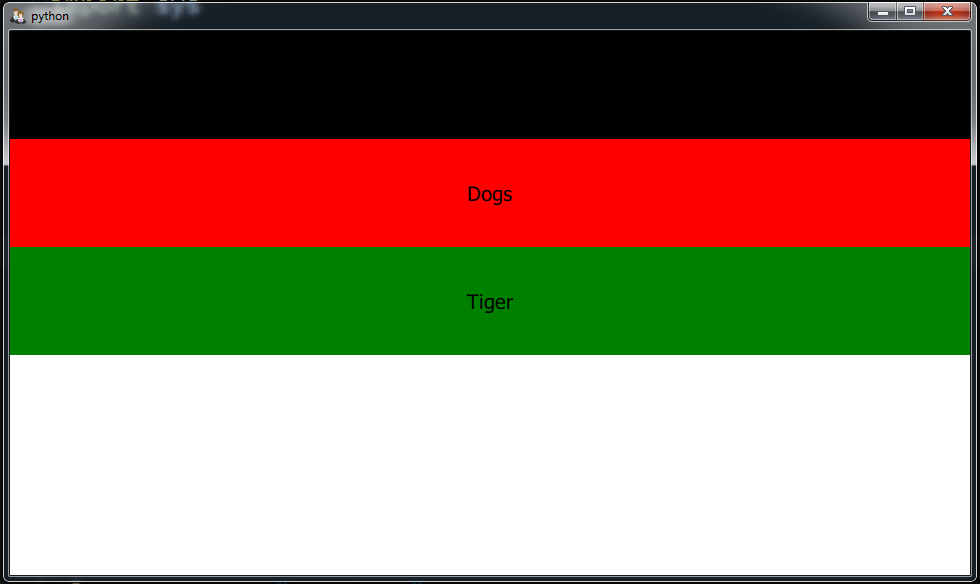
Run the complete code and this will be the result

Also you can watch the complete video for this article
Subscribe and Get Free Video Courses & Articles in your Email