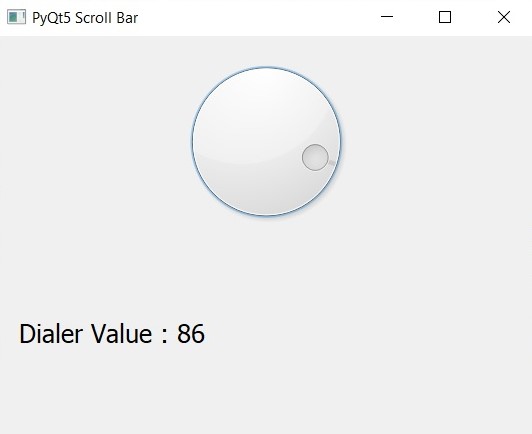
In this PyQt5 article i want to show creating QDial Example With valueChanged Signal, also iam going to show you can connect valueChanged Signal with PyQt5 slot. QDial class provides a rounded range control (like a speedometer or potentiometer). QDial is used when the user needs to control a value within a program-definable range, and the range either wraps around (for example, with angles measured from 0 to 359 degrees) or the dialog layout needs a square widget.
What is PyQt5 QDial ?
PyQt5 QDial is graphical user interface (GUI) widget provided by the PyQt5 library. it is circular dial that can be rotated by the user to select a value within range of values. QDial widget is often used as a user interface control for adjusting values such as volume or brightness.
PyQt5 QDial widget provides several properties that allow the developer to customize its appearance and behavior. for example minimum and maximum values of the dial can be set, as well as the current value. the widget can also be set to either wrap around when the maximum or minimum values are reached or to stop at the limits.
Also PyQt5 QDial widget provides several signals that can be used to respond to user interaction with the dial. for example valueChanged signal is emitted whenever the user rotates the dial to a new value.
So we can say that PyQt5 QDial is useful widget for creating interactive GUI applications with a circular dial interface.
Also you can read more Python GUI articles in the below links
- Kivy GUI Development Tutorials
- TKinter GUI Development Tutorials
- Pyside2 GUI Development
- wxPython GUI Development Tutorials
- PyQt5 GUI Development Tutorials
First we need some imports.
|
1 2 3 |
from PyQt5 import QtGui from PyQt5.QtWidgets import QApplication, QWidget, QDial, QVBoxLayout, QLabel import sys |
After that we are going to create our main Window class that extends from QWidget. and in the constructor of the class we need to add some requirements of the window like set window title, window icon and window geometry.
|
1 2 3 4 5 6 7 8 9 10 11 |
class Window(QWidget): def __init__(self): super().__init__() self.title = "PyQt5 Scroll Bar" self.top = 200 self.left = 500 self.width = 400 self.height = 300 self.setWindowIcon(QtGui.QIcon("icon.png")) self.setWindowTitle(self.title) self.setGeometry(self.left, self.top, self.width, self.height) |
In here we have created the object of QVBoxLayout and also QLabel.
|
1 2 |
vbox = QVBoxLayout() self.label = QLabel(self) |
We also change the font of our QLabel using this code.
|
1 |
self.label.setFont(QtGui.QFont("Sanserif", 15)) |
And now we create our QDial. we set the maximum and minimum value for the qdial.
|
1 2 3 4 |
self.dial = QDial() self.dial.setMaximum(0) self.dial.setMaximum(100) self.dial.setValue(30) |
In here we have connected the valueChanged signal of QDial with dialer_changed() slot or method.
|
1 |
self.dial.valueChanged.connect(self.dialer_changed) |
Now we create our slot for connecting to valueChanged Signal. first we are going to get the value from QDial and after that we set the value to the label.
|
1 2 3 |
def dialer_changed(self): getValue = self.dial.value() self.label.setText(" Dialer Value : " + str(getValue)) |
Also every PyQt5 application must create an application object.
|
1 |
App = QApplication(sys.argv) |
Finally, we enter the mainloop of the application. The event handling starts from this point.
|
1 2 |
window = Window() sys.exit(App.exec_()) |
Complete source code PyQt5 QDial Example With valueChanged Signal
|
1 2 3 4 5 6 7 8 9 10 11 12 13 14 15 16 17 18 19 20 21 22 23 24 25 26 27 28 29 30 31 32 33 34 35 36 |
from PyQt5 import QtGui from PyQt5.QtWidgets import QApplication, QWidget, QDial, QVBoxLayout, QLabel import sys class Window(QWidget): def __init__(self): super().__init__() self.title = "PyQt5 Scroll Bar" self.top = 200 self.left = 500 self.width = 400 self.height = 300 self.setWindowIcon(QtGui.QIcon("icon.png")) self.setWindowTitle(self.title) self.setGeometry(self.left, self.top, self.width, self.height) vbox = QVBoxLayout() self.label = QLabel(self) self.label.setFont(QtGui.QFont("Sanserif", 15)) self.dial = QDial() self.dial.setMaximum(0) self.dial.setMaximum(100) self.dial.setValue(30) self.dial.valueChanged.connect(self.dialer_changed) vbox.addWidget(self.dial) vbox.addWidget(self.label) self.setLayout(vbox) self.show() def dialer_changed(self): getValue = self.dial.value() self.label.setText(" Dialer Value : " + str(getValue)) App = QApplication(sys.argv) window = Window() sys.exit(App.exec_()) |
Run the code and this is the result

Also you can watch the complete video for this article
Subscribe and Get Free Video Courses & Articles in your Email