In this Python PyQt5 article iam going to show you How to Create QGridLayout in Python PyQt5. The GridLayout widget provides a container which allows widgets to be laid out in a dynamically sized grid.
What is QGridLayout in PyQt5 ?
QGridLayout is a layout manager in PyQt5 that arranges widgets in a grid. It divides the space into rows and columns and then places the widgets in the cells of the grid. Each cell can contain only one widget.
To use QGridLayout, you create an instance of the class and set it as the layout for the container widget. You then add widgets to the layout using the addWidget method, specifying the row and column where the widget should be placed. You can also specify the number of rows and columns in the grid using the setRowCount and setColumnCount methods.
Join PyQt5 Full Course for Free
PyQt5 Course
Also you can read more Python GUI articles in the below links
- Kivy GUI Development Tutorials
- TKinter GUI Development Tutorials
- Pyside2 GUI Development
- wxPython GUI Development Tutorials
- PyQt5 GUI Development Tutorials
How to Create QGridLayout in Python PyQt5
First we need some imports.
|
1 2 3 4 5 |
from PyQt5.QtWidgets import QApplication, QDialog, QPushButton, QGridLayout, QGroupBox, QVBoxLayout import sys from PyQt5 import QtGui from PyQt5.QtCore import QRect from PyQt5 import QtCore |
After that we are going to create our main Window class that extends from QDialog . and in the constructor of the class we need to initialize some requirements of the window . also we have called our initWindow() method in here.
|
1 2 3 4 5 6 7 8 9 10 |
class Window(QDialog): def __init__(self): super().__init__() self.title = "Grid Layout" self.top = 200 self.left = 400 self.width = 400 self.height = 100 self.iconName = "icon.png" self.InitWindow() |
After that we are going to create our InitWindow() method. we set our window title, window icon and window geometry. also we have created the QVBoxLayout object in here. we have also called our CreateLayout() method in here.
|
1 2 3 4 5 6 7 8 9 |
def InitWindow(self): self.setWindowIcon(QtGui.QIcon(self.iconName)) self.setWindowTitle(self.title) self.setGeometry(self.left, self.top, self.width, self.height) self.CreateLayout() vbox = QVBoxLayout() vbox.addWidget(self.groupBox) self.setLayout(vbox) self.show() |
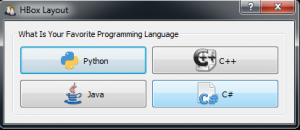
In here we have created the objects for QGroupBox and QGridLayout. also we have created some QPushButtons. because we want to add the buttons in the grid layout.
|
1 2 3 4 5 6 7 8 9 10 11 12 13 14 15 16 17 18 19 20 21 22 23 24 |
def CreateLayout(self): self.groupBox = QGroupBox("What Is Your Favorite Programming Language") gridLayout = QGridLayout() self.button = QPushButton("Python", self) self.button.setIcon(QtGui.QIcon("pythonicon.png")) self.button.setIconSize(QtCore.QSize(40, 40)) self.button.setMinimumHeight(40) gridLayout.addWidget(self.button, 0,0) self.button2 = QPushButton("C++", self) self.button2.setIcon(QtGui.QIcon("cpp.png")) self.button2.setIconSize(QtCore.QSize(40, 40)) self.button2.setMinimumHeight(40) gridLayout.addWidget(self.button2, 0,1) self.button3 = QPushButton("Java", self) self.button3.setIcon(QtGui.QIcon("java.png")) self.button3.setIconSize(QtCore.QSize(40, 40)) self.button3.setMinimumHeight(40) gridLayout.addWidget(self.button3,1,0) self.button4 = QPushButton("C#", self) self.button4.setIcon(QtGui.QIcon("csharp.png")) self.button4.setIconSize(QtCore.QSize(40, 40)) self.button4.setMinimumHeight(40) gridLayout.addWidget(self.button4, 1, 1) self.groupBox.setLayout(gridLayout) |
Also every PyQt5 application must create an application object.
|
1 |
app = QApplication(sys.argv) |
Finally, we enter the mainloop of the application. The event handling starts from this point.
|
1 2 |
window = Window() sys.exit(app.exec_()) |
Run the complete code and this will be the result

Complete source code for PyQt5 Grid Layout (Python GUI Development)
|
1 2 3 4 5 6 7 8 9 10 11 12 13 14 15 16 17 18 19 20 21 22 23 24 25 26 27 28 29 30 31 32 33 34 35 36 37 38 39 40 41 42 43 44 45 46 47 48 49 50 51 52 53 54 55 56 57 58 59 60 |
from PyQt5.QtWidgets import QApplication, QDialog, QPushButton, QGridLayout, QGroupBox, QVBoxLayout import sys from PyQt5 import QtGui from PyQt5.QtCore import QRect from PyQt5 import QtCore class Window(QDialog): def __init__(self): super().__init__() self.title = "HBox Layout" self.top = 200 self.left = 400 self.width = 400 self.height = 100 self.iconName = "icon.png" self.InitWindow() def InitWindow(self): self.setWindowIcon(QtGui.QIcon(self.iconName)) self.setWindowTitle(self.title) self.setGeometry(self.left, self.top, self.width, self.height) self.CreateLayout() vbox = QVBoxLayout() vbox.addWidget(self.groupBox) self.setLayout(vbox) self.show() def CreateLayout(self): self.groupBox = QGroupBox("What Is Your Favorite Programming Language") gridLayout = QGridLayout() self.button = QPushButton("Python", self) self.button.setIcon(QtGui.QIcon("pythonicon.png")) self.button.setIconSize(QtCore.QSize(40, 40)) self.button.setMinimumHeight(40) gridLayout.addWidget(self.button, 0,0) self.button2 = QPushButton("C++", self) self.button2.setIcon(QtGui.QIcon("cpp.png")) self.button2.setIconSize(QtCore.QSize(40, 40)) self.button2.setMinimumHeight(40) gridLayout.addWidget(self.button2, 0,1) self.button3 = QPushButton("Java", self) self.button3.setIcon(QtGui.QIcon("java.png")) self.button3.setIconSize(QtCore.QSize(40, 40)) self.button3.setMinimumHeight(40) gridLayout.addWidget(self.button3,1,0) self.button4 = QPushButton("C#", self) self.button4.setIcon(QtGui.QIcon("csharp.png")) self.button4.setIconSize(QtCore.QSize(40, 40)) self.button4.setMinimumHeight(40) gridLayout.addWidget(self.button4, 1, 1) self.groupBox.setLayout(gridLayout) if __name__ == "__main__": app = QApplication(sys.argv) window = Window() sys.exit(app.exec_()) |
This is another example on Python PyQt5 QGridLayout
|
1 2 3 4 5 6 7 8 9 10 11 12 13 14 15 16 17 18 19 20 21 22 23 24 25 26 27 28 29 30 31 32 33 34 35 36 37 38 39 40 41 42 43 |
import sys from PyQt5.QtWidgets import QApplication, QWidget, QLabel, QLineEdit, QPushButton, QGridLayout class Example(QWidget): def __init__(self): super().__init__() self.initUI() def initUI(self): # Create widgets lbl1 = QLabel('Name:', self) lbl2 = QLabel('Age:', self) lbl3 = QLabel('Email:', self) txt1 = QLineEdit(self) txt2 = QLineEdit(self) txt3 = QLineEdit(self) btn = QPushButton('Submit', self) # Create grid layout grid = QGridLayout() self.setLayout(grid) # Add widgets to layout grid.addWidget(lbl1, 0, 0) grid.addWidget(txt1, 0, 1) grid.addWidget(lbl2, 1, 0) grid.addWidget(txt2, 1, 1) grid.addWidget(lbl3, 2, 0) grid.addWidget(txt3, 2, 1) grid.addWidget(btn, 3, 1) self.setGeometry(300, 300, 250, 150) self.setWindowTitle('QGridLayout Example') self.show() if __name__ == '__main__': app = QApplication(sys.argv) ex = Example() sys.exit(app.exec_()) |
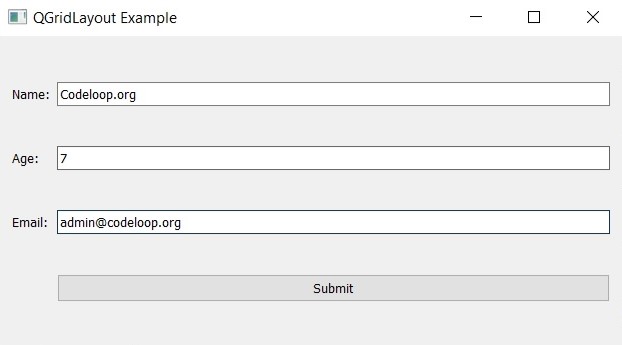
In this example we have created simple form with three labels, three text input fields, and a submit button. We use QGridLayout to arrange the widgets in a grid. addWidget method is used to add each widget to the layout and specify its position in the grid.
When you run the program, you’ll see the form displayed in a window with the widgets arranged in a grid. You can enter text in the text input fields and click the submit button to submit the form.
Run the complete code and this is the result

Also you can watch the complete video for this article
Subscribe and Get Free Video Courses & Articles in your Email