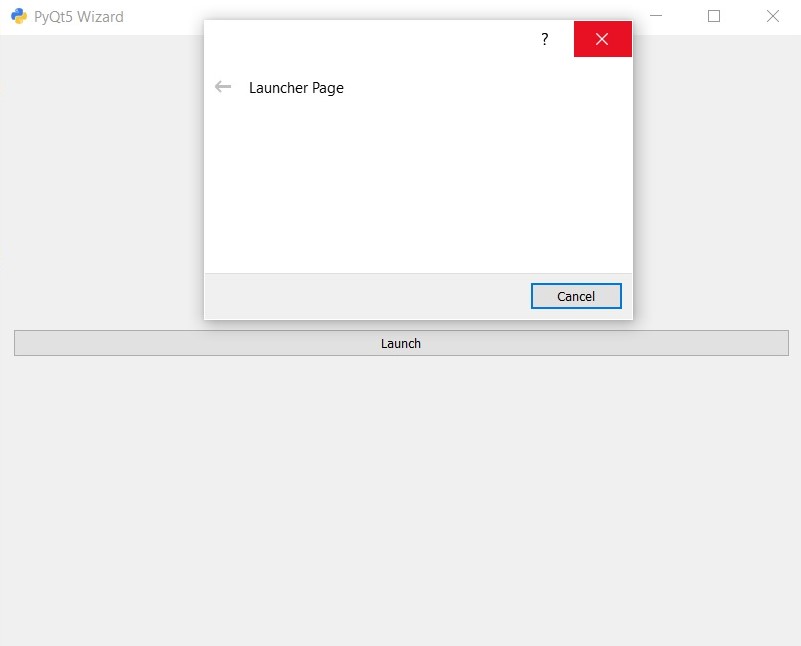
In this PyQt5 GUI article i want to show you Creating Wizard Page With QWizard in PyQt5, QWizard is a class in PyQt5 that allows you to create wizard-like user interface for series of steps or pages. wizard is a common UI pattern for guiding the user through a complex or multi step process.
QWizard provides simple way to create series of pages that guide the user through set of steps. each page can contain different widgets, such as labels, input fields, and buttons and can be customized to fit the specific needs of your application.
QWizard also provides navigation buttons that allow the user to move forward and backward through the wizard, as well as progress bar that shows the user how far they are in the process.
So we can say that QWizard makes it easy to create professional looking wizard like UI in your PyQt5 application, and can be a useful tool for improving the user experience when dealing with complex tasks.
So first we need some imports.
|
1 2 3 |
from PyQt5 import QtGui from PyQt5.QtWidgets import QApplication, QWidget, QWizard, QVBoxLayout, QPushButton import sys |
This is our main window class that extends from QWidget and in here we are going to initialize some requirements of the window like title and geometry. also we have called our InitWindow() method in here.
|
1 2 3 4 5 6 7 8 9 10 11 12 |
class Window(QWidget): def __init__(self): super().__init__() self.title = "PyQt5 Wizard" self.top = 200 self.left = 500 self.width = 400 self.height = 300 self.InitWindow() |
In here we have set the window title, icon and geometry.
|
1 2 3 |
self.setWindowIcon(QtGui.QIcon("icon.png")) self.setWindowTitle(self.title) self.setGeometry(self.left, self.top, self.width, self.height) |
When you are going to create widgets, you need to create layout, in here we are using QVBoxLayout.
|
1 |
vbox= QVBoxLayout() |
This is our QPushButton, and you can see that i have the connected button clicked signal with the btn_clicked() method.
|
1 2 |
button = QPushButton("Launch") button.clicked.connect(self.btn_clicked) |
In here we have created the object of the QWizard class, also we have give a title to our wizard window.
|
1 2 |
self.wizard = QWizard() self.wizard.setWindowTitle("Launcher Page") |
This is the method that we have already connected with the clicked signal of the QPushButton.
|
1 2 3 |
def btn_clicked(self): self.wizard.open() |
And this is the event loop for our gui window.
|
1 2 3 |
App = QApplication(sys.argv) window = Window() sys.exit(App.exec_()) |
Complete source code for PyQt5 GUI Creating Wizard Page With QWizard.
|
1 2 3 4 5 6 7 8 9 10 11 12 13 14 15 16 17 18 19 20 21 22 23 24 25 26 27 28 29 30 31 32 33 34 35 36 37 38 39 40 41 42 43 44 45 46 47 48 49 |
from PyQt5 import QtGui from PyQt5.QtWidgets import QApplication, QWidget, QWizard, QVBoxLayout, QPushButton import sys class Window(QWidget): def __init__(self): super().__init__() self.title = "PyQt5 Wizard" self.top = 200 self.left = 500 self.width = 400 self.height = 300 self.InitWindow() def InitWindow(self): self.setWindowIcon(QtGui.QIcon("icon.png")) self.setWindowTitle(self.title) self.setGeometry(self.left, self.top, self.width, self.height) vbox= QVBoxLayout() button = QPushButton("Launch") button.clicked.connect(self.btn_clicked) vbox.addWidget(button) self.setLayout(vbox) self.wizard = QWizard() self.wizard.setWindowTitle("Launcher Page") self.show() def btn_clicked(self): self.wizard.open() App = QApplication(sys.argv) window = Window() sys.exit(App.exec_()) |
Run your code and this will be the output

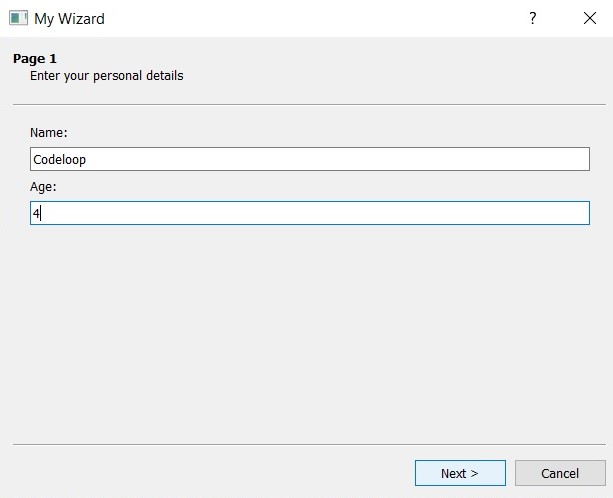
This is more complex example, in this example we will have three pages to work
|
1 2 3 4 5 6 7 8 9 10 11 12 13 14 15 16 17 18 19 20 21 22 23 24 25 26 27 28 29 30 31 32 33 34 35 36 37 38 39 40 41 42 43 44 45 46 47 48 49 50 51 52 53 54 55 56 57 58 59 60 61 62 63 64 65 66 67 68 69 70 71 72 73 74 75 76 77 78 79 80 81 82 83 84 85 86 87 88 89 90 91 92 93 94 95 96 97 98 99 100 |
from PyQt5.QtWidgets import QApplication, QWizard, QWizardPage, QLabel, QLineEdit, QVBoxLayout import sys class Page1(QWizardPage): def __init__(self, parent=None): super().__init__(parent) self.setTitle("Page 1") self.setSubTitle("Enter your personal details") layout = QVBoxLayout() self.setLayout(layout) self.nameLabel = QLabel("Name:") self.nameEdit = QLineEdit() self.nameEdit.setPlaceholderText("Enter your name") self.registerField("name*", self.nameEdit) layout.addWidget(self.nameLabel) layout.addWidget(self.nameEdit) self.ageLabel = QLabel("Age:") self.ageEdit = QLineEdit() self.registerField("age", self.ageEdit) layout.addWidget(self.ageLabel) layout.addWidget(self.ageEdit) class Page2(QWizardPage): def __init__(self, parent=None): super().__init__(parent) self.setTitle("Page 2") self.setSubTitle("Choose your favorite programming language") layout = QVBoxLayout() self.setLayout(layout) self.languageLabel = QLabel("Language:") self.languageEdit = QLineEdit() self.languageEdit.setPlaceholderText("Enter your favorite language") self.registerField("language*", self.languageEdit) layout.addWidget(self.languageLabel) layout.addWidget(self.languageEdit) class Page3(QWizardPage): def __init__(self, parent=None): super().__init__(parent) self.setTitle("Page 3") self.setSubTitle("Choose your favorite color") layout = QVBoxLayout() self.setLayout(layout) self.colorLabel = QLabel("Color:") self.colorEdit = QLineEdit() self.colorEdit.setPlaceholderText("Enter your favorite color") self.registerField("color*", self.colorEdit) layout.addWidget(self.colorLabel) layout.addWidget(self.colorEdit) class Wizard(QWizard): def __init__(self, parent=None): super().__init__(parent) self.setWindowTitle("My Wizard") self.addPage(Page1()) self.addPage(Page2()) self.addPage(Page3()) self.setWizardStyle(QWizard.ClassicStyle) self.setOption(QWizard.NoBackButtonOnStartPage) self.setButtonText(QWizard.NextButton, "Next >") self.setButtonText(QWizard.BackButton, "< Back") self.setButtonText(QWizard.FinishButton, "Finish") self.button(QWizard.FinishButton).setEnabled(False) self.currentIdChanged.connect(self.validateCurrentPage) def validateCurrentPage(self): if self.currentId() == 0: if not self.field("name"): self.button(QWizard.NextButton).setEnabled(False) else: self.button(QWizard.NextButton).setEnabled(True) elif self.currentId() == 1: if not self.field("language"): self.button(QWizard.NextButton).setEnabled(False) else: self.button(QWizard.NextButton).setEnabled(True) elif self.currentId() == 2: if not self.field("color"): self.button(QWizard.FinishButton).setEnabled(False) else: self.button(QWizard.FinishButton).setEnabled(True) return super().validateCurrentPage() if __name__ == '__main__': app = QApplication(sys.argv) wizard = Wizard() wizard.show() sys.exit(app.exec_()) |
This wizard has three pages:
- Page 1: asks for the user’s name and age
- Page 2: asks for the user’s favorite programming language
- Page 3: asks for the user’s favorite color
The wizard is set up to disable the “Next” button until all
Run your code and this will be the output

Also you can check more Python GUI articles in the below links
- Kivy GUI Development Tutorials
- TKinter GUI Development Tutorials
- Psyide2 GUI Development
- wxPython GUI Development Tutorials
- PyQt5 GUI Development Tutorials
Also you can watch the complete video for this article
Subscribe and Get Free Video Courses & Articles in your Email