In this PyQt5 GUI article i want to show you Creating QScrollArea. The QScrollArea class provides a scrolling view onto another widget.A scroll area is used to display the contents of a child widget within a frame. If the widget exceeds the size of the frame, the view can provide scroll bars so that the entire area of the child widget can be viewed.
What is PyQt5 ?
PyQt5 is Python binding for the Qt cross platform application framework. it allows developers to create desktop applications with graphical user interface (GUI) using the Python programming language. PyQt5 is developed by Riverbank Computing and is licensed under the GPL and commercial licenses.
Qt is popular framework for developing graphical user interfaces, and PyQt5 provides access to all of Qt’s functionality, including support for widgets, layouts, graphics, multimedia and networking. it also provides Pythonic API for working with Qt, which makes it easy to create and manage GUIs in Python.
Some of the key features of PyQt5 include:
- Cross-platform support: PyQt5 allows developers to create applications that run on multiple platforms, including Windows, macOS and Linux.
- Qt Designer integration: PyQt5 includes integration with Qt Designer, it is visual tool for designing and laying out GUIs.
- Extensive documentation: PyQt5 provides extensive documentation and examples, which make it easy to learn and use.
- Support for modern Python features: PyQt5 supports the latest features of Python such as type annotations, async/await and f-strings.
- Large community: PyQt5 has large and active community of developers, which provides support, guidance and contributions to the project.
so PyQt5 is often used in desktop application development for creating GUIs with functionalities, such as data visualization, multimedia playback and database integration. it is also often used in scientific and engineering applications for creating custom visualization and analysis tools, in this article you will see that how easily we can use multimedia module for creating of Media Player with Python & PyQt5.
Also you can read more Python GUI articles in the below links
- Kivy GUI Development Tutorials
- TKinter GUI Development Tutorials
- Psyide2 GUI Development
- wxPython GUI Development Tutorials
- PyQt5 GUI Development Tutorials
How to Create ScrollArea in PyQt5
First we need some imports.
|
1 2 3 |
from PyQt5 import QtGui from PyQt5.QtWidgets import QApplication, QWidget, QScrollArea, QVBoxLayout, QGroupBox, QLabel, QPushButton, QFormLayout import sys |
After that we are going to create our main Window class that extends from QWidget. and in
the constructor of the class we need to add some requirements of the window like set window
title, window icon and window geometry.
and in the constructor we have added a value, because we want to add some value in there.
|
1 2 3 4 5 6 7 8 9 10 11 |
class Window(QWidget): def __init__(self, val): super().__init__() self.title = "PyQt5 Scroll Bar" self.top = 200 self.left = 500 self.width = 400 self.height = 300 self.setWindowIcon(QtGui.QIcon("icon.png")) self.setWindowTitle(self.title) self.setGeometry(self.left, self.top, self.width, self.height) |
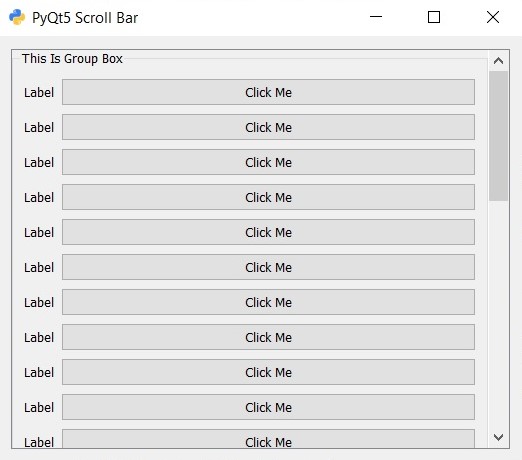
In here we going to create the object of QFormLayout and QGroupBox. also we have created two empty lists.
|
1 2 3 4 |
formLayout =QFormLayout() groupBox = QGroupBox("This Is Group Box") labelLis = [] comboList = [] |
Using this code we want to create some buttons to add in the window for testing the scroll of the window.
|
1 2 3 4 |
for i in range(val): labelLis.append(QLabel("Label")) comboList.append(QPushButton("Click Me")) formLayout.addRow(labelLis[i], comboList[i]) |
Also every PyQt5 application must create an application object.
|
1 |
App = QApplication(sys.argv) |
Finally, we enter the mainloop of the application. The event handling starts from this point.
|
1 2 |
window = Window(30) sys.exit(App.exec()) |
Complete source code for PyQt5 GUI Creating QScrollArea Example
|
1 2 3 4 5 6 7 8 9 10 11 12 13 14 15 16 17 18 19 20 21 22 23 24 25 26 27 28 29 30 31 32 33 |
from PyQt5 import QtGui from PyQt5.QtWidgets import QApplication, QWidget, QScrollArea, QVBoxLayout, QGroupBox, QLabel, QPushButton, QFormLayout import sys class Window(QWidget): def __init__(self, val): super().__init__() self.title = "PyQt5 Scroll Bar" self.top = 200 self.left = 500 self.width = 400 self.height = 300 self.setWindowIcon(QtGui.QIcon("icon.png")) self.setWindowTitle(self.title) self.setGeometry(self.left, self.top, self.width, self.height) formLayout =QFormLayout() groupBox = QGroupBox("This Is Group Box") labelLis = [] comboList = [] for i in range(val): labelLis.append(QLabel("Label")) comboList.append(QPushButton("Click Me")) formLayout.addRow(labelLis[i], comboList[i]) groupBox.setLayout(formLayout) scroll = QScrollArea() scroll.setWidget(groupBox) scroll.setWidgetResizable(True) scroll.setFixedHeight(400) layout = QVBoxLayout(self) layout.addWidget(scroll) self.show() App = QApplication(sys.argv) window = Window(30) sys.exit(App.exec()) |
Run the complete code and this is the output

This is another example for PyQt5 Scrollbar
|
1 2 3 4 5 6 7 8 9 10 11 12 13 14 15 16 17 18 19 20 21 22 23 24 25 26 27 28 29 30 31 32 33 34 35 36 37 |
import sys from PyQt5.QtWidgets import QApplication, QWidget, QVBoxLayout, QListWidget, QScrollBar class Window(QWidget): def __init__(self): super().__init__() self.MyUI() def MyUI(self): # Create a QListWidget to display the items self.list_widget = QListWidget(self) # Add some items to the list for i in range(20): self.list_widget.addItem("Item {}".format(i)) # Create a scrollbar and connect it to the list scrollbar = QScrollBar(self) scrollbar.setMaximum(self.list_widget.count()) scrollbar.sliderMoved.connect(self.list_widget.setCurrentRow) # Create a layout for the widget and add the list and scrollbar to it vbox = QVBoxLayout(self) vbox.addWidget(self.list_widget) vbox.addWidget(scrollbar) self.setLayout(vbox) self.setGeometry(300, 300, 250, 150) self.setWindowTitle('Scrollbar Example') self.show() if __name__ == '__main__': app = QApplication(sys.argv) window = Window() sys.exit(app.exec_()) |
In this example we have created QListWidget to display list of items, and after that we have created QScrollBar and connected to the list using the sliderMoved signal. when the user moves the scrollbar, the setCurrentRow method of the list is called to set the current row to the appropriate item. we add both the list and scrollbar to QVBoxLayout and set that as the layout for the widget.
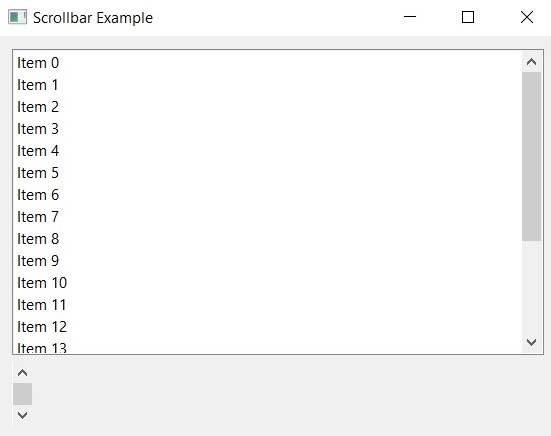
when you run the example, you should see window with list of 20 items and scrollbar on the right hand side. you can use the scrollbar to scroll through the list and select different items.
This will be the output of above code

Customization of ScrollArea in PyQt5
Using customization of QScrollArea in PyQt5 you can give nice appearance and behavior of the scroll area, and it will better suit their application’s needs.
This is an example
|
1 2 3 4 5 6 7 8 9 10 11 12 13 14 15 16 17 18 19 20 21 22 23 24 25 26 27 28 29 30 31 32 33 34 35 36 37 38 39 40 41 42 43 44 45 46 47 48 49 50 51 52 53 54 55 56 57 58 59 60 |
import sys from PyQt5 import QtGui, QtWidgets, QtCore class SCrollWindow(QtWidgets.QWidget): def __init__(self): super().__init__() self.title = "Codeloop - Customized QScrollArea" self.left = 200 self.top = 200 self.width = 400 self.height = 300 self.setWindowTitle(self.title) self.setGeometry(self.left, self.top, self.width, self.height) # Create a scroll area scroll = QtWidgets.QScrollArea(self) scroll.setGeometry(50, 50, 300, 200) # Set scrollbar policies scroll.setHorizontalScrollBarPolicy(QtCore.Qt.ScrollBarAlwaysOff) scroll.setVerticalScrollBarPolicy(QtCore.Qt.ScrollBarAsNeeded) # Create a widget to be scrolled widget = QtWidgets.QWidget() layout = QtWidgets.QVBoxLayout(widget) # Add content to the widget (labels in this example) for i in range(20): label = QtWidgets.QLabel(f"Label {i}") layout.addWidget(label) # Set the widget as the scroll area's widget scroll.setWidget(widget) # Set scrollbar properties scroll.verticalScrollBar().setMinimum(0) scroll.verticalScrollBar().setMaximum(100) scroll.verticalScrollBar().setSingleStep(10) scroll.verticalScrollBar().setPageStep(50) # Change size constraints scroll.setMinimumSize(200, 200) scroll.setMaximumSize(600, 600) # Customize scroll bar appearance using style sheet scroll.setStyleSheet(""" QScrollBar:vertical {background: #f0f0f0; border: 1px solid #ccc; width: 10px;} QScrollBar::handle:vertical {background: #999; border-radius: 5px;} QScrollBar::add-line:vertical {border: none; background: none;} QScrollBar::sub-line:vertical {border: none; background: none;} """) self.show() if __name__ == '__main__': app = QtWidgets.QApplication(sys.argv) window = SCrollWindow() sys.exit(app.exec_()) |
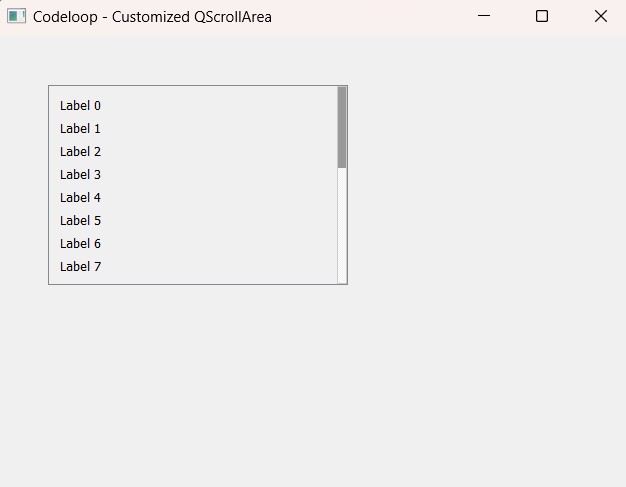
This code creates a PyQt5 application window with a customized QScrollArea. It sets the scrollbar policies to control their visibility, adjusts scrollbar properties, changes size constraints and customizes the scroll bar appearance using a style sheet. scroll area contains labels as content, but you can replace them with any widgets as needed. Run this code to see the customized QScrollArea in action.
Run the code and this will be the result

Integrating Interactive Elements in PyQt5 QScrollArea
Integrating interactive elements inside a QScrollArea in PyQt5 enhances user engagement and provides a richer user experience. Developers can include different widgets such as buttons, checkboxes or even custom widgets to enable user interaction.
This is an example:
|
1 2 3 4 5 6 7 8 9 10 11 12 13 14 15 16 17 18 19 20 21 22 23 24 25 26 27 28 29 30 31 32 33 34 35 36 37 38 39 |
import sys from PyQt5 import QtWidgets class InteractWindow(QtWidgets.QWidget): def __init__(self): super().__init__() self.title = "Codeloop - Interactive Elements" self.left = 200 self.top = 200 self.width = 400 self.height = 300 self.setWindowTitle(self.title) self.setGeometry(self.left, self.top, self.width, self.height) # Create scroll area scroll = QtWidgets.QScrollArea(self) scroll.setGeometry(50, 50, 300, 200) # Create widget to be scrolled widget = QtWidgets.QWidget() layout = QtWidgets.QVBoxLayout(widget) # Add interactive elements (buttons) to the widget for i in range(10): button = QtWidgets.QPushButton(f"Button {i}", self) layout.addWidget(button) # Set the widget as the scroll area's widget scroll.setWidget(widget) self.show() if __name__ == '__main__': app = QtWidgets.QApplication(sys.argv) window = InteractWindow() sys.exit(app.exec_()) |
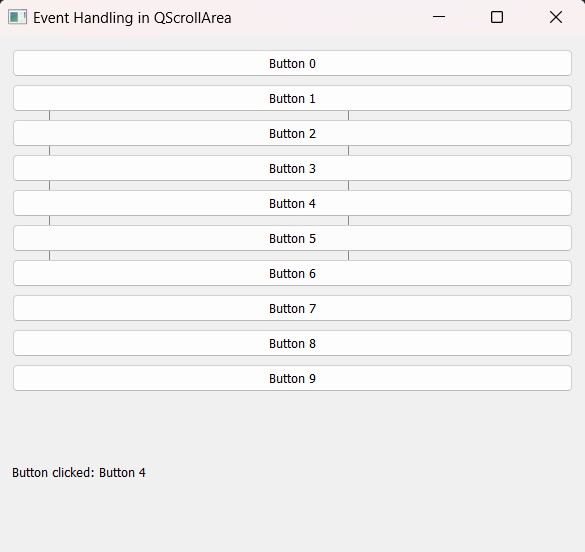
In this example, interactive elements (buttons) are added to the scroll area’s widget. Users can interact with these buttons, and developers can connect their signals to custom slots to handle button clicks and perform specific actions. This demonstrates how interactive elements can be seamlessly integrated into a QScrollArea to enhance user engagement and interactivity.
Handling events in PyQt5 QScrollArea
Handling events of PyQt5 QScrollArea allows you to respond to user interactions, such as scroll bar movements or interactions with the content, and it provides more dynamic and interactive user experience.
This is an example
|
1 2 3 4 5 6 7 8 9 10 11 12 13 14 15 16 17 18 19 20 21 22 23 24 25 26 27 28 29 30 31 32 33 34 35 36 37 38 39 40 41 42 43 44 45 46 47 48 49 50 51 52 53 54 55 56 57 58 59 60 61 |
import sys from PyQt5.QtWidgets import QApplication, QWidget , QScrollArea, QVBoxLayout, QPushButton, QLabel from PyQt5.QtCore import Qt class EventWindow(QWidget): def __init__(self): super().__init__() self.title = "Event Handling in QScrollArea" self.left = 200 self.top = 200 self.width = 400 self.height = 300 self.setWindowTitle(self.title) self.setGeometry(self.left, self.top, self.width, self.height) # Create a scroll area scroll = QScrollArea(self) scroll.setGeometry(50, 50, 300, 200) layout = QVBoxLayout() # Add interactive elements (buttons) to the widget for i in range(10): button = QPushButton(f"Button {i}", self) layout.addWidget(button) button.clicked.connect(self.on_button_clicked) # Connect button click event # Create a label to display events self.event_label = QLabel(self) layout.addWidget(self.event_label) self.setLayout(layout) # Connect scroll bar value changed event scroll.verticalScrollBar().valueChanged.connect(self.on_scrollbar_value_changed) self.show() def on_scrollbar_value_changed(self, value): self.event_label.setText(f"Scroll bar value changed: {value}") def on_button_clicked(self): sender = self.sender() self.event_label.setText(f"Button clicked: {sender.text()}") def mousePressEvent(self, event): if event.button() == Qt.LeftButton: self.event_label.setText("Left mouse button pressed") def keyPressEvent(self, event): if event.key() == Qt.Key_Up: self.event_label.setText("Up arrow key pressed") if __name__ == '__main__': app = QApplication(sys.argv) window = EventWindow() sys.exit(app.exec_()) |
Run the code and this will be the result

FAQs:
What is the use of QScrollArea?
QScrollArea is a widget provided by PyQt, using that you can display larger content than the visible area. It provides a scrollable viewport onto another widget or layout, and it allows you to view content that extends beyond the visible boundaries of the widget.
What is a PyQt widget?
In PyQt, a widget is a graphical user interface (GUI) element that users can interact with it, for example buttons, labels, text boxes or scroll bars. Widgets serve as the building blocks of GUI applications, and it provides visual components that users interact with it to perform tasks or receive information.
Subscribe and Get Free Video Courses & Articles in your Email
Thank you for your nice site of PyQt5 tutorial; https://codeloop.org/pyqt5.
I’m a python beginner. I learned a lot form your site.
These days, I guess you have changed the layout of the site.
Up until now, in the right side of the site, I could see the List of series of 80 PyQt5 tutorials.
But now, there are the Ads instead of the List. So I can’t see these, so I can’t look for the tutorial which I want to study and can’t go to the page well.
I’m afraid but I want you to fix it before style if you could.
(And I’m not a English native speaker. I’m sorry for my strange English)
yea there is a little problem with the theme that iam using, iam working to solve that problem , after that i again add the custom sidebars for every tutorial.
thank you for your replay
I’m waiting for and wishing that problem solved
how i can make that button can use clicked.connect() ?