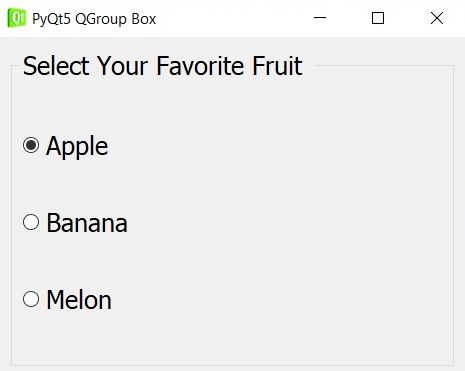
In this PyQt5 GUI article iam going to show you Creating QGroupBox in PyQt , also we want to use QGroupBox class. The Group Box example shows how to use the different kinds of group boxes in Qt. Group boxes are container widgets that organize buttons into groups, both logically and on screen. They manage the interactions between the user and the application so that you do not have to enforce simple constraints.
Join PyQt5 Full Course for Free
PyQt5 Course
What is QGroupBox in PyQt5 ?
In PyQt5, a QGroupBox is a widget that provides a container to group and organize a set of related widgets. It displays a border around its contents and optionally a title to indicate the grouping. The QGroupBox is useful for creating visually appealing and organized user interfaces.
A QGroupBox can contain any type of widget, such as buttons, labels, checkboxes, and so on. The contents of a QGroupBox can be aligned in various ways, including top, bottom, left, right, center, and justified. You can also customize the appearance of the QGroupBox using stylesheets, including the border, title, and background color.
Also you can read more Python GUI articles in the below links
- Kivy GUI Development Tutorials
- TKinter GUI Development Tutorials
- Pyside2 GUI Development
- wxPython GUI Development Tutorials
- PyQt5 GUI Development Tutorials
PyQt5 GUI Creating QGroupBox In PyQt
First we need some imports.
|
1 2 3 |
from PyQt5 import QtGui from PyQt5.QtWidgets import QApplication, QWidget, QHBoxLayout, QRadioButton, QGroupBox, QVBoxLayout import sys |
After that we are going to create our main Window class that extends from QWidget. and in the constructor of the class we need to add some requirements of the window like set window title, window icon and window geometry.
|
1 2 3 4 5 6 7 8 9 10 11 |
class Window(QWidget): def __init__(self): super().__init__() self.title = "PyQt5 QGroup Box" self.top = 200 self.left = 500 self.width = 400 self.height = 300 self.setWindowTitle(self.title) self.setWindowIcon(QtGui.QIcon("icon.png")) self.setGeometry(self.left, self.top, self.width, self.height) |
In here we are going to create the object of QHBoxLayout with QGroupBox. also we have the font for the group box.
|
1 2 3 |
hbox = QHBoxLayout() groupbox = QGroupBox("Select Your Favorite Fruit ") groupbox.setFont(QtGui.QFont("Sanserif", 15)) |
Add the groupbox in the layout.
|
1 |
hbox.addWidget(groupbox) |
Create QVBoxLayout and add the radiobuttons to the vboxlayout. after that set the groupbox layout with the vbox.
|
1 2 3 4 5 6 7 8 9 |
vbox = QVBoxLayout() rad1 = QRadioButton("Apple") vbox.addWidget(rad1) rad2 = QRadioButton("Banana") vbox.addWidget(rad2) rad3 = QRadioButton("Melon") vbox.addWidget(rad3) groupbox.setLayout(vbox) self.setLayout(hbox) |
Also every PyQt5 application must create an application object.
|
1 |
App = QApplication(sys.argv) |
Finally, we enter the mainloop of the application. The event handling starts from this point.
|
1 2 |
window = Window() sys.exit(App.exec()) |
Complete source code for PyQt5 GUI Creating QGroupBox In PyQt
|
1 2 3 4 5 6 7 8 9 10 11 12 13 14 15 16 17 18 19 20 21 22 23 24 25 26 27 28 29 30 31 32 33 34 35 36 |
from PyQt5 import QtGui from PyQt5.QtWidgets import QApplication, QWidget, QHBoxLayout, QRadioButton, QGroupBox, QVBoxLayout import sys class Window(QWidget): def __init__(self): super().__init__() self.title = "PyQt5 QGroup Box" self.top = 200 self.left = 500 self.width = 400 self.height = 300 self.setWindowTitle(self.title) self.setWindowIcon(QtGui.QIcon("icon.png")) self.setGeometry(self.left, self.top, self.width, self.height) hbox = QHBoxLayout() groupbox = QGroupBox("Select Your Favorite Fruit ") groupbox.setFont(QtGui.QFont("Sanserif", 15)) hbox.addWidget(groupbox) vbox = QVBoxLayout() rad1 = QRadioButton("Apple") vbox.addWidget(rad1) rad2 = QRadioButton("Banana") vbox.addWidget(rad2) rad3 = QRadioButton("Melon") vbox.addWidget(rad3) groupbox.setLayout(vbox) self.setLayout(hbox) self.show() if __name__ == "__main__": App = QApplication(sys.argv) window = Window() sys.exit(App.exec_()) |
Run the complete code and this will be the result

Also you can watch the complete video for this article.
Subscribe and Get Free Video Courses & Articles in your Email