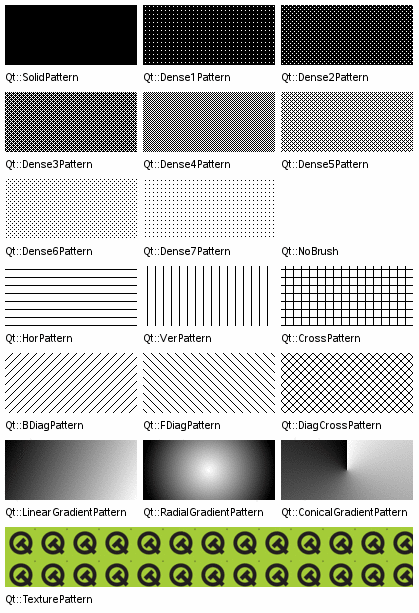
In this PyQt5 article we are going to talk about different Brush Styles that are exists in PyQt5 for QPainter Class. the QBrush class defines the fill pattern of shapes drawn by QPainter and there are different Brush Styles in PyQt5. you can watch my previous articles on QPainter drawing. so now according to QT Documentation about QBrush the QBrush class defines the fill pattern of shapes drawn by QPainter, the brush style() defines the fill pattern using the Qt.BrushStyle.
So first of all you can check my some articles on QPainter
1: PyQt5 Drawing Rectangle With QPainter Class
2: PyQt5 Drawing Ellipse With QPainter Class
3: PyQt5 Drawing Polygon With QPainter Class
Image from Qt Documentation

OK now this is the complete source code for PyQt5 Brush Styles In QPainter Class
|
1 2 3 4 5 6 7 8 9 10 11 12 13 14 15 16 17 18 19 20 21 22 23 24 25 26 27 28 29 30 31 32 33 34 35 36 37 38 39 40 41 42 43 44 45 46 47 48 49 50 51 52 53 54 55 56 57 58 59 60 61 62 63 64 65 66 67 68 69 70 |
from PyQt5 import QtGui from PyQt5.QtWidgets import QApplication, QMainWindow import sys from PyQt5.QtGui import QPainter, QPen, QBrush from PyQt5.QtCore import Qt class Window(QMainWindow): def __init__(self): super().__init__() # Window properties self.title = "Codeloop - PyQt5 Brush Styles" self.top = 200 self.left = 500 self.width = 600 self.height = 400 # Initialize the window self.InitWindow() def InitWindow(self): # Set window icon self.setWindowIcon(QtGui.QIcon("codeloop.png")) # Set window title and geometry self.setWindowTitle(self.title) self.setGeometry(self.left, self.top, self.width, self.height) # Show the window self.show() def paintEvent(self, event): # Define a QPainter object for painting painter = QPainter(self) # Set pen properties painter.setPen(QPen(Qt.black, 4, Qt.SolidLine)) # Draw rectangles with different brush styles painter.setBrush(QBrush(Qt.red, Qt.DiagCrossPattern)) painter.drawRect(10,100, 150,100) painter.setPen(QPen(Qt.black, 4, Qt.SolidLine)) painter.setBrush(QBrush(Qt.red, Qt.Dense1Pattern)) painter.drawRect(180, 100, 150, 100) painter.setPen(QPen(Qt.black, 4, Qt.SolidLine)) painter.setBrush(QBrush(Qt.red, Qt.HorPattern)) painter.drawRect(350, 100, 150, 100) painter.setPen(QPen(Qt.black, 4, Qt.SolidLine)) painter.setBrush(QBrush(Qt.red, Qt.VerPattern)) painter.drawRect(10, 220, 150, 100) painter.setPen(QPen(Qt.black, 4, Qt.SolidLine)) painter.setBrush(QBrush(Qt.red, Qt.BDiagPattern)) painter.drawRect(180, 220, 150, 100) painter.setPen(QPen(Qt.black, 4, Qt.SolidLine)) painter.setBrush(QBrush(Qt.red, Qt.Dense3Pattern)) painter.drawRect(350, 220, 150, 100) painter.setPen(QPen(Qt.black, 4, Qt.SolidLine)) painter.setBrush(QBrush(Qt.red, Qt.Dense4Pattern)) painter.drawRect(10, 340, 150, 100) # Create the application instance App = QApplication(sys.argv) # Create the main window window = Window() # Execute the application sys.exit(App.exec()) |
This is our main Window class that extends from QMainWindow. and in the constructor of
the class we need to initialize some window requirements.
|
1 2 3 4 5 6 7 8 9 10 11 12 |
class Window(QMainWindow): def __init__(self): super().__init__() self.title = "Codeloop - PyQt5 Brush Styles" self.top = 200 self.left = 500 self.width = 600 self.height = 400 self.InitWindow() |
In here we are going to set our window title, window icon and window geometry, also
we need to show our window in here.
|
1 2 3 4 5 |
def InitWindow(self): self.setWindowIcon(QtGui.QIcon("icon.png")) self.setWindowTitle(self.title) self.setGeometry(self.left, self.top, self.width, self.height) self.show() |
In the paintEvent() method we are going to implement our different brush styles.
|
1 2 3 4 5 6 7 8 9 10 11 12 13 14 15 16 17 18 19 20 21 22 23 24 25 26 27 28 29 30 31 |
def paintEvent(self, event): painter = QPainter(self) painter.setPen(QPen(Qt.black, 4, Qt.SolidLine)) painter.setBrush(QBrush(Qt.red, Qt.DiagCrossPattern)) painter.drawRect(10,100, 150,100) painter.setPen(QPen(Qt.black, 4, Qt.SolidLine)) painter.setBrush(QBrush(Qt.red, Qt.Dense1Pattern)) painter.drawRect(180, 100, 150, 100) painter.setPen(QPen(Qt.black, 4, Qt.SolidLine)) painter.setBrush(QBrush(Qt.red, Qt.HorPattern)) painter.drawRect(350, 100, 150, 100) painter.setPen(QPen(Qt.black, 4, Qt.SolidLine)) painter.setBrush(QBrush(Qt.red, Qt.VerPattern)) painter.drawRect(10, 220, 150, 100) painter.setPen(QPen(Qt.black, 4, Qt.SolidLine)) painter.setBrush(QBrush(Qt.red, Qt.BDiagPattern)) painter.drawRect(180, 220, 150, 100) painter.setPen(QPen(Qt.black, 4, Qt.SolidLine)) painter.setBrush(QBrush(Qt.red, Qt.Dense3Pattern)) painter.drawRect(350, 220, 150, 100) painter.setPen(QPen(Qt.black, 4, Qt.SolidLine)) painter.setBrush(QBrush(Qt.red, Qt.Dense4Pattern)) painter.drawRect(10, 340, 150, 100) |
Also every PyQt5 application must create an application object.
|
1 |
App = QApplication(sys.argv) |
Finally, we enter the mainloop of the application. The event handling starts from this point.
|
1 2 |
window = Window() sys.exit(App.exec()) |
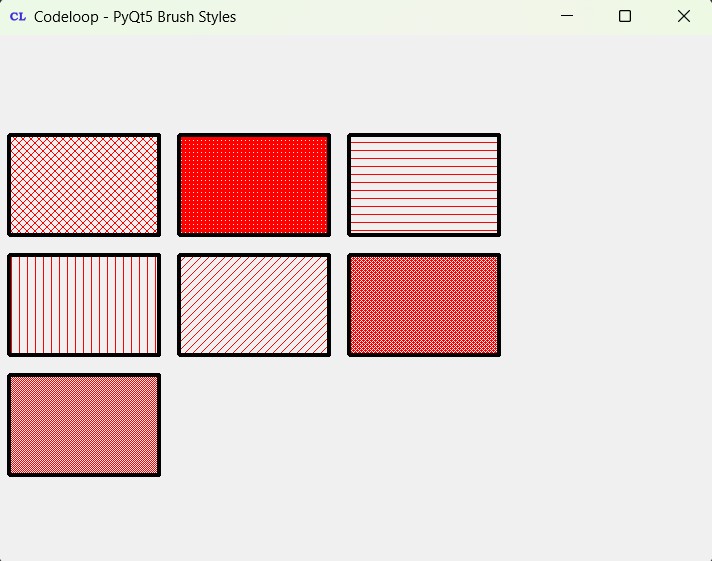
Run the complete code and this will be the result

FAQs:
How to use QPainter in Qt?
QPainter is a powerful class in Qt, and it is used for drawing and painting on different paint devices, such as widgets, pixmaps and images. for using QPainter in Qt, we need to follow these basic steps:
- Instantiate a QPainter object.
- Set up the painting options, such as pen, brush and font.
- Call different drawing functions of QPainter to draw shapes, text, and images.
- Optionally, handle transformation functions to scale, rotate or translate the painting coordinates.
- Finish painting by calling the
end()method of QPainter.
How to add shape in PyQt5?
For adding shapes in PyQt5 using QPainter, follow these steps:
- Subclass QWidget or QMainWindow to create a custom widget or window.
- Override paintEvent() method for handling painting.
- Instantiate QPainter object inside the paintEvent() method.
- Use drawing functions of QPainter to add shapes such as rectangles, ellipses, polygons, or lines.
- Set the pen and brush properties to customize the appearance of the shapes.
What is the difference between PySide and PyQt?
PySide and PyQt are both Python bindings for Qt framework, and it allows you to create GUI applications using Python. these are the main differences between them:
- Licensing: PyQt is available under the GNU GPL and commercial license, but PySide is available under the LGPL.
- Community and Support: PyQt has been around longer and has larger community and more resources available. PySide is an official Qt project supported by The Qt Company.
- Compatibility: PyQt is compatible with both Python 2 and Python 3, but PySide focuses on Python 3 only.
- APIs: While both provide similar APIs to access Qt functionalities, there may be minor differences in syntax and usage between PyQt and PySide.
Subscribe and Get Free Video Courses & Articles in your Email