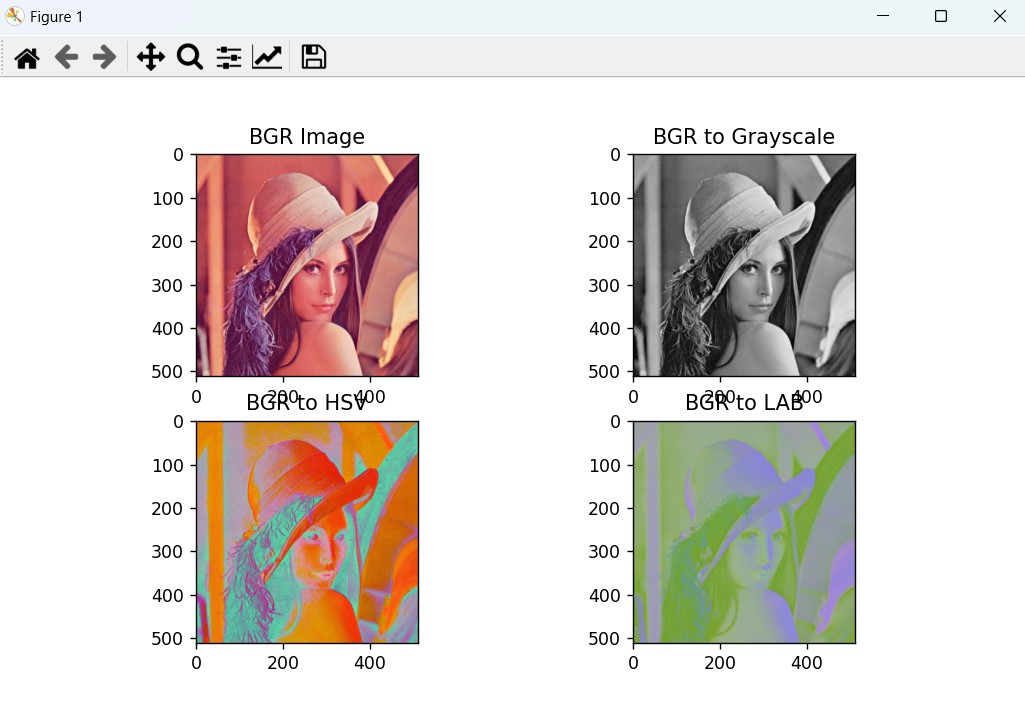
In this OpenCV Python article we are going to talk about Color Spaces Introduction. so first of all let’s talk about different types of color spaces in OpenCV.
What are OpenCV Color Spaces?
In OpenCV Color spaces represent colors in different ways, There are more than 150 color-space conversion methods available in OpenCV. But we will look into only two which are most widely used ones, BGR ↔ Gray and BGR ↔ HSV.
What is BGR Color?
BGR color is a color representation commonly used in digital imaging, particularly in computer vision and image processing. BGR stands for Blue-Green-Red, which refers to the order of color channels used to represent an image in memory.
What is RGB Color?
RGB color is a color model used in digital imaging, computer graphics and displays. RGB stands for Red, Green, and Blue, which are the primary colors of light. In the RGB color model, colors are created by different intensities of these three primary colors.
What is HSV Color?
HSV color, also known as HSB (Hue, Saturation, Brightness), is a color model that represents colors based on three components: hue, saturation, and value (or brightness). The HSV color model is often used in graphics software, image processing and color selection tools because it provides an easy way to specify and manipulate colors.
How to Convert Color Spaces in Python OpenCV?
For color conversion, we use the function cv.cvtColor(input_image, flag) where flag determines the type of conversion.
For BGR → Gray conversion we use the flags cv.COLOR_BGR2GRAY. Similarly for BGR → HSV, we use the flag cv.COLOR_BGR2HSV. To get other flags, just run following commands in your Python terminal :
|
1 2 3 |
import cv2 as cv flags = [i for i in dir(cv) if i.startswith('COLOR_')] print( flags ) |
This is the complete source code for this article
|
1 2 3 4 5 6 7 8 9 10 11 12 13 14 15 16 17 18 19 20 21 22 23 24 25 26 27 28 29 30 31 32 33 34 35 |
import cv2 import matplotlib.pyplot as plt # Load the image img1 = cv2.imread("lena.tif") # Convert to different color spaces bgrgray = cv2.cvtColor(img1, cv2.COLOR_BGR2GRAY) bgrhsv = cv2.cvtColor(img1, cv2.COLOR_BGR2HSV) brightLAB = cv2.cvtColor(img1, cv2.COLOR_BGR2LAB) # Display images using matplotlib plt.figure(figsize=(10, 8)) # Original BGR image plt.subplot(2, 2, 1) plt.imshow(cv2.cvtColor(img1, cv2.COLOR_BGR2RGB)) plt.title('BGR Image') # BGR to Grayscale plt.subplot(2, 2, 2) plt.imshow(bgrgray, cmap='gray') plt.title('BGR to Grayscale') # BGR to HSV plt.subplot(2, 2, 3) plt.imshow(cv2.cvtColor(bgrhsv, cv2.COLOR_BGR2RGB)) plt.title('BGR to HSV') # BGR to LAB plt.subplot(2, 2, 4) plt.imshow(cv2.cvtColor(brightLAB, cv2.COLOR_BGR2RGB)) plt.title('BGR to LAB') plt.show() |
Let’ describe the code:
Importing Libraries:
- We import the necessary libraries: cv2 for image processing and matplotlib.pyplot for displaying images.
Loading the Image:
- We load an image named “lena.tif” using cv2.imread() and store it in the variable img1.
Converting to Different Color Spaces:
- We convert the loaded image (img1) to different color spaces:
-
-
- bgrgray: Convert from BGR (Blue-Green-Red) to Grayscale using cv2.cvtColor() with cv2.COLOR_BGR2GRAY.
- bgrhsv: Convert from BGR to HSV (Hue-Saturation-Value) using cv2.cvtColor() with cv2.COLOR_BGR2HSV.
- brightLAB: Convert from BGR to LAB (CIE L*a*b*) using cv2.cvtColor() with cv2.COLOR_BGR2LAB.
-
Displaying Images Using Matplotlib:
- We create a new figure using plt.figure(figsize=(10, 8)) with a specified size.
Showing the Plot:
- We call plt.show() to display the plot with all subplots.
Run the complete code and this will be the result

Subscribe and Get Free Video Courses & Articles in your Email