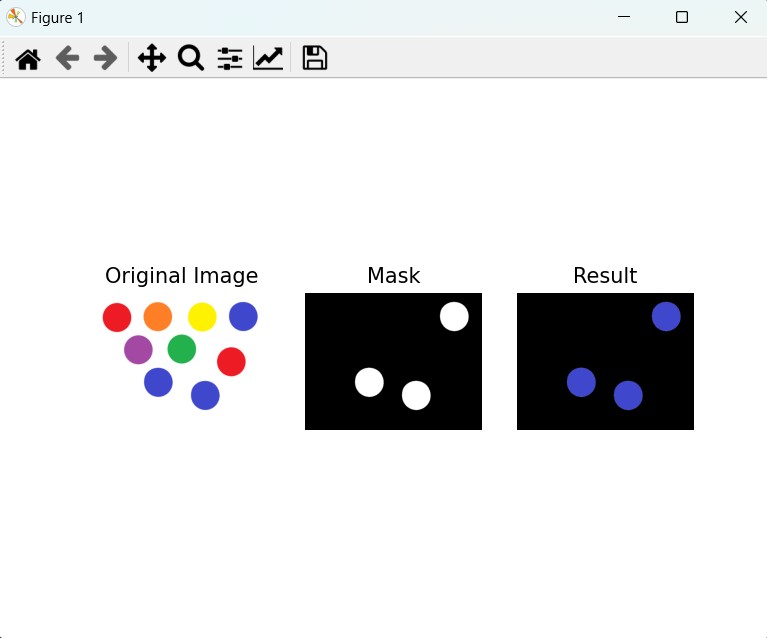
In this OpenCV Python article i want to show a basics Color Detection Example in OpenCV. firs of all let’s talk about Color Detection in OpenCV.
What is OpenCV Python Color Detection?
Color detection in OpenCV Python involves identifying and isolating specific colors or ranges of colors inside an image or video stream. This process typically involves the following steps:
- Image Loading: Load an image or capture frames from a video source using OpenCV’s cv2.imread() function or video capture methods.
- Color Space Conversion: Convert the image from the default BGR (Blue-Green-Red) color space to another color space such as HSV (Hue-Saturation-Value) or RGB (Red-Green-Blue). HSV color space is commonly used for color detection because it separates color information from intensity information.
- Thresholding: Apply a thresholding technique for creating a binary mask, where pixels that fall inside the specific color range are set to white (255) and pixels outside the range are set to black (0). This step helps isolate the desired color from the rest of the image.
- Morphological Operations (Optional): Perform morphological operations such as erosion and dilation to further refine the binary mask and remove noise or small unwanted objects.
- Contour Detection (Optional): Find contours in the binary mask to identify the shapes or regions corresponding to the detected color blobs.
- Object Detection and Analysis (Optional): Analyze the detected color regions, such as calculating their centroids, areas, bounding boxes, or applying further processing based on specific requirements.
How does color work on a computer?
So we represent colors on a computers by color-space or color models which basically describes range of colors as tuples of numbers. Instead of going for each color, we’ll discuss most common color-space we use .i.e. RGB(Red, Green, Blue) and HSV (Hue, Saturation, Value).
RGB basically describes color as a tuple of three components. Each component can take a value between 0 and 255, where the tuple (0, 0, 0) represents black and (255, 255, 255) represents white. For example, if we were to show a pure blue pixel on-screen, then the R value would be 0, the G value would be 0, and the B value would be 255.
Below are a few more examples of colors in RGB:
| Color | RGB value |
|---|---|
| Red | 255, 0, 0 |
| Orange | 255, 128, 0 |
| Pink | 255, 153, 255 |
OpenCV Python Color Detection Example
Let’s create an Example, So now this is the complete code for OpenCV Python Color Detection.
|
1 2 3 4 5 6 7 8 9 10 11 12 13 14 15 16 17 18 19 20 21 22 23 24 25 26 27 28 29 30 31 32 33 34 35 36 37 38 39 |
import cv2 import numpy as np import matplotlib.pyplot as plt # Load the image img = cv2.imread('img.png') # Convert BGR to HSV hsv = cv2.cvtColor(img, cv2.COLOR_BGR2HSV) # Define the range of red color in HSV lower_range = np.array([110,50,50]) upper_range = np.array([130,255,255]) # Create a mask for the red color mask = cv2.inRange(hsv, lower_range, upper_range) # Apply the mask to the original image result = cv2.bitwise_and(img, img, mask=mask) # Display the original image plt.subplot(1, 3, 1) plt.imshow(cv2.cvtColor(img, cv2.COLOR_BGR2RGB)) plt.title('Original Image') plt.axis('off') # Display the mask plt.subplot(1, 3, 2) plt.imshow(mask, cmap='gray') plt.title('Mask') plt.axis('off') # Display the result plt.subplot(1, 3, 3) plt.imshow(cv2.cvtColor(result, cv2.COLOR_BGR2RGB)) plt.title('Result') plt.axis('off') plt.show() |
OK first of all you need to have an image in your working directory iam using this image, you can get this image from below.

Run the complete code and this will be the result

Subscribe and Get Free Video Courses & Articles in your Email
hello!!
I have a question, once that the color is detected, how could i save a variable acknowledging that the color has been detected? I want the code to enter a loop if the color is detected, but i dont know how to convert it to a variable, thank you!!