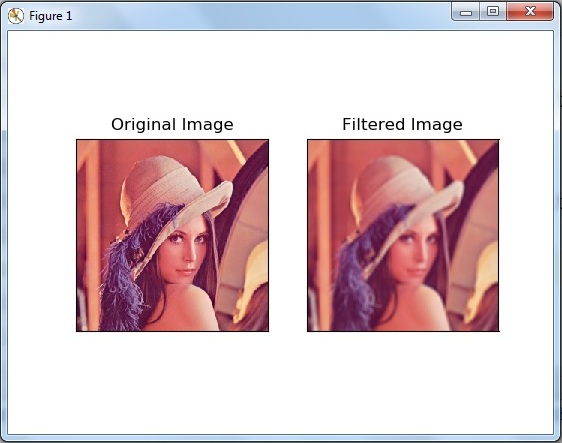
In this OpenCV article we are going to talk about Image Filtering or 2D Convolution in OpenCV.
you can do image filtering using low pass filter (LPF) and high pass filters (HPF). for example
if you want to remove the noises of the image you can use LPF filter or if you want to blur an
image you can use LPF. and using HPF filter you can find the edges in the image. in opencv
there is a function cv2.filter2D() that is used for filtering.
Read Image Smoothing Techniques in OpenCV
1: OpenCV Averaging Image Blurring in Python
2: OpenCV Gaussian Blurring for Images in Python
3: OpenCV Median Blurring for Images in Python
4: OpenCV Smooth Image with Bilateral Filtering
So now this is the complete code for OpenCV Image Filtering or 2D Convolution
|
1 2 3 4 5 6 7 8 9 10 11 12 13 14 15 16 17 18 19 20 21 22 23 24 25 26 27 28 |
import cv2 import numpy as np from matplotlib import pyplot as plt image = cv2.imread('lena.tif') kernel = np.ones((5,5), np.float32)/25 #ddepth filter_2d = cv2.filter2D(image, -1, kernel) #convert the image from bgr to rgb original_image = cv2.cvtColor(image, cv2.COLOR_BGR2RGB) filtered_image = cv2.cvtColor(filter_2d, cv2.COLOR_BGR2RGB) plt.subplot(121) plt.imshow(original_image),plt.title('Original Image') plt.xticks([]), plt.yticks([]) plt.subplot(122),plt.imshow(filtered_image),plt.title('Filtered Image') plt.xticks([]), plt.yticks([]) plt.show() |
This line of code is used for reading of the image, make sure that you have added an image
in your working directory.
|
1 |
image = cv2.imread('lena.tif') |
In here we are going to create Kernel, and in this example we are going to use a 5 by 5
averaging filter kernel.
|
1 |
kernel = np.ones((5,5), np.float32)/25 |
And now we are going to use cv2.filter() method from OpenCV for filtering. we need to give some
arguments, the first one is the image source, the second one is the ddepth and the third one is the
kernel that we have already created.
|
1 |
filter_2d = cv2.filter2D(image, -1, kernel) |
Because we are going to show our images in Matplotlib, so Matplotlib uses RGB (Red, Green, Blue)
color system, and OpenCV uses BGR (Blue, Green, Red) color system, we need to convert the BGR
color to RGB. if we don’t do this there will be messed up in the color.
|
1 2 |
original_image = cv2.cvtColor(image, cv2.COLOR_BGR2RGB) filtered_image = cv2.cvtColor(filter_2d, cv2.COLOR_BGR2RGB) |
Note: cv2.waitKey() is a keyboard binding function. Its argument is the time in milliseconds.
the function waits specified milliseconds for any keyboard event. If you press any key in that
time, the program continues. If 0 is passed, it waits indefinitely for a key stroke.
So now run the complete code and this will be the result.

Subscribe and Get Free Video Courses & Articles in your Email