In this Java GUI article we are going to learn Creating Menu Button in JavaFX, so MenuButton
is a button which, when clicked or pressed, will show a ContextMenu . a MenuButton shares a
very similar API to the Menu control, so for that you set the items that should be shown in
the items ObservableList, and there is a Labeled. text property to specify the label shown within
the MenuButton.
Also you can check Python GUI Development Tutorials in the below link.
1: PyQt5 GUI Development Tutorials
2: TKinter GUI Development Tutorials
3: Pyside2 GUI Development Tutorials
4: Kivy GUI Development Tutorials
5: wxPython GUI Development Tutorials
You can create Menu Button by creating the object of MenuButton class like this.
you need to give the text for the MenuButton, an image and also the items that you want to
add in this MenuButton.
|
1 |
MenuButton menuButton = new MenuButton("Programming Languages",imageView, item1, item2, item3, item4); |
So now this is the source code for Java GUI – Creating Menu Button in JavaFX
|
1 2 3 4 5 6 7 8 9 10 11 12 13 14 15 16 17 18 19 20 21 22 23 24 25 26 27 28 29 30 31 32 33 34 35 36 37 38 39 40 41 42 43 44 45 46 47 48 49 50 51 52 53 54 55 56 57 58 |
import javafx.application.Application; import javafx.event.ActionEvent; import javafx.event.EventHandler; import javafx.scene.Scene; import javafx.scene.control.Menu; import javafx.scene.control.MenuButton; import javafx.scene.control.MenuItem; import javafx.scene.image.Image; import javafx.scene.image.ImageView; import javafx.scene.layout.HBox; import javafx.stage.Stage; import java.io.FileInputStream; import java.io.FileNotFoundException; public class MenuButtons extends Application { public static void main(String[] args) { launch(args); } @Override public void start(Stage stage) throws FileNotFoundException { stage.setTitle("JavaFX Menu Buttons"); MenuItem item1 = new MenuItem("Java"); MenuItem item2 = new Menu("Python"); MenuItem item3 = new Menu("C++"); MenuItem item4 = new Menu("Scala"); FileInputStream inputStream = new FileInputStream("images/myicon.png"); Image image = new Image(inputStream); ImageView imageView = new ImageView(image); MenuButton menuButton = new MenuButton("Programming Languages",imageView, item1, item2, item3, item4); item1.setOnAction(new EventHandler<ActionEvent>() { @Override public void handle(ActionEvent event) { System.out.println("Item One Is Selected"); } }); HBox hbox = new HBox(menuButton); Scene scene = new Scene(hbox, 400, 300); stage.setScene(scene); stage.show(); } } |
These are the menu items that we need to for the MenuButton, basically there are four
menu items that we want.
|
1 2 3 4 |
MenuItem item1 = new MenuItem("Java"); MenuItem item2 = new Menu("Python"); MenuItem item3 = new Menu("C++"); MenuItem item4 = new Menu("Scala"); |
This is the image that we want to add for the JavaFX MenuButton, make sure that you have
already added an icon in your working directory.
|
1 2 3 |
FileInputStream inputStream = new FileInputStream("images/myicon.png"); Image image = new Image(inputStream); ImageView imageView = new ImageView(image); |
In every JavaFX application we need to create a container, a container is like layout. as we
have created an HBox container in the above code, and we add our MenuButton object in the
HBox Layout.
|
1 |
HBox hbox = new HBox(menuButton); |
Also for every JavaFX application we need to create a Scene object. in the scene we need
to add our container with the width and height of the window, if you want to colorize your
window, you can do it in here. you can see that we have given 400 width and 300 height for the
window.
|
1 |
Scene scene = new Scene(hbox, 400, 300); |
At the end you need to set your scene object to the stage of the window, and show the window.
|
1 2 |
stage.setScene(scene); stage.show(); |
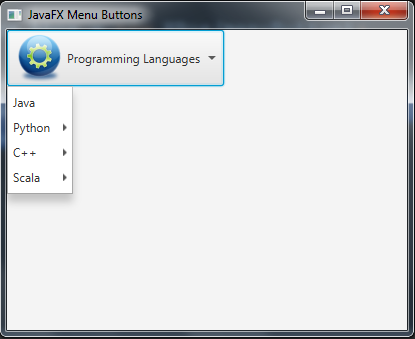
Run the complete code and this will be the result

Subscribe and Get Free Video Courses & Articles in your Email