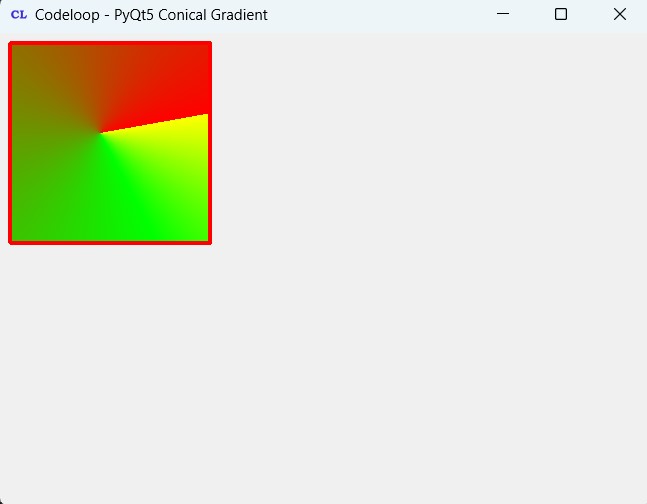
In this PyQt5 article we are going to have Introduction To PyQt5 QConicalGradient Color. According to QT Documentation The colors in a gradient is defined using stop points of the QGradientStop type, i.e. a position and a color. Use the QGradient::setColorAt() or the QGradient::setStops() function to define the stop points. It is the gradient’s complete set of stop points that describes how the gradient area should be filled. If no stop points have been specified, a gradient of black at 0 to white at 1 is used. In addition to the functions inherited from QGradient, the QConicalGradient class provides the angle() and center() functions returning the start angle and center of the gradient.
You can see two more Color Gradients in PyQt5
So now this is the complete code Introduction To PyQt5 QConicalGradient Color
|
1 2 3 4 5 6 7 8 9 10 11 12 13 14 15 16 17 18 19 20 21 22 23 24 25 26 27 28 29 30 31 32 33 34 35 36 37 38 39 40 41 42 43 44 45 46 47 48 49 50 51 52 53 54 55 56 57 58 |
from PyQt5 import QtGui from PyQt5.QtWidgets import QApplication, QMainWindow import sys from PyQt5.QtGui import QPainter, QBrush, QPen, QConicalGradient from PyQt5.QtCore import Qt, QPoint class Window(QMainWindow): def __init__(self): super().__init__() # Window properties self.title = "Codeloop - PyQt5 Conical Gradient" self.top = 100 self.left = 100 self.width = 680 self.height = 500 # Initialize the window self.InitWindow() def InitWindow(self): # Set window properties self.setWindowIcon(QtGui.QIcon("codeloop.png")) self.setWindowTitle(self.title) self.setGeometry(self.top, self.left, self.width, self.height) self.show() def paintEvent(self, event): # Override paint event to draw custom content painter = QPainter(self) # Set pen for drawing outline painter.setPen(QPen(Qt.red, 4, Qt.SolidLine)) # Create conical gradient conicalGradient = QConicalGradient(QPoint(100, 100), 10) # Set colors for gradient conicalGradient.setColorAt(0.0, Qt.red) conicalGradient.setColorAt(0.8, Qt.green) conicalGradient.setColorAt(1.0, Qt.yellow) # Set brush with conical gradient painter.setBrush(QBrush(conicalGradient)) # Draw rectangle with the gradient painter.drawRect(10, 10, 200, 200) # Create the application instance App = QApplication(sys.argv) # Create the main window window = Window() # Execute the application event loop sys.exit(App.exec()) |
This is our main Window class that extends from QMainWindow. and in the constructor of the class we need to initialize some window requirements.
|
1 2 3 4 5 6 7 8 9 10 11 12 |
class Window(QMainWindow): def __init__(self): super().__init__() self.title = "PyQt5 Conical Gradient" self.top = 100 self.left = 100 self.width = 680 self.height = 500 self.InitWindow() |
In here we are going to set our window title, window icon and window geometry, also we need to show our window in here.
|
1 2 3 4 5 |
def InitWindow(self): self.setWindowIcon(QtGui.QIcon("icon.png")) self.setWindowTitle(self.title) self.setGeometry(self.top, self.left, self.width, self.height) self.show() |
So if you have seen my previous articles, you will be familiar with the rest of the codes iam going just give you some information about def paintEvent() method, this is a built in method for drawing in PyQt5.
In these of lines of codes first we have created QPainter object, also we have set our pen. after that we have created the object of QConicalGradient, in the constructor we set conical with center and also staring interpolation at the angle. after that we set the color for our ConicalGradient, at the end we draw our rectangle.
|
1 2 3 4 5 6 7 8 9 10 11 12 |
def paintEvent(self, event): painter = QPainter(self) painter.setPen(QPen(Qt.red, 4, Qt.SolidLine)) conicalGradient = QConicalGradient(QPoint(100,100),10) conicalGradient.setColorAt(0.0, Qt.red) conicalGradient.setColorAt(0.8, Qt.green) conicalGradient.setColorAt(1.0, Qt.yellow) painter.setBrush(QBrush(conicalGradient)) painter.drawRect(10,10, 200,200) |
Also every PyQt5 application must create an application object.
|
1 |
App = QApplication(sys.argv) |
Finally, we enter the mainloop of the application. The event handling starts from this point.
|
1 2 |
window = Window() sys.exit(App.exec()) |
Run the complete code and this will be the result

FAQs:
What is PyQt5 used for?
PyQt5 is a set of Python bindings for the Qt application framework. It is used for developing cross-platform desktop applications with rich graphical user interfaces (GUIs). PyQt5 allows you to create powerful and feature-rich applications that can run on different platforms such as Windows, macOS and Linux. It provides different widgets, tools and features for building interactive desktop applications.
How to design a GUI using PyQt5?
For designing a GUI using PyQt5, you can follow these general steps:
- Import required modules from PyQt5.
- Create a main application instance using QApplication.
- Create one or more widget instances (such as QMainWindow or QWidget) to serve as the main window or containers for other widgets.
- Add widgets (buttons, labels, text boxes, etc.) to the main window or containers using layout managers (QLayout).
- Customize appearance and behavior of widgets using properties and methods provided by PyQt5.
- Connect signals (user interactions) to slots (event handlers) using the connect() method.
- Display the main window or containers using the show() method of the application instance.
- Start the event loop using the exec() method of the application instance to handle user interactions and events.
What is a widget in PyQt5?
In PyQt5, a widget is a graphical user interface (GUI) element that users can interact with that. Widgets can represent different user interface elements such as buttons, labels, text boxes, check boxes, radio buttons, sliders and many more. Each widget in PyQt5 is an instance of a specific class derived from the QWidget base class.
Subscribe and Get Free Video Courses & Articles in your Email