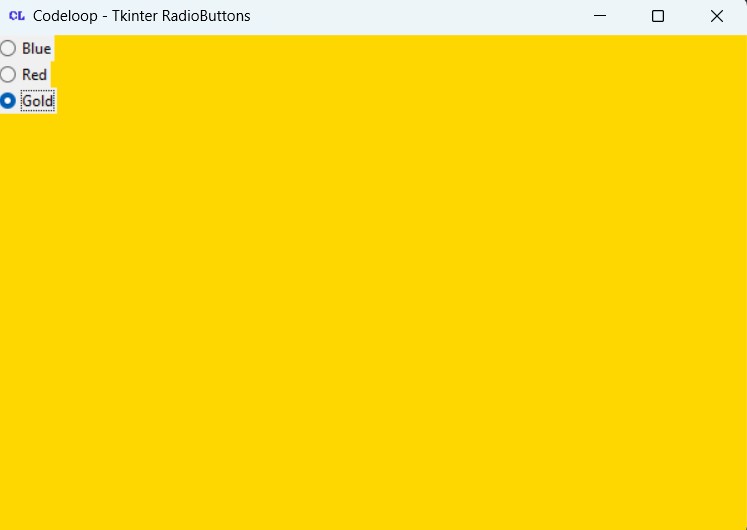
In this Python article i want to show you How to Create RadioButton in TKinter Python, so first of all let’s talk about RadioButton in TKinter?
What is RadioButton in Python TKinter?
RadioButton or Radio Option in TKinter is a graphical user interface (GUI) element that allows users to select one option from a set of mutually exclusive options. In Python Tkinter, a RadioButton is implemented using Radiobutton widget.
RadioButton widgets typically appear as small circles or squares accompanied by text labels. Users can select only one option at a time, and selecting one RadioButton automatically deselects any other RadioButton within the same group. RadioButton widgets are commonly used in forms, settings panels and other user interfaces where users need to make a single choice from a predefined set of options
How to Create RadioButton in TKinter Python?
In Tkinter, you can create RadioButton widgets using Radiobutton class from the tkinter module. Each RadioButton is associated with a variable and selecting a RadioButton updates the value of that variable to indicate the user’s choice.
This is the complete source code for this article
|
1 2 3 4 5 6 7 8 9 10 11 12 13 14 15 16 17 18 19 20 21 22 23 24 25 26 27 28 29 30 31 32 33 34 35 36 37 38 39 40 41 42 43 44 45 46 47 48 49 50 51 52 53 54 55 56 57 58 |
import tkinter as tk from tkinter import ttk # Define colors for RadioButton options COLOR1 = "Blue" COLOR2 = "Red" COLOR3 = "Gold" # Custom window class inheriting from tk.Tk class Window(tk.Tk): def __init__(self): # Initialize parent class (tk.Tk) tk.Tk.__init__(self) # Set window title self.title("Codeloop - Tkinter RadioButtons") # Set minimum window size self.minsize(600, 400) # Set window icon self.iconphoto(True, tk.PhotoImage(file='codeloop.png')) # Call method to create RadioButton widgets self.radioButton() # Method to handle RadioButton selection event def radEvent(self): # Get the selected RadioButton value radSelected = self.radValues.get() # Set window background color based on selected RadioButton if radSelected == 1: self.configure(background=COLOR1) elif radSelected == 2: self.configure(background=COLOR2) elif radSelected == 3: self.configure(background=COLOR3) # Method to create RadioButton widgets def radioButton(self): # Initialize IntVar to store RadioButton value self.radValues = tk.IntVar() # Create RadioButton widgets rad1 = ttk.Radiobutton(self, text=COLOR1, variable=self.radValues, value=1, command=self.radEvent) rad1.grid(column=0, row=0, sticky=tk.W, columnspan=3) rad2 = ttk.Radiobutton(self, text=COLOR2, variable=self.radValues, value=2, command=self.radEvent) rad2.grid(column=0, row=1, sticky=tk.W, columnspan=3) rad3 = ttk.Radiobutton(self, text=COLOR3, variable=self.radValues, value=3, command=self.radEvent) rad3.grid(column=0, row=2, sticky=tk.W, columnspan=3) # Create an instance of the custom Window window = Window() window.mainloop() |
This code is Python Tkinter application that creates a window with three RadioButtons. Each RadioButton represents a color option. When the user selects one of these options, the background color of the window changes accordingly.
First, we have imported the necessary modules from Tkinter library. After that we define three color constants.
Next, we define a custom class named Window, which inherits from tk.Tk. This class represents the main application window. Inside the class, there are methods to initialize the window, handle RadioButton selection events and create the RadioButtons.
__init__ method initializes the window by setting its title, minimum size and icon. It also calls the radioButton method to create the RadioButtons.
The radEvent method is called when a RadioButton is selected. It retrieves the value of the selected RadioButton and changes the background color of the window accordingly.
The radioButton method creates three RadioButtons using ttk.Radiobutton widget. Each RadioButton is associated with a specific color option and is configured to call the radEvent method when selected.
And lastly an instance of the Window class is created, and the Tkinter event loop is started with the mainloop method.
Run the complete source code and this will be the result

Subscribe and Get Free Video Courses & Articles in your Email