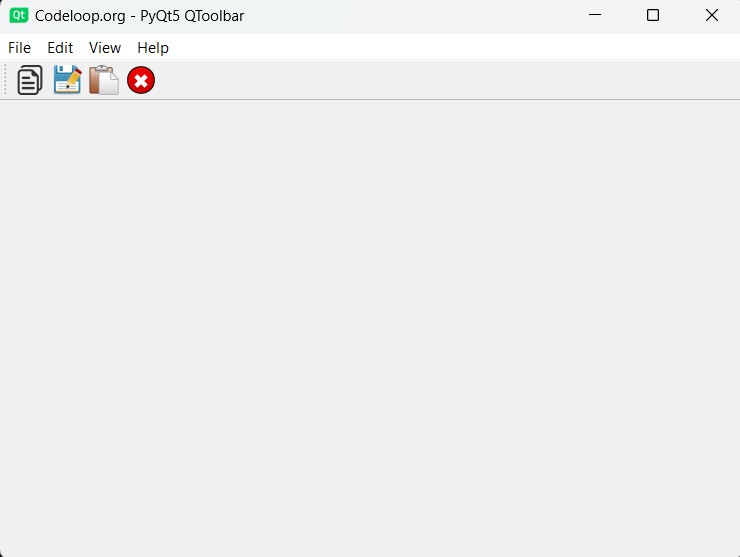
In this PyQt5 article i want to show How to Create QToolBar in PyQt5. the QToolBar class provides a movable panel that contains a set of controls. toolbar buttons are added by adding actions, using addAction() or insertAction(). Groups of buttons can be separated using addSeparator() or insertSeparator().
What is PyQt5 QToolBar ?
PyQt5 QToolBar is a customizable toolbar widget that provides easy way to group and organize a set of frequently used actions in a PyQt5 application. it is standard widget that is part of the PyQt5 library and can be easily added to PyQt5 applications.
QToolBar is designed to work in conjunction with other PyQt5 classes such as QAction, which represents an action that the user can take in the application. you can add QAction objects to a QToolBar to create toolbar that contains buttons or other widgets that represent the actions.
QToolBar provides several customization options, such as ability to add separators between actions and the ability to add custom widgets to the toolbar. you can also customize the appearance of the toolbar by setting the background color, icon size and other properties.
using QToolBar in your PyQt5 application can help make your application more user friendly by providing easy access to frequently used actions. you can group related actions together on a toolbar, which can make it easier for users to find the actions they need.
To use QToolBar in your PyQt5 application, you can create an instance of the QToolBar class, add QAction objects to it, and then add the toolbar to your application’s main window using the QMainWindow class’s addToolBar() method.
Basically we are using some codes from the previews example in this post.
Also you can read more Python GUI articles in the below links
- Kivy GUI Development Tutorials
- TKinter GUI Development Tutorials
- Pyside2 GUI Development
- wxPython GUI Development Tutorials
- PyQt5 GUI Development Tutorials
So now first we need some imports.
|
1 2 3 4 |
from PyQt5 import QtGui from PyQt5.QtWidgets import QApplication, QMainWindow, QAction import sys from PyQt5.QtGui import QIcon |
After that we create our Window class that extends from QMainWindow and in that class we add some requirements of our window, also we create a method of CreateMenu() in the class . basically this method is for creating menus and toolbar.
|
1 2 3 4 5 6 7 8 9 10 11 12 13 14 15 16 17 18 19 20 21 22 23 24 25 26 27 28 29 30 31 32 33 34 35 36 37 38 39 |
class Window(QMainWindow): def __init__(self): super().__init__() self.title = "PyQt5 QToolbar" self.top = 200 self.left = 500 self.width = 680 self.height = 480 self.setWindowIcon(QtGui.QIcon("icon.png")) self.setWindowTitle(self.title) self.setGeometry(self.left, self.top, self.width, self.height) self.CreateMenu() self.show() def CreateMenu(self): mainMenu = self.menuBar() fileMenu = mainMenu.addMenu('File') editMenu = mainMenu.addMenu('Edit') viewMenu = mainMenu.addMenu('View') helpMenu = mainMenu.addMenu('Help') copyAction = QAction(QIcon("copy.png"), 'Copy', self) copyAction.setShortcut("Ctrl+C") fileMenu.addAction(copyAction) saveAction = QAction(QIcon("Save.png"), 'Save', self) saveAction.setShortcut("Ctrl+S") fileMenu.addAction(saveAction) pasteAction = QAction(QIcon("Paste.png"), 'Paste', self) pasteAction.setShortcut("Ctrl+P") fileMenu.addAction(pasteAction) exiteAction = QAction(QIcon("exit.png"), 'Exit', self) exiteAction.setShortcut("Ctrl+E") exiteAction.triggered.connect(self.exitWindow) fileMenu.addAction(exiteAction) self.toolbar = self.addToolBar('Toolbar') self.toolbar.addAction(copyAction) self.toolbar.addAction(saveAction) self.toolbar.addAction(pasteAction) self.toolbar.addAction(exiteAction) def exitWindow(self): self.close() |
So in here we have created some menu items.
|
1 2 3 4 5 |
mainMenu = self.menuBar() fileMenu = mainMenu.addMenu('File') editMenu = mainMenu.addMenu('Edit') viewMenu = mainMenu.addMenu('View') helpMenu = mainMenu.addMenu('Help') |
Also every PyQt5 application must create an application object. The sys.argv parameter is a list of arguments from a command line.
|
1 |
App = QApplication(sys.argv) |
Finally, we enter the mainloop of the application. The event handling starts from this point.
|
1 2 |
window = Window() sys.exit(App.exec_()) |
Run the complete code and this will be the result.

Complete source code for How to Create QToolBar in PyQt5
|
1 2 3 4 5 6 7 8 9 10 11 12 13 14 15 16 17 18 19 20 21 22 23 24 25 26 27 28 29 30 31 32 33 34 35 36 37 38 39 40 41 42 43 44 45 46 47 48 49 50 51 52 53 54 55 56 57 58 59 60 61 62 63 64 65 |
# Import necessary modules from PyQt5 library from PyQt5 import QtGui from PyQt5.QtWidgets import QApplication, QMainWindow, QAction import sys from PyQt5.QtGui import QIcon # Define main window class class Window(QMainWindow): def __init__(self): super().__init__() # Set window properties self.title = "Codeloop.org - PyQt5 QToolbar" self.top = 200 self.left = 500 self.width = 680 self.height = 480 # Set window icon self.setWindowIcon(QtGui.QIcon("icon.png")) self.setWindowTitle(self.title) self.setGeometry(self.left, self.top, self.width, self.height) # Create menu bar self.CreateMenu() self.show() # Method to create the menu bar and toolbar def CreateMenu(self): # Create main menu bar mainMenu = self.menuBar() # Add menu items fileMenu = mainMenu.addMenu('File') editMenu = mainMenu.addMenu('Edit') viewMenu = mainMenu.addMenu('View') helpMenu = mainMenu.addMenu('Help') # Create actions for file menu copyAction = QAction(QIcon("copy.png"), 'Copy', self) copyAction.setShortcut("Ctrl+C") fileMenu.addAction(copyAction) saveAction = QAction(QIcon("Save.png"), 'Save', self) saveAction.setShortcut("Ctrl+S") fileMenu.addAction(saveAction) pasteAction = QAction(QIcon("Paste.png"), 'Paste', self) pasteAction.setShortcut("Ctrl+P") fileMenu.addAction(pasteAction) exitAction = QAction(QIcon("exit.png"), 'Exit', self) exitAction.setShortcut("Ctrl+E") exitAction.triggered.connect(self.exitWindow) fileMenu.addAction(exitAction) # Create toolbar self.toolbar = self.addToolBar('Toolbar') # Add actions to toolbar self.toolbar.addAction(copyAction) self.toolbar.addAction(saveAction) self.toolbar.addAction(pasteAction) self.toolbar.addAction(exitAction) # Method to close the window def exitWindow(self): self.close() # Create a PyQt application instance App = QApplication(sys.argv) # Create an instance of the Window class window = Window() # Execute the application sys.exit(App.exec_()) |
Styles and Themes in PyQt5 Toolbar
Also you can add styles to your toolbar in PyQt5, for that you can add this code.
|
1 2 |
# Apply stylesheet to toolbar self.toolbar.setStyleSheet("background-color: #34495E; color: #FFFFFF; border: 1px solid #2C3E50;") |
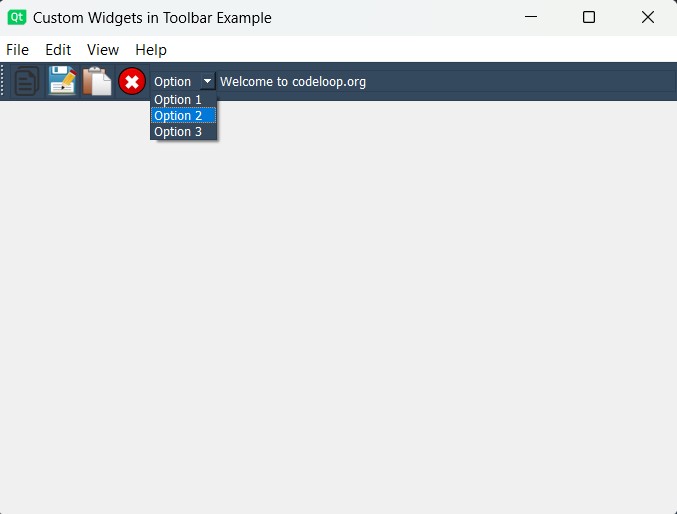
In this example, we’ve added a custom stylesheet to the toolbar using the setStyleSheet() method. stylesheet sets the background color to a dark blue (#34495E), the text color to white (#FFFFFF), and adds a border with a slightly darker shade of blue (#2C3E50).
Add Custom Widgets in PyQt5 Toolbars
Also you can include custom widgets like combo boxes or line edits within the toolbar
|
1 2 3 4 5 6 7 8 9 10 |
combo_box = QComboBox() combo_box.addItems(['Option 1', 'Option 2', 'Option 3']) toolbar_combo_box_action = QWidgetAction(self) toolbar_combo_box_action.setDefaultWidget(combo_box) self.toolbar.addAction(toolbar_combo_box_action) line_edit = QLineEdit() toolbar_line_edit_action = QWidgetAction(self) toolbar_line_edit_action.setDefaultWidget(line_edit) self.toolbar.addAction(toolbar_line_edit_action) |
In this example, we’ve added a combo box and a line edit widget to the toolbar using QComboBox and QLineEdit classes respectively. We then wrap these widgets with QWidgetAction instances and add them to the toolbar using addAction() method.
Now after adding the custom widget and style, this will be the result

Subscribe and Get Free Video Courses & Articles in your Email