In this PyQt5 article we are going to learn How To Create QStackedWidget in PyQt5, QStackedWidget can be used to create a user interface similar to the one provided by QTabWidget. It is a convenience layout widget built on top of the QStackedLayout class.
What is PyQt5 QStackedWidget ?
PyQt5 QStackedWidget is a widget that allows you to stack multiple widgets on top of each other and display only one widget at a time. QStackedWidget widget is commonly used in graphical user interfaces (GUIs) to display different screens or pages in single window.
Each widget in QStackedWidget is assigned an index value, and widget with the highest index value is displayed on top. you can use setCurrentIndex() method to switch between the widgets and display the one you want to show.
some of the common properties and methods of the QStackedWidget widget includes number of widgets in the stack, current widget index, index of specific widget and list of widgets in the stack. QStackedWidget widget also emits signals when the current widget is changed or when a new widget is added to or removed from the stack.
QStackedWidget can be used to implement wizards, tabbed interfaces and multi page dialogs. It is easy way to organize multiple screens or pages within single window and can improve the user experience by reducing clutter and allowing the user to focus on the task at hand.
Also you can read more Python GUI articles in the below links
- Kivy GUI Development Tutorials
- TKinter GUI Development Tutorials
- Pyside2 GUI Development
- wxPython GUI Development Tutorials
- PyQt5 GUI Development Tutorials
Create QStackedWidget in PyQt5
First of all we need some imports.
|
1 2 3 4 |
from PyQt5.QtWidgets import QWidget, QApplication, QVBoxLayout, QStackedWidget, QLabel, QPushButton import sys from PyQt5.QtGui import QIcon from PyQt5 import QtGui |
After that we are going to create our StackedWidget class that extends from QWidget and we initialize and set our window requirements in the constructor of that class also we have called our stackedWidgt() method in the class.
|
1 2 3 4 5 6 7 8 9 10 11 12 13 |
class StackedWidget(QWidget): def __init__(self): super().__init__() self.title = "PyQt5 StackedWidget" self.top = 200 self.left = 500 self.width = 300 self.height = 200 self.setWindowIcon(QtGui.QIcon("icon.png")) self.setWindowTitle(self.title) self.setGeometry(self.left, self.top, self.width, self.height) self.stackedWidget() self.show() |
In here we have created the object of QVBoxLayout, also we have created the object of QStackedWidget and we have added the stacked widget to the vbox layout.
|
1 2 3 |
vbox = QVBoxLayout() self.stackedWidget = QStackedWidget() vbox.addWidget(self.stackedWidget) |
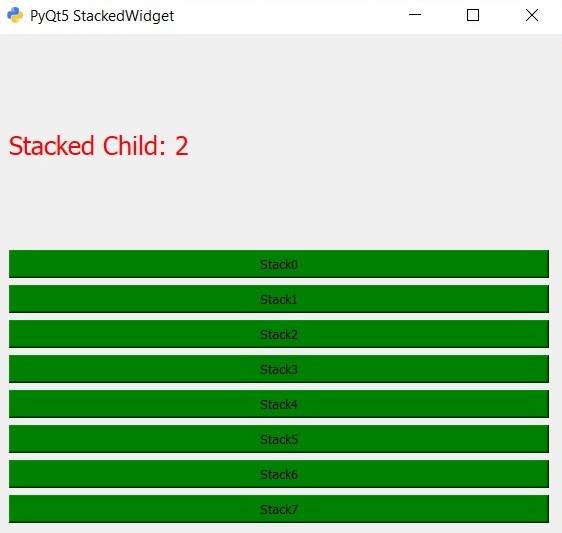
Now we need to create some buttons for our stacked widget, and we are going to use for loop to create 8 buttons for us.
|
1 2 3 4 5 6 7 8 |
for x in range(0,8): label = QLabel("Stacked Child: " + str(x)) label.setFont(QtGui.QFont("sanserif", 15)) label.setStyleSheet('color:red') self.stackedWidget.addWidget(label) self.button = QPushButton("Stack" + str(x)) self.button.setStyleSheet('background-color:green') self.button.page = x |
After that we create btn_clicked() slot because we want to connect that with clicked signal of button.
|
1 2 3 |
def btn_clicked(self): self.button = self.sender() self.stackedWidget.setCurrentIndex(self.button.page - 1) |
Also every PyQt5 application must create an application object.
|
1 |
App = QApplication(sys.argv) |
Finally, we enter the mainloop of the application. The event handling starts from this point.
|
1 2 |
window = StackedWidget() sys.exit(App.exec_()) |
Complete Source code for PyQt5 How To Create QStackedWidget
|
1 2 3 4 5 6 7 8 9 10 11 12 13 14 15 16 17 18 19 20 21 22 23 24 25 26 27 28 29 30 31 32 33 34 35 36 37 38 39 40 41 42 43 44 45 46 47 48 49 50 51 52 53 54 55 56 57 58 59 60 61 62 63 |
# Import necessary PyQt5 modules from PyQt5.QtWidgets import QWidget, QApplication, QVBoxLayout, QStackedWidget, QLabel, QPushButton import sys from PyQt5.QtGui import QIcon from PyQt5 import QtGui # Create a custom QWidget subclass for the stacked widget class StackedWidget(QWidget): def __init__(self): super().__init__() # Set up initial properties of the widget self.title = "PyQt5 StackedWidget" self.top = 200 self.left = 500 self.width = 300 self.height = 200 self.setWindowIcon(QtGui.QIcon("icon.png")) # Set window icon self.setWindowTitle(self.title) # Set window title self.setGeometry(self.left, self.top, self.width, self.height) # Set window geometry # Call method to create stacked widget and display it self.stackedWidget() self.show() # Method to create and configure the QStackedWidget def stackedWidget(self): # Create a QVBoxLayout to arrange widgets vertically vbox = QVBoxLayout() # Create the QStackedWidget self.stackedWidget = QStackedWidget() vbox.addWidget(self.stackedWidget) # Add the stacked widget to the layout # Loop to create and add labels and buttons to the stacked widget for x in range(0, 8): label = QLabel("Stacked Child: " + str(x)) label.setFont(QtGui.QFont("sanserif", 15)) label.setStyleSheet('color:red') self.stackedWidget.addWidget(label) # Add label to the stacked widget self.button = QPushButton("Stack" + str(x)) self.button.setStyleSheet('background-color:green') self.button.page = x self.button.clicked.connect(self.btn_clicked) # Connect button click event vbox.addWidget(self.button) # Add button to the layout # Set the layout of the widget self.setLayout(vbox) # Method to handle button click events def btn_clicked(self): self.button = self.sender() # Get the button that triggered the event self.stackedWidget.setCurrentIndex(self.button.page - 1) # Set current index of the stacked widget # Create QApplication instance and main window App = QApplication(sys.argv) window = StackedWidget() # Execute the application sys.exit(App.exec_()) |
Run the code and this is the result

This is the second example on PyQt5 QStackWidget
|
1 2 3 4 5 6 7 8 9 10 11 12 13 14 15 16 17 18 19 20 21 22 23 24 25 26 27 28 29 30 31 32 33 34 35 36 37 38 39 40 41 42 43 44 45 46 47 48 |
import sys from PyQt5.QtWidgets import QApplication, QStackedWidget, QWidget, QLabel, QPushButton, QVBoxLayout class Widget1(QWidget): def __init__(self, parent=None): super().__init__(parent) layout = QVBoxLayout() label = QLabel("Welcome to Widget 1!") layout.addWidget(label) button = QPushButton("Switch to Widget 2") button.clicked.connect(self.switch_widget) layout.addWidget(button) self.setLayout(layout) def switch_widget(self): stacked_widget.setCurrentIndex(1) class Widget2(QWidget): def __init__(self, parent=None): super().__init__(parent) layout = QVBoxLayout() label = QLabel("Welcome to Widget 2!") layout.addWidget(label) button = QPushButton("Switch to Widget 1") button.clicked.connect(self.switch_widget) layout.addWidget(button) self.setLayout(layout) def switch_widget(self): stacked_widget.setCurrentIndex(0) if __name__ == '__main__': app = QApplication(sys.argv) # Create the QStackedWidget and add the two widgets to it stacked_widget = QStackedWidget() widget1 = Widget1() widget2 = Widget2() stacked_widget.addWidget(widget1) stacked_widget.addWidget(widget2) # Show the first widget stacked_widget.setCurrentIndex(0) stacked_widget.show() sys.exit(app.exec_()) |
In this example we have defined two different widgets (Widget1 and Widget2) and use them to populate QStackedWidget. each widget contains QLabel and QPushButton and the buttons are used to switch between the two widgets.
when button is clicked, we use setCurrentIndex() method of the QStackedWidget to switch to the other widget. the initial widget displayed is set using setCurrentIndex(0).
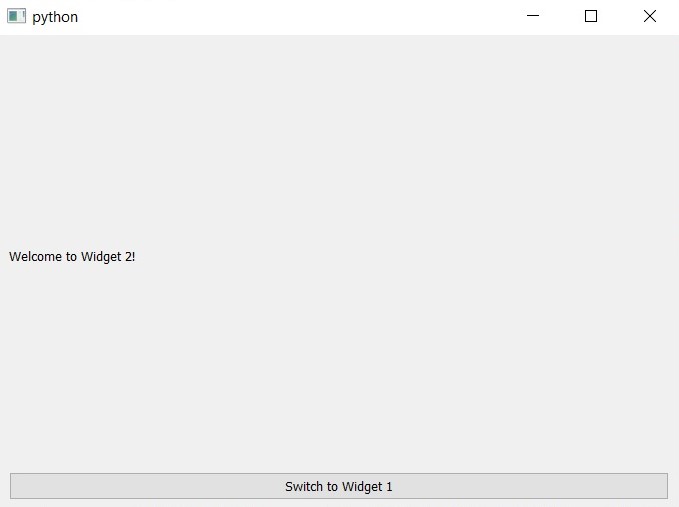
when you run this code, you should see first widget displayed with button to switch to the second widget. when you click the button, the second widget will be displayed with a button to switch back to the first widget.
Run the code and this is the result

FAQs:
How to use stacked widget in Qt?
In Qt, you can use QStackedWidget class to create a stack of widgets where only one widget is visible at a time.
Who makes PyQt?
PyQt is developed and maintained by Riverbank Computing. It is a set of Python bindings for the Qt application framework, and it enables you to create cross-platform GUI applications using Python programming language.
How to import PyQt in Python?
In Python, you can import PyQt using the following statement:
|
1 |
from PyQt5 import QtWidgets, QtCore, QtGui |
This statement imports the QtWidgets module, which contains classes for creating GUI applications, also QtCore and QtGui modules, which provide core functionality and graphical elements. These modules are typically required when working with PyQt applications.
Subscribe and Get Free Video Courses & Articles in your Email