In this article we are going to learn How to Create Menubar in PyQt5. the QMenuBar class provides a horizontal menu bar. a menu bar consists of a list of pull-down menu items. You add menu items with addMenu().
Also you can read more Python GUI articles in the below links
- Kivy GUI Development Tutorials
- TKinter GUI Development Tutorials
- Pyside2 GUI Development
- wxPython GUI Development Tutorials
- PyQt5 GUI Development Tutorials
First we need some imports.
|
1 2 3 4 |
from PyQt5 import QtGui from PyQt5.QtWidgets import QApplication, QMainWindow, QAction import sys from PyQt5.QtGui import QIcon |
After that we are going to create our Window class that extends from QMainWindow. and in that class we add some requirements of our window, also we create our CreateMenu method and in method we add our menu and menuitems.
|
1 2 3 4 5 6 7 8 9 10 11 12 13 14 15 16 17 18 19 20 21 22 23 24 25 26 27 28 29 30 31 32 33 34 35 36 |
class Window(QMainWindow): def __init__(self): super().__init__() self.title = "PyQt5 Menubar" self.top = 200 self.left = 500 self.width = 680 self.height = 480 self.setWindowIcon(QtGui.QIcon("icon.png")) self.setWindowTitle(self.title) self.setGeometry(self.left, self.top, self.width, self.height) self.CreateMenu() self.show() def CreateMenu(self): mainMenu = self.menuBar() fileMenu = mainMenu.addMenu('File') editMenu = mainMenu.addMenu('Edit') viewMenu = mainMenu.addMenu('View') helpMenu = mainMenu.addMenu('Help') copyAction = QAction(QIcon("copy.png"), 'Copy', self) copyAction.setShortcut("Ctrl+C") fileMenu.addAction(copyAction) saveAction = QAction(QIcon("Save.png"), 'Save', self) saveAction.setShortcut("Ctrl+S") fileMenu.addAction(saveAction) pasteAction = QAction(QIcon("Paste.png"), 'Paste', self) pasteAction.setShortcut("Ctrl+P") fileMenu.addAction(pasteAction) exiteAction = QAction(QIcon("exit.png"), 'Exit', self) exiteAction.setShortcut("Ctrl+E") exiteAction.triggered.connect(self.exitWindow) fileMenu.addAction(exiteAction) def exitWindow(self): self.close() |
Also every PyQt5 application must create an application object.
|
1 |
App = QApplication(sys.argv) |
Finally, we enter the mainloop of the application. The event handling starts from this point. The mainloop receives events from the window system and dispatches them to the application widgets. also we have created the Window class object in here.
|
1 2 |
window = Window() sys.exit(App.exec_()) |
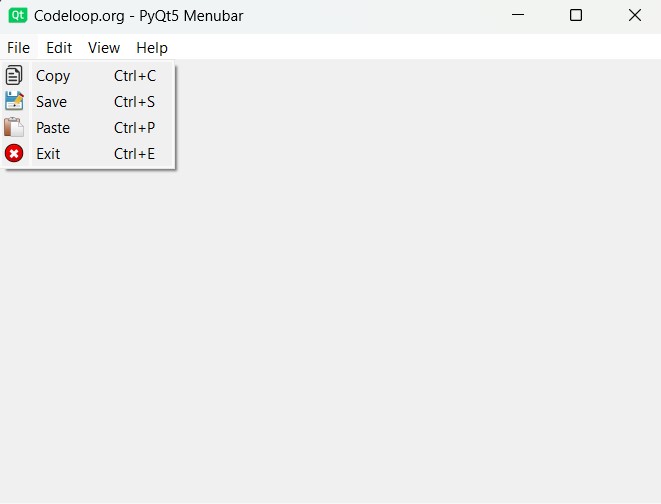
Run the complete code and this will be the result.

Complete source code for How to Create Menubar in PyQt5
|
1 2 3 4 5 6 7 8 9 10 11 12 13 14 15 16 17 18 19 20 21 22 23 24 25 26 27 28 29 30 31 32 33 34 35 36 37 38 39 40 41 42 43 44 45 46 47 48 49 50 51 52 53 54 55 56 57 58 59 60 61 62 63 64 65 66 |
# Import necessary modules from PyQt5 library from PyQt5 import QtGui from PyQt5.QtWidgets import QApplication, QMainWindow, QAction import sys from PyQt5.QtGui import QIcon # Define main window class class Window(QMainWindow): def __init__(self): super().__init__() # Set window properties self.title = "Codeloop.org - PyQt5 Menubar" self.top = 200 self.left = 500 self.width = 680 self.height = 480 # Set window icon self.setWindowIcon(QtGui.QIcon("icon.png")) self.setWindowTitle(self.title) self.setGeometry(self.left, self.top, self.width, self.height) # Create menu bar self.CreateMenu() self.show() # Method to create the menu bar def CreateMenu(self): # Create main menu bar mainMenu = self.menuBar() # Add menu items fileMenu = mainMenu.addMenu('File') editMenu = mainMenu.addMenu('Edit') viewMenu = mainMenu.addMenu('View') helpMenu = mainMenu.addMenu('Help') # Create actions for file menu copyAction = QAction(QIcon("copy.png"), 'Copy', self) copyAction.setShortcut("Ctrl+C") fileMenu.addAction(copyAction) saveAction = QAction(QIcon("Save.png"), 'Save', self) saveAction.setShortcut("Ctrl+S") fileMenu.addAction(saveAction) pasteAction = QAction(QIcon("Paste.png"), 'Paste', self) pasteAction.setShortcut("Ctrl+P") fileMenu.addAction(pasteAction) exitAction = QAction(QIcon("exit.png"), 'Exit', self) exitAction.setShortcut("Ctrl+E") exitAction.triggered.connect(self.exitWindow) fileMenu.addAction(exitAction) # Method to close the window def exitWindow(self): self.close() # Create a PyQt application instance App = QApplication(sys.argv) # Create an instance of the Window class window = Window() # Execute the application sys.exit(App.exec_()) |
Menu Separators in PyQt5
Adding separators between menu items is one of the best practices in GUI design, because it improves visual clarity and organization, especially when you are dealing with a large number of menu options. In PyQt5, you can easily add separators to your menus to visually group related actions or to provide clear visual breaks between different sections of your menu. for adding seperators in PyQt5 you can use addSeparator() method like this.
|
1 2 |
# Add a separator editMenu.addSeparator() |
Adding Sub Menus in PyQt5
Also you can add Sub Menus in PyQt5, Submenus are useful for organizing related actions into logical groups, and it provides users with more structured and intuitive menu navigation experience.
|
1 2 3 |
# Create submenus fileSubMenu = QMenu('File Submenu', self) fileMenu.addMenu(fileSubMenu) |
PyQ5 Menu Item with Checkboxes and Radio Buttons
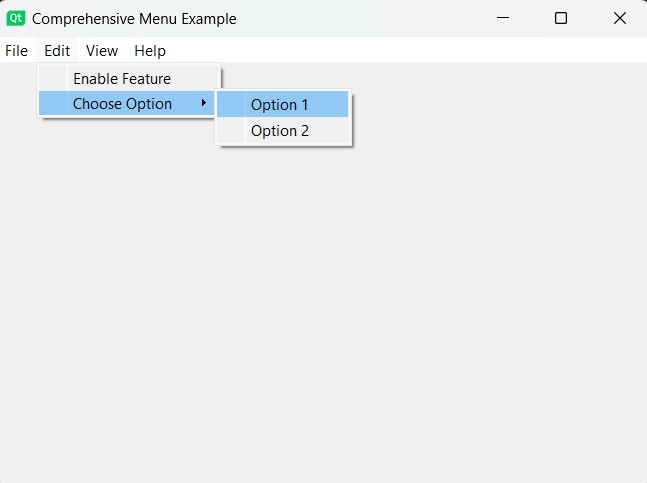
You can also add PyQt5 Widgets like Checkboxes and RadioButtons in the Menu Item, Menu items with checkboxes are useful for representing boolean options that can be toggled on or off, while radio buttons allow users to select exclusive options from a group.
Now all together this is the complete code
|
1 2 3 4 5 6 7 8 9 10 11 12 13 14 15 16 17 18 19 20 21 22 23 24 25 26 27 28 29 30 31 32 33 34 35 36 37 38 39 40 41 42 43 44 45 46 47 48 49 50 51 52 53 54 55 56 57 58 59 60 61 62 63 64 65 66 67 68 69 70 71 72 73 74 75 76 77 78 79 80 81 82 83 84 85 86 87 88 89 90 91 92 93 94 95 96 97 |
# Import necessary modules from PyQt5 library from PyQt5 import QtGui from PyQt5.QtWidgets import QApplication, QMainWindow, QAction, QMenu, QCheckBox, QRadioButton, QWidgetAction, \ QActionGroup import sys from PyQt5.QtGui import QIcon # Define main window class class Window(QMainWindow): def __init__(self): super().__init__() # Set window properties self.title = "Comprehensive Menu Example" self.top = 200 self.left = 500 self.width = 680 self.height = 480 # Set window icon self.setWindowIcon(QtGui.QIcon("icon.png")) self.setWindowTitle(self.title) self.setGeometry(self.left, self.top, self.width, self.height) # Create menu bar self.CreateMenu() self.show() # Method to create the menu bar and submenu def CreateMenu(self): # Create main menu bar mainMenu = self.menuBar() # Add menu items fileMenu = mainMenu.addMenu('File') editMenu = mainMenu.addMenu('Edit') viewMenu = mainMenu.addMenu('View') helpMenu = mainMenu.addMenu('Help') # Add submenu to 'File' menu fileSubMenu = QMenu('File Submenu', self) fileMenu.addMenu(fileSubMenu) # Add actions to 'File' submenu copyAction = QAction(QtGui.QIcon("copy.png"), 'Copy', self) copyAction.setShortcut("Ctrl+C") fileSubMenu.addAction(copyAction) saveAction = QAction(QtGui.QIcon("save.png"), 'Save', self) saveAction.setShortcut("Ctrl+S") fileSubMenu.addAction(saveAction) pasteAction = QAction(QtGui.QIcon("paste.png"), 'Paste', self) pasteAction.setShortcut("Ctrl+P") fileSubMenu.addAction(pasteAction) exitAction = QAction(QtGui.QIcon("exit.png"), 'Exit', self) exitAction.setShortcut("Ctrl+E") exitAction.triggered.connect(self.exitWindow) fileSubMenu.addAction(exitAction) # Add menu item with checkbox to 'Edit' menu checkboxAction = QAction(QtGui.QIcon("checkbox.png"), 'Enable Feature', self, checkable=True) checkboxAction.setChecked(True) # Default checked state checkboxAction.triggered.connect(self.checkboxActionTriggered) editMenu.addAction(checkboxAction) # Add submenu with radio buttons to 'Edit' menu radioSubMenu = QMenu('Choose Option', self) radioGroup = QActionGroup(self) # Group for radio buttons radio1 = QAction(QtGui.QIcon("radio1.png"), 'Option 1', self, checkable=True) radio1.setActionGroup(radioGroup) radio1.setChecked(True) # Default selected radio1.triggered.connect(lambda: self.radioActionTriggered("Option 1")) radio2 = QAction(QtGui.QIcon("radio2.png"), 'Option 2', self, checkable=True) radio2.setActionGroup(radioGroup) radio2.triggered.connect(lambda: self.radioActionTriggered("Option 2")) radioSubMenu.addAction(radio1) radioSubMenu.addAction(radio2) editMenu.addMenu(radioSubMenu) # Method to handle checkbox action def checkboxActionTriggered(self, checked): if checked: print("Feature enabled") else: print("Feature disabled") # Method to handle radio button action def radioActionTriggered(self, option): print("Selected option:", option) # Method to close the window def exitWindow(self): self.close() # Create a PyQt application instance App = QApplication(sys.argv) # Create an instance of the Window class window = Window() # Execute the application sys.exit(App.exec_()) |
Run the code and this will be the result

Subscribe and Get Free Video Courses & Articles in your Email